How to Setup TFTP on Ubuntu 11.10

Recently I decide to jump into the pool of using diskless Ubuntu. Basically the client computer downloads the necessary files from the Ubuntu server every time during the boot. To keep things simple and easy, Ubuntu does that by using TFTP. So the first step is to set up a TFTP server on the server. For those who haven’t heard of TFTP, it is similar to FTP, except that it has no security feature, and the function is extremely limited. Anyway, here is how to set up a TFTP server on Ubuntu 11.10:

Installing TFTP sounds easy. However, I’ve heard that many people experienced many issues during the installation, such as Error code 2: Access violation issue. That’s why I create this tutorial. If you follow exact the same steps, you will not experience any problem.

First, let’s install all the necessary packages:

sudo apt-get install xinetd tftpd tftp -y

Next, we need to create a configuration file:

sudo nano /etc/xinetd.d/tftp

Put the following content into the file.


service tftp
{
   protocol = udp
   port = 69
   socket_type = dgram
   wait = yes
   user = nobody
   server = /usr/sbin/in.tftpd
   server_args = var/lib/tftpboot -s
   disable = no
}

In the server_args, I have var/lib/tftpboot, which represents the location of the tftp root, i.e., /var/lib/tftpboot. Notice that I skip the root /.

Now let’s change the ownership of the directory:


sudo mkdir /var/lib/tftpboot
sudo chown -R nobody:nobody /var/lib/tftpboot
sudo chmod -R 777 /var/lib/tftpboot

and start the TFTP service:

sudo service xinetd stop
sudo service xinetd start

Verify the TFTP is running correctly or not:

netstat -na | grep LIST | grep 69

You should see something like this:

tcp        0      0 0.0.0.0:69              0.0.0.0:*     LISTEN

Test: Upload a file to TFTP Server

Now let’s test the TFTP server by logging into the server first:

tftp localhost

and upload a file:

tftp> put myfile.jpg
Sent 56733279 bytes in 5.7 seconds

Quit:

q

Make sure that file has been uploaded:

ls -l /var/lib/tftpboot

Test: Download a file from TFTP Server

Now, let’s go to a different directory and download the file we just upload.

cd some_other_directory

and log in to the tftp server again:

tftp localhost

and get the file:

tftp> get myfile.jpg
Received 56733279 bytes in 5.7 seconds

You are done.

Troubleshooting (e.g., Error code 2: Access violation)

If you see a message like: Error code 2: Access violation

Make sure that you:
– Follow the exact procedure in this tutorial
– Make sure that the tftp is started with -s flag.
– Check the permission of the directory, i.e., 777
– After you’ve made any changes to the TFTP configuration, make sure that you stop and start the inet service again.
– Don’t forget to quit tftp before retrying the command.

That’s it!

Enjoy TFTP.

–Derrick

Our sponsors:

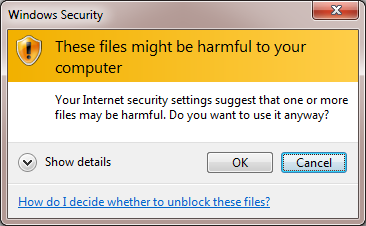
These files might be harmful to your computer – Your internet security settings suggest that one of more files may be harmful. Do you want to use it anyway?

I run my own network drive such that all computers in my network can access the same files. Every time when I try to access the shared files from Windows 7, it comes with nightmare (a gift from Microsoft). For example, if I move files within the network drive, Windows 7 will display a very annoying box like the one showing on the right.

These files might be harmful to your computer.

Your internet security settings suggest that one of more files may be harmful. Do you want to use it anyway?

If you click the help link below the message, you will find nothing but junk.

So how to get rid of this annoying box? You know, and we all know that Microsoft product is buggy and with lots of security problem. This box does nothing more than telling you:

Hey we are buggy. If your network drives contain virus or worm, that’s your problem, nothing to do with us. Do it at your own risk.

(And don’t forget that other operating system such as OS X, Linux etc do not have any annoying box, nor they do have any virus.)

To get kill this annoying box, simply following these steps:

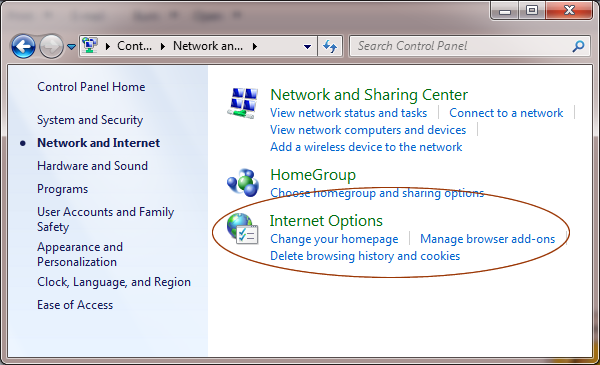
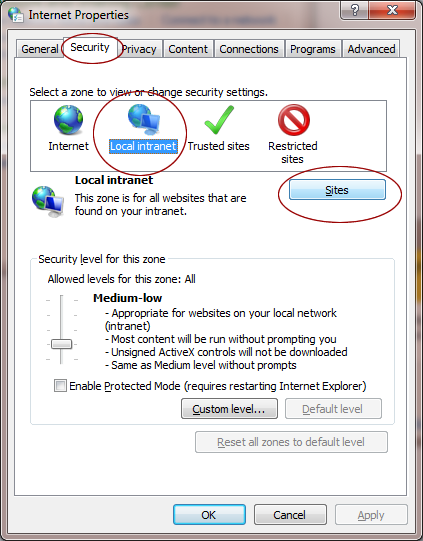
1. Go to Internet Options (Control Panel -> Network and Internet -> Internet Options)

2. Open the Security tab and select Local Intranet

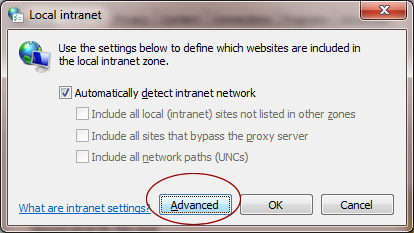
3. Click Local Intranet

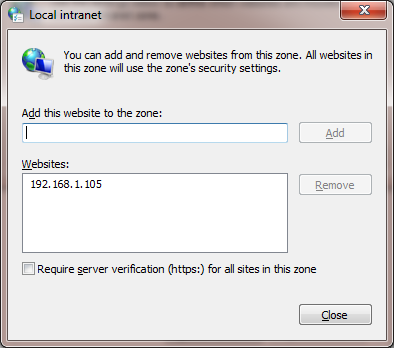
4. Type the IP address of your network drive

That’s it!

Happy file sharing.

–Derrick

Our sponsors:

Upgrading Ubuntu to 11.10 via Command Line

Ubuntu was out today, and I could not wait to try out the new features. However I am in the office now and I have no physical access to my Ubuntu box in my kitchen, so using the graphic interface is not an option to me. I searched online and I couldn’t find any tutorial about upgrading the Ubuntu via command line. So I decided to try my own:

First, make sure that your Ubuntu box is up-to-date:

sudo apt-get update
sudo apt-get upgrade -y
sudo apt-get dist-upgrade -y

Then, do some preparation work:

sudo apt-get install update-manager-core

Make sure that:

sudo nano /etc/update-manager/release-upgrades
Prompt=normal

Next, we are ready to start the journey:

sudo do-release-upgrade -d

Notice that Ubuntu will complain if you do it via SSH. I don’t care, so I choose “YES”.

Later, it will ask you whether you want to remove the old packages and install the new one. Of course the answer is Yes.

Depending on your CPU and internet connection speed. It can range from 30 minutes to few hours. After everything is done, make sure that you upgrade the system again:

sudo apt-get update -y
sudo apt-get dist-upgrade -y

That’s it! Have fun with Ubuntu 11.10!

–Derrick

Our sponsors:

How to Set up a Pure-FTPd Server with Virtual User on FreeBSD

This tutorial is for FreeBSD. If you are looking for setting up Pure-FTPd on Linux, click here.

My client likes to send me a huge data file (More than 10GB after compressed). Since I don’t care about the security during the transfer, I decide to go with the old school technology: FTP.

Basically, I need to set up a FTP server with virtual user. In the other words, the log in used by the FTP server has nothing to do with my system login, and I can easily disable that at any time.

1.) Install Pure-FTPd

sudo pkg_add -r pure-ftpd

2.) Create a user for Pure-FTPd, here I simply call it ftpuser.

sudo adduser ftpuser

3.) Let say, we want to create a user called guest to access the ftp server. guest is a virtual user, and its virtual home is in /home/ftpuser/guest

sudo mkdir /home/ftpuser/guest
sudo chown -R ftpuser:ftpuser  /home/ftpuser/
sudo chmod a+rw -R /home/ftpuser/

4.) Edit /etc/inetd.conf and add the following:

ftp     stream  tcp     nowait  root    /usr/local/sbin/pure-ftpd -O stats:/var/log/pureftpd.log       pure-ftpd -l puredb:/usr/local/etc/pureftpd.pdb

5.) Restart inetd

ps -ax | grep inetd
sudo killall -HUP inetd
sudo /usr/sbin/inetd -wW -C 6

6.) Edit /etc/syslog.conf

sudo nano /etc/syslog.conf

7.) Restart syslog

ps -ax | grep syslog
killall -HUP syslogd
/usr/sbin/syslogd -ss

8.) Create a user and add it into the Pure-FTPd database:

sudo pure-pw useradd guest -u ftpuser -d /home/ftpuser/guest/

You can also set the quota and maximum space:
1000 files, 100MB quota

pure-pw useradd guest -u ftpuser -d /home/ftpuser/guest/ -n 1000 -N 100 

9.) Set the password in case you forget the enter the password:

pure-pw passwd guest

10.) Update the database:

pure-pw mkdb

11.) If the system could not update the database, try this instead (One command, not two):

sudo pure-pw mkdb /usr/local/etc/pureftpd.pdb -f /usr/local/etc/pureftpd.passwd

That’s it!

–Derrick

Our sponsors:

How to Set up a Pure-FTPd Server with Virtual User on Fedora

This tutorial is for Fedora Linux. If you are looking for setting up Pure-FTPd on FreeBSD, click here.

My client likes to send me a huge data file (More than 10GB after compressed). Since I don’t care about the security during the transfer, I decide to go with the old school technology: FTP.

Basically, I need to set up a FTP server with virtual user. In the other words, the log in used by the FTP server has nothing to do with my system login, and I can easily disable that at any time.

0.) Make sure port 21 is opened. You can update this setting in the Fedora Firewall settings.

1.) Install Pure-FTPd

sudo yum install pure-ftpd -y

2.) Create a user for Pure-FTPd, here I simply call it ftpuser.

sudo adduser ftpuser

3.) Let say, we want to create a user called guest to access the ftp server. guest is a virtual user, and its virtual home is in /home/ftpuser/guest

sudo mkdir /home/ftpuser/guest
sudo chown -R ftpuser:ftpuser  /home/ftpuser/
sudo chmod a+rw -R /home/ftpuser/

4.) Edit the Pure-FTPd configuration

sudo nano /etc/pure-ftpd/pure-ftpd.conf

5.) Uncomment the following:

PureDB                        /etc/pure-ftpd/pureftpd.pdb

6.) Start the Pure-FTPd

/etc/init.d/pure-ftpd start

If you want to start Pure-FTPd automatically, include this line in /etc/rc.local

7.) Create a user and add it into the Pure-FTPd database:

sudo pure-pw useradd guest -u ftpuser -d /home/ftpuser/guest/

You can also set the quota and maximum space:
1000 files, 100MB quota

pure-pw useradd guest -u ftpuser -d /home/ftpuser/guest/ -n 1000 -N 100 

8.) Set the password in case you forget the enter the password:

pure-pw passwd guest

9.) Update the database:

pure-pw mkdb

That’s it!

–Derrick

Our sponsors:

FreeBSD: Unable to find device node for /dev/ad0s1b in /dev!

While I reinstalled the FreeBSD on my FreeBSD box, I got the following error message:

Unable to find device node for /dev/ad0s1b in /dev!

I searched online and I found different solutions. The most popular one is about using the command, dd, to clean up the first and the last 35 blocks. However, this solution doesn’t always work.

The 35 block trick is mainly for GPT partition, which was created under Linux. However, my harddrive was used in FreeBSD last time. So the GPT problem doesn’t apply. Even I tried the solution to wipe out the first and the last 100 (which is more than 35) blocks, it didn’t work either. Therefore, I tried to wipe out the entire harddrive. It works.

1. Set up an environment such that you can use the command, dd, to wipe out your harddrive. You can either connect your harddrive to a working machine, or boot the system using Live CD.

2. Run the following command to determine the correct location of your harddrive:

su
fdisk -l

Let say, it is on /dev/sda

3. Find out how many partitions have been created in this harddrive:

ls /dev/sda*

Let say there are two: /dev/sda, /dev/sda1

4. Wipe out each partition one by one:

dd if=/dev/zero /dev/sda bs=512
dd if=/dev/zero /dev/sda1 bs=512

5. After everything is done, you can verify it by running fdisk again:

fdisk -l

and it should say something like partition table not found, which is what we expect.

That’s it! Try to install FreeBSD again and everything should be fine.

If you still experience any difficulties, try the following trick:

1. After defining the geometry, don’t press the “w” key.
2. After creating the partitions, don’t press the “w” key.
3. When selecting the media, instead of choosing CD, try to use Network.

That should avoid most possible potential issues.

–Derrick

Our sponsors:

rm: /var/empty: Operation not permitted

I was trying to remove a folder at /var/empty with no success (Operation not permitted):

ls -al
dr-xr-xr-x  2 root     wheel     512B Jul 18  2010 empty
sudo rm -Rf empty
rm: /var/empty: Operation not permitted

So I decided to change the permission:

sudo chmod a+rw empty/

and it did not work either:

chmod: empty/: Operation not permitted

Finally, I gave chflags a try:

chflags -R noschg empty/
sudo rm -Rf empty/

Done!

–Derrick

Our sponsors:

panic: ffs_blkfree: freeing free block

In the last few days, my FreeBSD box drove me crazy with the kernel panic. The error message is shown below:

dev = ad14s1f, block = 1, fs = /usr
panic: ffs_blkfree: freeing free block
cpuid = 4
KDB: stack backtrace:
...

I am not sure what caused this kernel panic, but it happened few times a day for a week. Every time it happened, I had to reboot my machine manually. After some investigations, I found the following solution:

1. Boot into the single user mode.
2. Run the following command to force (-f) the system to check the system. It is likely that you will get a lot of error, so adding a -y option (which assume yes to all the questions) will make your life easier:

fsck -f -y

After the check is done, reboot the system to normal mode:

reboot

The reason why my system had this kind of issue was due to the filesystem inconsistency. Even the fsck was trigger after each system was crashed, it could not detect or repair the problem (fsck will not fix any problem on a mounted partition on a running system.). That’s why we need to do it in the single user mode.

–Derrick

Our sponsors:

FreeBSD Startup Script – How to Start a Script on Boot in FreeBSD (An Alternative Solution to /etc/rc.local)

I want to start a script when booting my FreeBSD box automatically. Unlike Linux, FreeBSD does not honor the script you put in /etc/rc.local. Usually it is recommended to use the rc service (See here for details), however I think it is too complicated to convert my script to a rc compatible version. I decide to explore more simple solutions. I found that it can be done via Cron.

Suppose I have a script in the following location. I decide to run it when booting the machine automatically:

/script/myscript.sh

First, I need to include this script in the Cron:

sudo nano /etc/crontab

And add the following to the end of the file:

@reboot root /script/myscript.sh

That will make the system to execute this script.

However, the system may not run your script correctly because the Cron job uses a different shell and the path information may be missing. You can fix it by modifying the SHELL and PATH variables in /etc/crontab:

In my case, I uses Bash and I like my script executed by Bash:

SHELL=/usr/local/bin/bash

And my script needs to execute some commands that locate in /usr/local/bin:

PATH=/etc:/bin:/sbin:/usr/bin:/usr/sbin:/usr/local/bin

That’s it! Have fun with FreeBSD.

–Derrick

Our sponsors:

The devel/automake110 port has been deleted: No longer required by any port…Aborting update

My FreeBSD box must be sick today. For some reasons, when I ran the portsnap command (i.e., portsnap fetch update), it removed the entire port directory (i.e., rm /usr/ports -Rf). Therefore, I decided to build the entire port tree:

sudo su
cd /var/db/portsnap
rm -Rf *
portsnap fetch extract

I decided to run portmaster to update my system, I got the following error:

===>>> The devel/automake110 port has been deleted: No longer required by any port
===>>> Aborting update
Terminated

Well, the problem looks pretty simple. FreeBSD found an out-dated package installed in my system, and it could not find any corresponding port (Already deleted in the repository), that’s why it stops there and doesn’t know what to do next.

To solve this problem, the solution is very simple:

First, let’s see what version of automake we have in our system:

pkg_info | grep auto

which return:

autoconf-2.62       Automatically configure source code on many Un*x platforms
autoconf-2.68       Automatically configure source code on many Un*x platforms
autoconf-wrapper-20101119 Wrapper script for GNU autoconf
automake-1.10.1     GNU Standards-compliant Makefile generator (1.10)
automake-1.11.1     GNU Standards-compliant Makefile generator (1.11)
automake-wrapper-20101119 Wrapper script for GNU automake

Apparently, the older version of autoconf and automake cause the issues. Why not remove them?

sudo pkg_delete autoconf-2.62 automake-1.10.1

I re-ran the portmaster to update the system. Everything worked fine again!

–Derrick

Our sponsors: