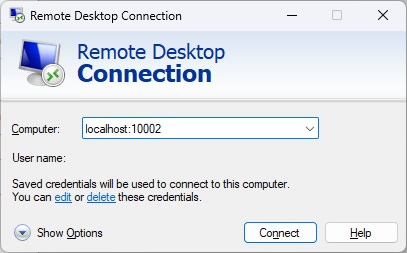
Google One VPN: How to by pass VPN in Windows

Recently I started using the Google One VPN service. I love it because of its simplicity. However, I quickly ran into problem because some services require my real IP addresses. Since the Google One VPN is designed for average Joe, it doesn’t have any advanced features. It is either all or nothing. Therefore I came up a way to solve this problem.

My goal is pretty simple. I want to enable/disable the VPN based on the application. For example, I want to disable VPN for my SSH client, my Remote Desktop, Portable Firefox, while I want to enable VPN for my another Portable Firefox and Google Chrome. My solution is pretty simple. I did this by creating a brunch of ports via SSH tunneling.

By default, Google One VPN routes most of traffics to the VPN based on the IP address you visit, with few exceptions, such as those on your local network (e.g., 192.168.1.X), or your own computer (e.g., 127.0.0.1). I realized that I can use this trick to achieve my goal. Of course, you will need another Linux/Mac/BSD computer or any server that support SSH to do it.

Goal #1: Using my real (home) IP address

In this case, my goal is very simple. I want to access certain websites using my real IP address. Here is the theory:

  • I make a SSH connection to my local Linux box.
  • I create a SSH tunnel, e.g., port 1234
  • For my application, I turn on the proxy option and route the traffic through that port, e.g., localhost:1234


Goal #2: Using my work IP address

In this case, I will need to SSH to my office front end server first. Then I create a number of SSH tunnels to connect to the devices/services in my work intranet. Notice that my office front end server has IP address restriction. It only allows certain IP addresses to make the connection. If I try to SSH to the server with my VPN IP address, it will be blocked. Even if I try to make the SSH connection before running the VPN software, my SSH connection will be disconnected after I turn on the VPN software. My solution is pretty simple. I route the traffic through my local Linux box.

Suppose I need to connect to my office workstation. Previously, I connected to the front end server first (e.g., 123.123.123.1). I created two SSH tunnels, one for my Firefox to consume, so that I can access certain website using my office IP address, another one to access my office workstation (e.g., 10.0.0.101) via Remote Desktop.

The idea is pretty simple. When I SSH to my Linux box on my local server, I create two ports in my SSH client (e.g., Putty). Here is my setup. Notice that I create two ports: 10001 and 10002. These create two ports on my Windows computer. Putty will forward the traffic to my Linux box. To keep things simple, I use the same port number, e.g., port 10001 on my Windows points to the port 10001 on my Linux box.

Once I connect to my local Linux box, I run the following commands.

#This will create a tunnel for the web browser to consume, i.e., browsing the website using office IP address.
#10001: The port created on the Linux box.
#123.123.123.1: The IP of my office front end server.
#This assumes that I can SSH to my office front end server using keys (no password)
nohup ssh -C -D 10001 123.123.123.1 -N > /dev/null &
#This will create a tunnel for the Remote Desktop to consume, i.e., I can connect to my office workstation.
#10002: The port created on the Linux box.
#10.0.0.101: The local IP of my office workstation
#3389: The port of my office workstation
#123.123.123.1: The IP of my office front end server.
#This assumes that I can SSH to my office front end server using keys (no password)
nohup ssh -C -L 10002:10.0.0.101:3389 123.123.123.1 -N > /dev/null &

Here is my proxy settings of my Portable Firefox

When I connect to my office workstation, I can do the following:

That’s it, have fun with your VPN.

Our sponsors:

[Wyze]How to control a lamp socket with a physical button

I wanted to install a Wyze camera outside my house. The location do not have any standard 120V outlet, so I ended up connecting a Wyze v3 camera via a Wyze lamp socket. This solveed the power problem of my camera, but it created another problem. My light was either always ON or always OFF. Since I had to keep the power always available for the camera, I had to keep the switch in an ON position all the time. Although I can control the lamp socket via the Wyze app, I think there must be an easy way to solve this problem, just like how I control the light before setting this up.

My idea is pretty simple. I have some older Wyze v2 camera laying around. I also have a door sensor and a Wyze accessory bridge available. I can turn these into a physical switch with some help using LEGO.

The door sensor has two parts. The circuit / sensor and the magnet. If the sensor measures the strength of the magnetic fields, if it is high (i.e., the magnet is attached, like the door is closed), then it emits a signal to the bridge sensor. If the value is low (i.e., the magnet is not attached, like door is opened), and it emits another sign to to tell the bridge sensor. We can build a LEGO physical button. Here is my setup:

Wyze Switch for Lamp Socket using LEGO

It houses a Wyze door sensor

The green block is used as a magnet

The green block has three magnets

This is how the switch is opened.

This is how the switch is opened.

Here are the software part:

That’s it. Have fun.

Our sponsors:

[Amazon Athena][ErrorCode: INTERNAL_ERROR_QUERY_ENGINE] Amazon Athena experienced an internal error while executing this query. Please contact AWS support for further assistance. You will not be charged for this query. We apologize for the inconvenience.

In the past couple months, I was developing an application that uses Amazon Athena. Amazon Athena is basically their own version of MariaDB ColumnStore, which is more integrated with their own infrastructures. Long story short, it is Amazon’s own MySQL database for big data engine. While I was checking out its new features, I tried some simple queries such as SELECT count(*) from my_table, and it throws out the following error:

Here is the error message:

[ErrorCode: INTERNAL_ERROR_QUERY_ENGINE] Amazon Athena experienced an internal error while executing this query. Please contact AWS support for further assistance. You will not be charged for this query. We apologize for the inconvenience.

Obviously, the error message didn’t tell much about what was the problem.

Here is my input:

$athenaClient->startQueryExecution(
		array(
			'QueryExecutionContext' => array(
				'Catalog' 	=> 'AwsDataCatalog',
        		        'Database' 	=> 'my_database',
			),
			'QueryString' => 'SELECT * FROM "my_database"."my_table" limit 10;',

			'ResultConfiguration' => array(
				'OutputLocation' => 'S3://s3bucket/my_folder/', 
			),
			'WorkGroup' => 'primary',
			
		)

Here is my output:

$athenaClient->GetQueryResults()

[Status] => Array
                (
                    [State] => FAILED
                    [StateChangeReason] => [ErrorCode: INTERNAL_ERROR_QUERY_ENGINE] Amazon Athena experienced an internal error while executing this query. Please contact AWS support for further assistance. You will not be charged for this query. We apologize for the inconvenience.
                    [SubmissionDateTime] => Aws\Api\DateTimeResult Object
                        (
                            [date] => 2022-11-24 15:51:13.344000
                            [timezone_type] => 3
                            [timezone] => UTC
                        )

                    [CompletionDateTime] => Aws\Api\DateTimeResult Object
                        (
                            [date] => 2022-11-24 15:51:14.488000
                            [timezone_type] => 3
                            [timezone] => UTC
                        )

                    [AthenaError] => Array
                        (
                            [ErrorCategory] => 1
                            [ErrorType] => 401
                            [Retryable] => 
                            [ErrorMessage] => [ErrorCode: INTERNAL_ERROR_QUERY_ENGINE] Amazon Athena experienced an internal error while executing this query. Please contact AWS support for further assistance. You will not be charged for this query. We apologize for the inconvenience.
                        )

                )


So what was the problem? The problem had nothing to do with the query. Instead, it was my S3 bucket URL. The protocol of the URL needed to be in lower case, i.e., s3://, not S3://. After I changed it to lower case, everything worked fine.

Our sponsors:

Apple M1 Chip CPU and GPU Benchmark Results

I received my 2020 mac mini today (US$ 699). Since this is the first product with Apple M1 chip CPU, I am curious to find out its performance. I ran some tests using benchmark apps including Blackmagic and Cinebench.

This Apple M1 chip is 8 cores and 8 threads. FYI, Apple said it has 25000 concurrent threads, it means the CPU can execute 25k jobs at the same time. Its like a kitchen with 8 chefs working on 25k orders. It doesn’t mean there are 25k chefs in the kitchen.

Here are the specification of this CPU (Source):

  • 8-core CPU with 4 performance cores and 4 efficiency cores
  • 8-core GPU (A nVidia GPU such as the one in GeForce RTX 2060 has 1920 cores)
  • 16-core Neural Engine

Testing Multi Core Performance of Apple M1 Chip Using Cinebench R23


Testing Single Core Performance of Apple M1 Chip Using Cinebench R23


Testing CPU and GPU Performance of Apple M1 Chip Using GeekBench 5

Results:


Testing Machine Learning Performance Using MLBenchy

Here is the result:

InceptionV3 Run Time: 1434ms
Nudity Run Time: 393ms
Resnet50  Run Time:1364ms
Car Recognition  Run Time:473ms
GoogleNetPlace  Run Time:410ms
GenderNet Run Time: 597ms
TinyYolo Run Time: 806ms

InceptionV3 Run Time: 121ms
Nudity Run Time: 83ms
Resnet50  Run Time:72ms
Car Recognition  Run Time:114ms
GoogleNetPlace  Run Time:111ms
GenderNet Run Time: 86ms
TinyYolo Run Time: 146ms

InceptionV3 Run Time: 91ms
Nudity Run Time: 76ms
Resnet50  Run Time:136ms
Car Recognition  Run Time:72ms
GoogleNetPlace  Run Time:147ms
GenderNet Run Time: 87ms
TinyYolo Run Time: 72ms


Done running the 3 iterations of the benchmark 

And finally, if you are curious about the SSD performance of the mac mini…

Testing Disk Performance of Mac Mini SSD Using Blackmagic Speed Test

I am quite surprise about its overall performance. The single core performance of Apple M1 chip is better than Intel i9-9880 and i7-1165. It will be quite useful if I need to perform some non-parallel computations. The multiple core performance of Apple M1 is quite impressive too. If you take a look to the result, you will notice that most of the CPUs that have better scores have more cores and threads. I really don’t expect a $700 computer that can beat the CPU that costs a thousand dollars or more.

Our sponsors:

[ZFS]How to repair a ZFS pool if one device was damaged

Today, I accidentally dd’ed a disk which was part of an active ZFS pool on my test server. I dd’ed the first and the last 10 sectors of the disk. Technically I didn’t lose any data because my ZFS configuration was RAIDZ. However once I rebooted my computer, my ZFS complained:

#This is what I did:
sudo dd if=/dev/zero of=/dev/sda bs=512 count=10
sudo dd if=/dev/zero of=/dev/sda bs=512 seek=$(( $(blockdev --getsz /dev/sda) - 4096 )) count=1M
sudo zpool status
  pool: storage
 state: DEGRADED
status: One or more devices could not be used because the label is missing or
        invalid.  Sufficient replicas exist for the pool to continue
        functioning in a degraded state.
action: Replace the device using 'zpool replace'.
   see: http://zfsonlinux.org/msg/ZFS-8000-4J
  scan: resilvered 2.40T in 1 days 00:16:34 with 0 errors on Fri Nov 13 20:05:53 2020
config:

        NAME                                 STATE     READ WRITE CKSUM
        storage                              DEGRADED     0     0     0
          raidz1-0                           DEGRADED     0     0     0
            ata-ST4000DM000-1F2168_S30076XX  ONLINE       0     0     0
            ata-ST4000DX001-1CE168_Z3019CXX  ONLINE       0     0     0
            ata-ST4000DM000-2AE166_WDH0S9YY  ONLINE       0     0     0
            ata-ST4000DM000-2AE166_WDH0SXZZ  ONLINE       0     0     0
            ata-ST4000DM000-2AE166_WDH0SXDD  ONLINE       0     0     0
            412403026512446213               UNAVAIL      0     0     0  was /dev/disk/by-id/ata-ST4000NM0033-9ZM170                                                                                                                         _Z1Z3RR74-part1

So I checked the problematic device, and I see the problem:

ls /dev/disk/by-id/

#This is normal disk:
lrwxrwxrwx 1 root root  10 Nov 13 20:58 ata-ST4000DX001-1CE168_Z3019CXX-part1 -> ../../sdd1
lrwxrwxrwx 1 root root  10 Nov 13 20:58 ata-ST4000DX001-1CE168_Z3019CXX-part9 -> ../../sdd9


#This is the problematic disk, part1 and part9 are missing.
lrwxrwxrwx 1 root root   9 Nov 13 20:58 ata-ST4000NM0033-9ZM170_Z1Z3RR74 -> ../../sdf

It is pretty easy to fix this problem. All you need is to bring the device offline and bring it back.

#First, offline the problematic device:
sudo zpool offline storage 412403026512446213
sudo zpool status
  pool: storage
 state: DEGRADED
status: One or more devices could not be used because the label is missing or
        invalid.  Sufficient replicas exist for the pool to continue
        functioning in a degraded state.
action: Replace the device using 'zpool replace'.
   see: http://zfsonlinux.org/msg/ZFS-8000-4J
  scan: resilvered 2.40T in 1 days 00:16:34 with 0 errors on Fri Nov 13 20:05:53 2020
config:

        NAME                                 STATE     READ WRITE CKSUM
        storage                              DEGRADED     0     0     0
          raidz1-0                           DEGRADED     0     0     0
            ata-ST4000DM000-1F2168_S30076XX  ONLINE       0     0     0
            ata-ST4000DX001-1CE168_Z3019CXX  ONLINE       0     0     0
            ata-ST4000DM000-2AE166_WDH0S9YY  ONLINE       0     0     0
            ata-ST4000DM000-2AE166_WDH0SXZZ  ONLINE       0     0     0
            ata-ST4000DM000-2AE166_WDH0SXDD  ONLINE       0     0     0
            412403026512446213               OFFLINE      0     0     0
#Then bring back the device:
sudo zpool online ata-ST4000NM0033-9ZM170_Z1Z3RR74 

#Resilver it
sudo zpool scrub storage

sudo zpool status
  pool: storage
 state: ONLINE
  scan: resilvered 36K in 0 days 00:00:01 with 0 errors on Fri Nov 13 21:03:01 2020
config:

        NAME                                  STATE     READ WRITE CKSUM
        storage                               ONLINE       0     0     0
          raidz1-0                            ONLINE       0     0     0
            ata-ST4000DM000-1F2168_S30076XX   ONLINE       0     0     0
            ata-ST4000DX001-1CE168_Z3019CXX   ONLINE       0     0     0
            ata-ST4000DM000-2AE166_WDH0S9YY   ONLINE       0     0     0
            ata-ST4000DM000-2AE166_WDH0SXZZ   ONLINE       0     0     0
            ata-ST4000DM000-2AE166_WDH0SXDD   ONLINE       0     0     0
            ata-ST4000NM0033-9ZM170_Z1Z3RR74  ONLINE       0     0     0

errors: No known data errors

That’s it.

Our sponsors:

[VM]Virtual Machine – File vs Shared Folder – Performance

I decide to move my Windows 10 system from a physical environment to a Linux based virtual environment. I am curious about what is the I/O performance difference between VM image and Shared Folder. The reason why I prefer putting the data at Linux level because I can rsync the data to a different server easily. So far this is what I’ve set up:

  • An i7 computer with CentOS 7 installed.
  • The OS lives on a SSD drive.
  • I used three 4k sectors HDDs to build a RAIDZ1 ZFS. Here are the parameters: ashift=12; compression=lz4; atime=off; redundant_metadata=most; xattr=sa; recordsize=16k
  • Virtual Box v6.2
  • Windows 10 was created within Virtual Box using default parameters, including dynamic VDI disk. If you really want to get the best performance, I recommend using a pre-allocated disk. However it comes with a price tag: you are going to use more disk space from your host, which you guest system may or may not use them at all. In my case, dynamic is good enough.

There are three tests I want to measure:

  • 1.) Windows 10 is hosted on ZFS (recordsize=16k), and write the data within the VM image file.
  • 2.) Windows 10 is hosted on SSD, and write the data within the VM image file.
  • 3.) Write the data using the VirtualBox Shared Folder feature.

I used ATTO Disk Benchmark to test the IO within Windows 10. Based on my tests, of course the the SSD gives the best performance, but difference between SSD and HDD based ZFS are not that big. I guess the ZFS team must have done a lot of magical work to *simulate* the SSD performance out of low cost ordinary disks. In terms of data storage, writing data within VM image performs worse than writing data via VirtualBox Shared Folder (i.e., back to HDD based ZFS), which I am not surprise. That’s because when you write the data within the VM image, you are asking the VM to write the data within the file first, then the VM is updating the data back to the disk. There are two steps here.

Here are the screen captures from the program. Noticed that the scale of the charts are not the same. So please compare the tests using numbers only.

Test #1: Windows 10 is hosted on ZFS (recordsize=16k), and write the data within the VM image file.


Test #2: Windows 10 is hosted on SSD, and write the data within the VM image file.


Test #3: Write the data using the VirtualBox Shared Folder feature.

Hope it helps.

Our sponsors:

[Python/CentOS 7] ImportError: cannot import name ssl_match_hostname

I was testing the certbot on my Google Cloud / Google Compute Engine (CentOS 7) today, and I ran into the following issues:

sudo certbot certonly --apache
Traceback (most recent call last):
  File "/bin/certbot", line 9, in module
    load_entry_point('certbot==1.4.0', 'console_scripts', 'certbot')()
  File "/usr/lib/python2.7/site-packages/pkg_resources.py", line 378, in load_entry_point
    return get_distribution(dist).load_entry_point(group, name)
  File "/usr/lib/python2.7/site-packages/pkg_resources.py", line 2566, in load_entry_point
    return ep.load()
  File "/usr/lib/python2.7/site-packages/pkg_resources.py", line 2260, in load
    entry = __import__(self.module_name, globals(),globals(), ['__name__'])
  File "/usr/lib/python2.7/site-packages/certbot/main.py", line 2, in 
    from certbot._internal import main as internal_main
  File "/usr/lib/python2.7/site-packages/certbot/_internal/main.py", line 16, in 
    from certbot import crypto_util
  File "/usr/lib/python2.7/site-packages/certbot/crypto_util.py", line 30, in 
    from certbot import util
  File "/usr/lib/python2.7/site-packages/certbot/util.py", line 23, in 
    from certbot._internal import constants
  File "/usr/lib/python2.7/site-packages/certbot/_internal/constants.py", line 6, in 
    from acme import challenges
  File "/usr/lib/python2.7/site-packages/acme/challenges.py", line 11, in 
    import requests
  File "/usr/lib/python2.7/site-packages/requests/__init__.py", line 58, in 
    from . import utils
  File "/usr/lib/python2.7/site-packages/requests/utils.py", line 32, in 
    from .exceptions import InvalidURL
  File "/usr/lib/python2.7/site-packages/requests/exceptions.py", line 10, in 
    from urllib3.exceptions import HTTPError as BaseHTTPError
  File "/usr/lib/python2.7/site-packages/urllib3/__init__.py", line 8, in 
    from .connectionpool import (
  File "/usr/lib/python2.7/site-packages/urllib3/connectionpool.py", line 11, in 
    from .exceptions import (
  File "/usr/lib/python2.7/site-packages/urllib3/exceptions.py", line 2, in 
    from .packages.six.moves.http_client import (
  File "/usr/lib/python2.7/site-packages/urllib3/packages/__init__.py", line 3, in 
    from . import ssl_match_hostname
ImportError: cannot import name ssl_match_hostname

In my case, it was caused by the stupid Google Cloud bloatware: Google Cloud SDK. When I set up the Google Cloud few years ago, Google loaded a lot of bloatware including Google Cloud SDK, which lives here: /usr/local/share/google/google-cloud-sdk/. If you take a look to this directory, you will notice that there are some python packages that may conflict with your system one. In my case, I have three conflicting packages, one from the EPEL repository, one from the PIP and one from Google Cloud SDK. They don’t get along with each other.

Here is what I did:


find /usr/ -name "ssl_match_hostname"

#My Local server - Good and trouble free:
/usr/lib/python2.7/site-packages/backports/ssl_match_hostname
/usr/lib/python2.7/site-packages/urllib3/packages/ssl_match_hostname


#Google Cloud Server - Bad and gave me trouble:
/usr/lib/python2.7/site-packages/backports/ssl_match_hostname/
/usr/lib/python2.7/site-packages/pip/_vendor/urllib3/packages/ssl_match_hostname/
/usr/local/share/google/google-cloud-sdk/lib/third_party/urllib3/packages/ssl_match_hostname/

So I ended up removing this package and reinstalling everything again:

sudo yum remove python2-urllib3


#Notice that google-compute-engine and python-google-compute-engine are included here. They are the source of the problem:

=============================================================================================================================================================================================================================================
 Package                                                           Arch                                        Version                                                      Repository                                                  Size
=============================================================================================================================================================================================================================================
Removing:
 python2-urllib3                                                   noarch                                      1.24.1-2.el7                                                 @forensics                                                 708 k
Removing for dependencies:
 certbot                                                           noarch                                      1.4.0-1.el7                                                  @epel                                                       97 k
 google-compute-engine                                             noarch                                      1:20190916.00-g2.el7                                         @google-cloud-compute                                       18 k
 python-google-compute-engine                                      noarch                                      1:20191210.00-g1.el7                                         @google-cloud-compute                                      398 k
 python-requests                                                   noarch                                      2.6.0-9.el7_8                                                @updates                                                   341 k
 python-requests-toolbelt                                          noarch                                      0.8.0-3.el7                                                  @epel                                                      277 k
 python2-acme                                                      noarch                                      1.4.0-2.el7                                                  @epel                                                      347 k
 python2-boto                                                      noarch                                      2.45.0-3.el7                                                 @epel                                                      9.4 M
 python2-certbot                                                   noarch                                      1.4.0-1.el7                                                  @epel                                                      1.5 M
 python2-certbot-apache                                            noarch                                      1.4.0-1.el7                                                  @epel                                                      579 k

Transaction Summary
=============================================================================================================================================================================================================================================
Remove  1 Package (+9 Dependent packages)


In my case, I reinstalled the packages I need:

#Reinstalling the certbot:
sudo yum install certbot python2-certbot-apache

Good luck!

Our sponsors:

Amazon EC2 VS Google Cloud Platform: Storage Speed Comparison

We’ve owned multiple cloud instances on both Amazon ECS and Google Cloud Platform. I always wonder what is the difference between them. So I decide to perform a very simple speed comparisons. All storage/disks are attached on RHEL Linux instance and formatted to XFS. Everything are using the default settings. Here are the commands I used:

#Dumping 1GB of data:
dd if=/dev/zero of=file.out bs=1M count=1000

#Dumping 10GB of data:
dd if=/dev/zero of=file.out bs=1M count=10000

Here are the results:

File Size/Storage Type
Amazon: General Purpose SSD
Amazon: Magnetic
Amazon: Throughput Optimized HDD
Google: Persistent Disk
Google: Local SSD

1GB
150 MB/s
40.8 MB/s
78.2 MB/s
1.30 GB/s
1.20 GB/s

10GB
68.4 MB/s
31.0 MB/s
68.0 MB/s
62.4 MB/s
338 MB/s

Clearly, Google Cloud is the winner in terms of both pricing and performance.

Our sponsors:

[VirtualBox]CentOS 7: NS_ERROR_FAILURE

After I reboot one of my VirtualBox host servers today, I was unable to start the virtual box guests. The error was a popular one: NS_ERROR_FAILURE.

The problem was caused by the kernel mismatch problem. All you need is to rebuild the virtual box library to match with your system kernel. In my case, I had the following:

#This is my Virtual Box version
6.0.16


#This is my Linux kernel:
uname -a
3.10.0-1062.12.1.el7.x86_64


#This is my virtual box modules version:
modinfo vboxdrv
filename:       /lib/modules/3.10.0-514.10.2.el7.x86_64/weak-updates/vboxdrv.ko.xz
version:        5.0.40 r115130 (0x00240000)
license:        GPL
description:    Oracle VM VirtualBox Support Driver
author:         Oracle Corporation
retpoline:      Y
rhelversion:    7.6
srcversion:     3AFDBBC6FDA2CE8CF253D33
depends:
vermagic:       3.10.0-957.1.3.el7.x86_64 SMP mod_unload modversions
parm:           force_async_tsc:force the asynchronous TSC mode (int)

As you can see, the Virtual Box kernel is loaded from a wrong kernel location. Also the Virtual Box is 5.0.40 instead of 6.0.16. In my case, all I need is to rebuild the virtual box library to make it compatible with the Linux kernel. In order to do it, you will need to do the following:

  1. Remove all the old Linux kernels
  2. Remove the Virtual Box modules.
  3. Uninstall the Virtual Box
  4. Reboot
  5. Install the Virtual Box
#Remove all of the old kernels:
sudo package-cleanup --oldkernels --count=1 -y; 


#Remove all except your current modules:
cd /lib/modules/


#Uninstall the Virtual Box
sudo yum remove VirtualBox-6.0


#Reboot
sudo reboot


#Install the Virtual Box
sudo yum install -y VirtualBox-6.0


#Install the Extension Pack (The version number may be different in your case)
wget --no-check-certificate https://download.virtualbox.org/virtualbox/6.0.16/Oracle_VM_VirtualBox_Extension_Pack-6.0.16.vbox-extpack
sudo VBoxManage extpack install --replace Oracle_VM_VirtualBox_Extension_Pack-6.0.16.vbox-extpack


#Start the Virtual Box again

That’s it! Hope it helps!

Our sponsors:

[ZFS On Linux Trouble] This pool uses the following feature(s) not supported by this system…All unsupported features are only required for writing to the pool, zpool create: invalid argument for this pool operation

When I rebooted my computer and loaded my ZFS pool today, I got this error message:

#sudo zpool import -a
This pool uses the following feature(s) not supported by this system:
        org.zfsonlinux:project_quota (space/object accounting based on project ID.)
        com.delphix:spacemap_v2 (Space maps representing large segments are more efficient.)
All unsupported features are only required for writing to the pool.
The pool can be imported using '-o readonly=on'.
cannot import 'my_zpool': unsupported version or feature

On my another machine, I also saw something similar when I tried to create a new pool:

zpool create: invalid argument for this pool operation

This kind of error usually happens when you move your ZFS pool from one system to the other. For example, if your ZFS pool was created in ZFS v10, and you move it to a new system that can only handle ZFS v9, then this error message will show up. Obviously, this is simply not true in my case (and yours too). My system showed me this message after rebooting the server. It had nothing to do with moving the ZFS pool from one to the other. In short, this message is misleading, however it gave me some idea of what was going wrong.

Long story short. It is a known bug of the ZFS on Linux. This kind of problem happens when your Linux kernel is updated every time. If you want to get this resolved, you can only do two things. Never update your system kernel, or never reboot your server (so that the new kernel will not be loaded). If you can’t do any of these, then ZFS on Linux is not for you.

If you need to access your data now, you can mount it as read only, although this is not a long term solution:

sudo zpool import my_zpool -o readonly=on

Another way is to reboot your server to the older working kernel, assuming your old kernel is still available in your system.

So here is the reason why your system could not open your ZFS pool:

  1. You are running Linux kernel ver A and ZFS on Linux ver X, and your system is happy.
  2. A new kernel is release (e.g., ver B). Your system download it and the kernel is sitting under /boot
  3. Later, a new ZFS on Linux (e.g., ver Y) is available. In theory, when upgrading the ZFS on Linux, it supposes to compile the DKMS code with each kernel in the system. In the other words, your current kernel (ver A) and the new pending kernel (ver B) should know how to use the ZFS on Linux (both ver X and Y). Notice that I am using the word: “In theory”. And you probably know that things are not ideal in reality.
  4. So when your system is booted into the new kernel, for some reasons, your new kernel does not have the skill (ZFS on Linux ver Y) to open your ZFS pool, therefore you see that error message.

Here is how to solve the problem. Reinstalling the ZFS and DKMS packages is not going to solve the problem. You will need to rebuild the DKMS modules with your new kernel. First, reboot your computer to the latest kernel first. Here are my versions. Your versions may be different.

Old Kernel: 3.10.0-1062.9.1.el7.x86_64
New Kernel: 3.10.0-1062.12.1.el7.x86_64

Old DKMS ZFS Module:   0.8.2
New DKMS ZFS Module:   0.8.3

Remove your old kernels.

sudo package-cleanup --oldkernels --count=1 -y

Check your current DKMS status. It should contain some error:

sudo dkms status
Error! Could not locate dkms.conf file.
File: /var/lib/dkms/zfs/0.8.2/source/dkms.conf does not exist.

Clean up the DKMS folder:

#cd /var/lib/dkms/zfs/

#ls -al
# Move old libraries and old kernels to somewhere
0.8.2  <---- Move this to /tmp
0.8.3  <-- Keep
original_module
kernel-3.10.0-1062.9.1.el7.x86_64-x86_64 -> 0.8.3/3.10.0-1062.9.1.el7.x86_64/x86_64  <-- Move this to /tmp

Remove the old DKMS modules that are associated with old kernels:

sudo dkms remove zfs/0.8.2 --all;

Recompile the new DKMS module with the current kernel:

sudo dkms --force install zfs/0.8.3

Check your DKMS status again, it should be clean:

sudo dkms status
zfs, 0.8.3, 3.10.0-1062.12.1.el7.x86_64, x86_64: installed

If you see any old kernel that is associated with the new DKMS module, remove them, e.g.,

#sudo dkms status
zfs, 0.8.3, 3.10.0-1062.12.1.el7.x86_64, x86_64: installed (original_module exists)
zfs, 0.8.3, 3.10.0-1062.9.1.el7.x86_64, x86_64: built (original_module exists) (WARNING! Missing some built modules!) (WARNING! Missing some built modules!) (WARNING! Missing some built modules!) (WARNING! Missing some built modules!) (WARNING! Missing some built modules!) (WARNING! Missing some built modules!) (WARNING! Missing some built modules!) (WARNING! Missing some built modules!)
sudo dkms remove zfs/0.8.3 -k 3.10.0-1062.9.1.el7.x86_64

Now you may try to import your ZFS pool again. If it doesn't work, try to mount the ZFS pool in read only mode first, back up your data, rebuild the pool and restore it from backup.

Our sponsors: