[ZFS]How to repair a ZFS pool if one device was damaged

Today, I accidentally dd’ed a disk which was part of an active ZFS pool on my test server. I dd’ed the first and the last 10 sectors of the disk. Technically I didn’t lose any data because my ZFS configuration was RAIDZ. However once I rebooted my computer, my ZFS complained:

#This is what I did:
sudo dd if=/dev/zero of=/dev/sda bs=512 count=10
sudo dd if=/dev/zero of=/dev/sda bs=512 seek=$(( $(blockdev --getsz /dev/sda) - 4096 )) count=1M
sudo zpool status
  pool: storage
 state: DEGRADED
status: One or more devices could not be used because the label is missing or
        invalid.  Sufficient replicas exist for the pool to continue
        functioning in a degraded state.
action: Replace the device using 'zpool replace'.
   see: http://zfsonlinux.org/msg/ZFS-8000-4J
  scan: resilvered 2.40T in 1 days 00:16:34 with 0 errors on Fri Nov 13 20:05:53 2020
config:

        NAME                                 STATE     READ WRITE CKSUM
        storage                              DEGRADED     0     0     0
          raidz1-0                           DEGRADED     0     0     0
            ata-ST4000DM000-1F2168_S30076XX  ONLINE       0     0     0
            ata-ST4000DX001-1CE168_Z3019CXX  ONLINE       0     0     0
            ata-ST4000DM000-2AE166_WDH0S9YY  ONLINE       0     0     0
            ata-ST4000DM000-2AE166_WDH0SXZZ  ONLINE       0     0     0
            ata-ST4000DM000-2AE166_WDH0SXDD  ONLINE       0     0     0
            412403026512446213               UNAVAIL      0     0     0  was /dev/disk/by-id/ata-ST4000NM0033-9ZM170                                                                                                                         _Z1Z3RR74-part1

So I checked the problematic device, and I see the problem:

ls /dev/disk/by-id/

#This is normal disk:
lrwxrwxrwx 1 root root  10 Nov 13 20:58 ata-ST4000DX001-1CE168_Z3019CXX-part1 -> ../../sdd1
lrwxrwxrwx 1 root root  10 Nov 13 20:58 ata-ST4000DX001-1CE168_Z3019CXX-part9 -> ../../sdd9


#This is the problematic disk, part1 and part9 are missing.
lrwxrwxrwx 1 root root   9 Nov 13 20:58 ata-ST4000NM0033-9ZM170_Z1Z3RR74 -> ../../sdf

It is pretty easy to fix this problem. All you need is to bring the device offline and bring it back.

#First, offline the problematic device:
sudo zpool offline storage 412403026512446213
sudo zpool status
  pool: storage
 state: DEGRADED
status: One or more devices could not be used because the label is missing or
        invalid.  Sufficient replicas exist for the pool to continue
        functioning in a degraded state.
action: Replace the device using 'zpool replace'.
   see: http://zfsonlinux.org/msg/ZFS-8000-4J
  scan: resilvered 2.40T in 1 days 00:16:34 with 0 errors on Fri Nov 13 20:05:53 2020
config:

        NAME                                 STATE     READ WRITE CKSUM
        storage                              DEGRADED     0     0     0
          raidz1-0                           DEGRADED     0     0     0
            ata-ST4000DM000-1F2168_S30076XX  ONLINE       0     0     0
            ata-ST4000DX001-1CE168_Z3019CXX  ONLINE       0     0     0
            ata-ST4000DM000-2AE166_WDH0S9YY  ONLINE       0     0     0
            ata-ST4000DM000-2AE166_WDH0SXZZ  ONLINE       0     0     0
            ata-ST4000DM000-2AE166_WDH0SXDD  ONLINE       0     0     0
            412403026512446213               OFFLINE      0     0     0
#Then bring back the device:
sudo zpool online ata-ST4000NM0033-9ZM170_Z1Z3RR74 

#Resilver it
sudo zpool scrub storage

sudo zpool status
  pool: storage
 state: ONLINE
  scan: resilvered 36K in 0 days 00:00:01 with 0 errors on Fri Nov 13 21:03:01 2020
config:

        NAME                                  STATE     READ WRITE CKSUM
        storage                               ONLINE       0     0     0
          raidz1-0                            ONLINE       0     0     0
            ata-ST4000DM000-1F2168_S30076XX   ONLINE       0     0     0
            ata-ST4000DX001-1CE168_Z3019CXX   ONLINE       0     0     0
            ata-ST4000DM000-2AE166_WDH0S9YY   ONLINE       0     0     0
            ata-ST4000DM000-2AE166_WDH0SXZZ   ONLINE       0     0     0
            ata-ST4000DM000-2AE166_WDH0SXDD   ONLINE       0     0     0
            ata-ST4000NM0033-9ZM170_Z1Z3RR74  ONLINE       0     0     0

errors: No known data errors

That’s it.

Our sponsors:

[VirtualBox]CentOS 7: NS_ERROR_FAILURE

After I reboot one of my VirtualBox host servers today, I was unable to start the virtual box guests. The error was a popular one: NS_ERROR_FAILURE.

The problem was caused by the kernel mismatch problem. All you need is to rebuild the virtual box library to match with your system kernel. In my case, I had the following:

#This is my Virtual Box version
6.0.16


#This is my Linux kernel:
uname -a
3.10.0-1062.12.1.el7.x86_64


#This is my virtual box modules version:
modinfo vboxdrv
filename:       /lib/modules/3.10.0-514.10.2.el7.x86_64/weak-updates/vboxdrv.ko.xz
version:        5.0.40 r115130 (0x00240000)
license:        GPL
description:    Oracle VM VirtualBox Support Driver
author:         Oracle Corporation
retpoline:      Y
rhelversion:    7.6
srcversion:     3AFDBBC6FDA2CE8CF253D33
depends:
vermagic:       3.10.0-957.1.3.el7.x86_64 SMP mod_unload modversions
parm:           force_async_tsc:force the asynchronous TSC mode (int)

As you can see, the Virtual Box kernel is loaded from a wrong kernel location. Also the Virtual Box is 5.0.40 instead of 6.0.16. In my case, all I need is to rebuild the virtual box library to make it compatible with the Linux kernel. In order to do it, you will need to do the following:

  1. Remove all the old Linux kernels
  2. Remove the Virtual Box modules.
  3. Uninstall the Virtual Box
  4. Reboot
  5. Install the Virtual Box
#Remove all of the old kernels:
sudo package-cleanup --oldkernels --count=1 -y; 


#Remove all except your current modules:
cd /lib/modules/


#Uninstall the Virtual Box
sudo yum remove VirtualBox-6.0


#Reboot
sudo reboot


#Install the Virtual Box
sudo yum install -y VirtualBox-6.0


#Install the Extension Pack (The version number may be different in your case)
wget --no-check-certificate https://download.virtualbox.org/virtualbox/6.0.16/Oracle_VM_VirtualBox_Extension_Pack-6.0.16.vbox-extpack
sudo VBoxManage extpack install --replace Oracle_VM_VirtualBox_Extension_Pack-6.0.16.vbox-extpack


#Start the Virtual Box again

That’s it! Hope it helps!

Our sponsors:

“ZFS on Linux”: The ZFS modules are not loaded. Try running ‘/sbin/modprobe zfs’ as root to load them.

Last Updated: Oct 10, 2021

This article is based on my experience with CentOS 7. If you are running other Linux distributions, please adjust the commands and package names accordingly (e.g., yum –> apt-get).

As of Oct 3, 2019, I cannot get ZFS on Linux running on CentOS 8.

ZFS on Linux is a not robust solution to get ZFS up and running in Linux environments. Unlike FreeBSD, ZFS does not work with the Linux kernel natively. The developers of ZFS on Linux came up a rather crappy solution: By injecting the ZFS into the kernel via DKMS, Linux kernel will understand what is ZFS. It works very well, and it really works with a single assumption: The system will never get updated or rebooted after installing ZFS on Linux. So what will happen after you update the system (e.g., kernel, ZFS on Linux packages) and the system got rebooted? There is a good chance that your ZFS module will not be loaded:

Event What will happen after reboot? What do you need to do?
You update kernel first, then ZFS on Linux afterward
Before Dec 12, 2018: Your system will load the ZFS modules.
Dec 12, 2018 – Dec 2019: Probably not
After Jan 2020: 50/50
Remove the old kernels from DKMS database. Rebuild the ZFS (and SPL if running 0.7.x) modules with the new kernel in the DKMS database.
You update ZFS on Linux first, then kernel afterward If your system boots into the new kernel (which is default), your system WILL NOT load the ZFS modules. Remove and install the ZFS and DKMS packages. Remove the old kernels from DKMS database. Rebuild the SPL and ZFS modules with the new kernel in the DKMS database.
You update ZFS on Linux only. Kernel has not been updated. Your system will load the ZFS modules. Remove the old kernels from DKMS database. Rebuild the SPL and ZFS modules with the new kernel in the DKMS database.
You update kernel only. ZFS on Linux has not been updated. Your system will load the ZFS modules. Remove the old kernels from DKMS database. Rebuild the SPL and ZFS modules with the new kernel in the DKMS database.

There are two steps to rescue your data back. We will start with removing your DKMS module first. If it does not work, we will reinstall the ZFS packages. Also, I am assuming that your system is booted to the new kernel. Please keep in mind that ZFS on Linux does not work with Linux kernel v4 (as of Oct 3, 2019, either via kernel-ml via CentOS 7 or native v4 on CentOS 8). It only works with v3.

If you need to access your data, the easiest way is to boot to the old working kernel. Once you are ready to clean up the problem, boot to the new kernel and follow my instructions below.

Step 1: Clean up and Reinstall DKMS Modules

Most of the time, the ZFS on Linux messes up the DKMS modules after the update. I suggest to clean up and reinstall DKMS modules once again. As of December 12, 2018, the ZFS on Linux will remove all of the DKMS modules for no reason.

First, check your DKMS status. You will need to clean up the DKMS if it is empty (nothing is installed), orphan (library is installed, but none of them is attached to any kernel) or multiple (multiple kernels installed). If it is clean (single kernel only), you may skip this step. If you are using ZFS on Linux ver 0.7.x, your DKMS will contain two modules (zfs and spl). If you are using ver. 0.8.x, your DKMS will contain one module only (zfs).

#dkms status

In general, all you want is only one version of DKMS modoule is installed, and it is attached to one kernel only. If you see multiple versions of DKMS modules, or multiple kernels, that’s bad.

#An example of dirty DKMS status (This is bad):
spl, 0.7.12, 3.10.0-862.14.4.el7: installed (original_module exists) (WARNING! Diff between built and installed module!)
spl, 0.7.12, 3.10.0-957.1.3.el7: installed (original_module exists)
zfs, 0.7.12, 3.10.0-862.14.4.el7: installed (original_module exists) (WARNING! Diff between built and installed module!)
zfs, 0.7.12, 3.10.0-957.1.3.el7: installed (original_module exists)

#An example of empty DKMS status (This is bad):
(empty)

#An example of DKMS status without kernal (This is bad):
zfs, 0.7.12: added
spl, 0.7.12: added

#An example of clean DKMS status (This is good):
spl, 0.7.12, 3.10.0-957.1.3.el7.x86_64, x86_64: installed
zfs, 0.7.12, 3.10.0-957.1.3.el7.x86_64, x86_64: installed 

or 

spl, 0.7.12, 3.10.0-957.1.3.el7.x86_64, x86_64: installed (original_module exists)
zfs, 0.7.12, 3.10.0-957.1.3.el7.x86_64, x86_64: installed (original_module exists)

or 

zfs, 0.8.3, 3.10.0-1127.el7.x86_64, x86_64: installed (original_module exists)

In my example above, my ZFS on Linux is 0.7.12, my old kernel is 3.10.0-862.14.4.el7, my new kernel is 3.10.0-957.1.3.el7. Your version may be different.

If your situation is something like the following:

Error! Could not locate dkms.conf file.
File: /var/lib/dkms/zfs/0.8.2/source/dkms.conf does not exist.

That means you have multiple versions of dkms-ZFS modules installed in your system. In my case, the 0.8.3 is running, and the old (0.8.2) is still available. Check the folder (/var/lib/dkms/zfs/) to see if any old libraries need to be removed.

#Currently running: dkms ZFS 0.8.3, kernel 3.10.0-1062.18.1.el7.x86_64

cd /var/lib/dkms/zfs/

#ls -al
total 12K
0.8.2 <---- Delete this 0.8.3 kernel-3.10.0-1062.1.2.el7.x86_64-x86_64 -> 0.8.2/3.10.0-1062.1.2.el7.x86_64/x86_64 <---- Delete this kernel-3.10.0-1062.4.1.el7.x86_64-x86_64 -> 0.8.2/3.10.0-1062.4.1.el7.x86_64/x86_64 <---- Delete this kernel-3.10.0-1062.4.3.el7.x86_64-x86_64 -> 0.8.2/3.10.0-1062.4.3.el7.x86_64/x86_64 <---- Delete this kernel-3.10.0-1062.7.1.el7.x86_64-x86_64 -> 0.8.2/3.10.0-1062.7.1.el7.x86_64/x86_64 <---- Delete this kernel-3.10.0-1062.9.1.el7.x86_64-x86_64 -> 0.8.3/3.10.0-1062.9.1.el7.x86_64/x86_64 <---- Delete this

You may want to remove both ZFS and SPL DKMS modules first, then reinstall them:

#If your version is 0.7.x:
sudo dkms remove zfs/0.7.12 --all; 
sudo dkms remove spl/0.7.12 --all; 


#If your version is 0.8.x:
sudo dkms remove zfs/0.8.3 --all; 

Sometimes, you will need to remove the old kernel manually:

sudo dkms remove zfs/0.7.12 -k 3.10.0-862.14.4.el7.x86_64; 
sudo dkms remove spl/0.7.12 -k 3.10.0-862.14.4.el7.x86_64;

Time to reinstall them:

#Don't forget to use the version that matches your system. In my situation, it was 0.7.12 / 0.8.3

#0.7.x:
sudo dkms --force install spl/0.7.12; 
sudo dkms --force install zfs/0.7.12;

#0.8.x:
sudo dkms --force install zfs/0.8.3;

Run the DKMS status again. You should see both ZPL and SPL are attached to the new kernel:

#If your version is 0.7.x:
spl, 0.7.12, 3.10.0-957.1.3.el7.x86_64, x86_64: installed
zfs, 0.7.12, 3.10.0-957.1.3.el7.x86_64, x86_64: installed

#If your version is 0.8.x:
zfs, 0.8.3, 3.10.0-1127.el7.x86_64, x86_64: installed

Try to load the ZFS module and import your ZFS data:

sudo /sbin/modprobe zfs
sudo zpool import -a

If everything looks good, you can reboot your system and test to see if the ZFS is loaded automatically or not. Once everything is okay, remove the old kernel from the system.

sudo package-cleanup --oldkernels --count=1 -y

That’s it, you are good to go.


Step 2: Reinstall ZFS packages

If you have tried the first step and it didn’t work. You may want to reinstall the ZFS packages. Here is a typical error message:

You try to import the ZFS data and the system complains:

#zpool import -a
The ZFS modules are not loaded.
Try running '/sbin/modprobe zfs' as root to load them.

So you try to load the ZFS module and the system complains again:

#/sbin/modprobe zfs
modprobe: FATAL: Module zfs not found.
or
modprobe: ERROR: could not insert 'zfs': Invalid argument

What you need to do is to erase all the ZFS and related packages:

yum erase zfs zfs-dkms libzfs2 spl spl-dkms libzpool2 -y

Please reboot the system. This step is very important.

reboot

After that, try to install ZFS again.

yum install zfs -y

If the system complaints about mismatched dependent packages, try to remove the affected packages first and run the installation again.

After the installation, try to start the ZFS module:

/sbin/modprobe zfs
zpool import -a

If the ZFS is up and running, please clean up your DKMS from step 1. If it complains again, please follow the steps below:

  1. Reboot
  2. Clear the cache of the yum repository and try to update the system again. (sudo yum clean all)
  3. Reboot to the latest kernel
  4. Erase the ZFS and related packages, try it again.

Keep in mind that ZFS on Linux is based on DKMS, a very buggy and unreliable platform. Sometimes when you uninstall and install the packages, don’t expect that it will do the same thing as fresh install. Before you send your server to the landfill, try this:

Check the dkms status:

#dkms status
#version 0.7.x
zfs, 0.7.2: added
spl, 0.7.2: added

#version 0.8.x
zfs, 0.8.3: added

If you see this message, that means the ZFS packages have been installed, but the DKMS doesn’t know how to use it. You will need to tell DKMS about it:

#version 0.7.x
dkms --force install zfs/0.7.2
dkms --force install spl/0.7.2

#version 0.8.x
dkms --force install zfs/0.8.3
#Try to start ZFS again.
/sbin/modprobe zfs
zpool import -a

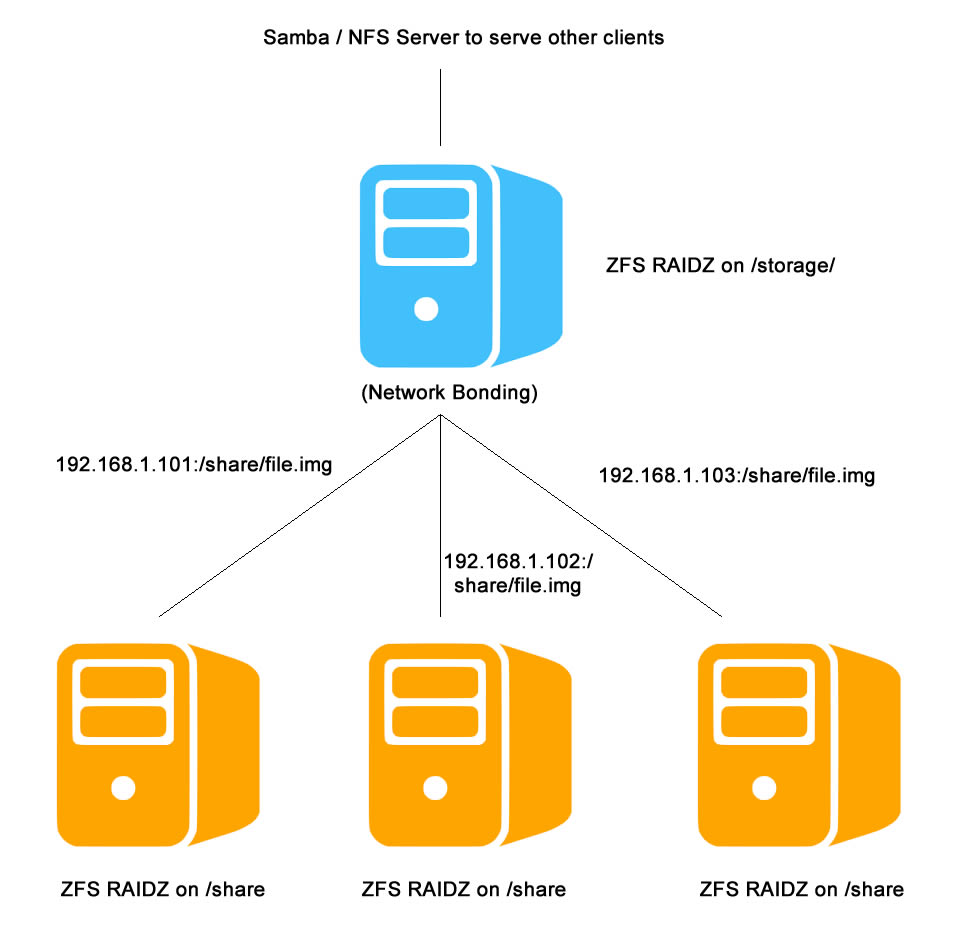
If you already tried it for more than 3 times without any luck, don’t waste your time. You may want to bring the ZFS disks to a different server. The new server should be able to recognize the ZFS disks. For the original server, you can connect to the ZFS disks on the new server via NFS using the original path. That will minimize the impact of changes.

Keep in mind that the ZFS version is very important. The server with newer ZFS version can read the ZFS disks created in older ZFS versions. You can always check the ZFS versions by running the following:

#Get the version of the host:
sudo zfs upgrade -v
sudo zpool upgrade -v


#Get the version of the ZFS disks:
sudo zfs get version
sudo zpool get version

This is pretty much what I need to do on my 60 servers every month. If you are in a similar situation like mine, I guarantee that you will become an expert of fixing this kind of mess after few months. Good luck!

Our sponsors:

ZFS Cluster: A Network-Based ZFS Implementation

I always like to experimenting the idea of building a ZFS cluster, i.e., it has the robust of the ZFS with the cluster capacity. So I came up a test environment with this prototype. Keep in mind that this is just a proof of concept rather than a production-ready solution. I mainly want to test the idea of ZFS cluster.

The idea is pretty simple. Typically when we build the ZFS server, the members of the RAID are the hard drives. In my experiment, I use files instead of hard drives, where the corresponding files live in a network share (mounted via NFS). Since the bottle neck of the I/O will be limited by the network, I include a network bonding to increase the overall bandwidth.

The yellow servers are simply regular servers running ZFS with NFS service. I use the following command to generate a simple file / place holder for ZFS mounting:

#This will create an empty 1TB file, you can think of it as a 1TB hard drive / place holder.
truncate -s 1000G file.img

Make sure that the corresponding NFS service is serving the file.img to the client (the blue server).


The blue server will be the NFS client of the yellow servers, where I will use it to serve the data to other computers. It has the following features:

It has a network bonding based on three Ethernet adapter:

#cat /proc/net/bonding/bond0


Ethernet Channel Bonding Driver: v3.7.1 (April 27, 2011)

Bonding Mode: adaptive load balancing
Primary Slave: None
Currently Active Slave: enp0s25
MII Status: up
MII Polling Interval (ms): 1
Up Delay (ms): 0
Down Delay (ms): 0

Slave Interface: enp0s25
MII Status: up
Speed: 1000 Mbps
Duplex: full
Link Failure Count: 0
Permanent HW addr: 00:19:d1:b2:1e:0d
Slave queue ID: 0

Slave Interface: enp6s0
MII Status: up
Speed: 1000 Mbps
Duplex: full
Link Failure Count: 0
Permanent HW addr: 00:18:4d:f0:12:7b
Slave queue ID: 0

Slave Interface: enp6s1
MII Status: up
Speed: 1000 Mbps
Duplex: full
Link Failure Count: 0
Permanent HW addr: 00:22:3f:f6:98:03
Slave queue ID: 0

It mounts the yellow servers via NFS

#df
192.168.1.101:/storage/share   25T  3.9T   21T  16%  /nfs/192-168-1-101
192.168.1.102:/storage/share   8.1T  205G  7.9T   3% /nfs/192-168-1-102
192.168.1.103:/storage/share   8.3T  4.4T  4.0T  52% /nfs/192-168-1-103

The ZFS has the following structure:

#sudo zpool status
        NAME                                  STATE     READ WRITE CKSUM
        storage                               ONLINE       0     0     0
          raidz1-0                            ONLINE       0     0     0
            /nfs/192-168-1-101/file.img       ONLINE       0     0     0
            /nfs/192-168-1-102/file.img       ONLINE       0     0     0
            /nfs/192-168-1-103/file.img       ONLINE       0     0     0

or:

zpool create -f storage raidz /nfs/192-168-1-101/file.img \
                              /nfs/192-168-1-102/file.img \
                              /nfs/192-168-1-103/file.img

The speed of the network will be the limitation of the system, I don’t expect the I/O speed goes beyond 375MB/s (125MB/s x 3). Also since it is a file-based ZFS (the ZFS on the blue server is based on files, not disks), so the overall performance will be discounted.

#Write speed
time dd if=/dev/zero of=/storage/data/file.out bs=1M count=1000
1000+0 records in
1000+0 records out
1048576000 bytes (1.0 GB) copied, 3.6717 s, 285 MB/s
#Read speed
time dd if=/storage/data/file.out of=/dev/null
1000+0 records in
1000+0 records out
1048576000 bytes (1.0 GB) copied, 3.9618 s, 265 MB/s

Both read and the write speed are roughly around 75% of the maximum bandwidth, which is not bad at all.

So I decide to make one of the yellow servers offline, let’s see what’s going on:

#sudo zpool status
        NAME                                  STATE     READ WRITE CKSUM
        storage                               ONLINE       0     0     0
          raidz1-0                            ONLINE       0     0     0
            /nfs/192-168-1-101/file.img       ONLINE       0     0     0
            /nfs/192-168-1-102/file.img       ONLINE       0     0     0
            /nfs/192-168-1-103/file.img       UNAVAIL      0     0     0 cannot open

And the pool is still functioning, that’s pretty cool!


Here are some notes that will affect the overall performance:

  • The quality of the Ethernet card matters, which includes PCIe or PCI, 1 lane or 16 lane, total throughput etc.
  • The network traffic. Is the switch busy?
  • How are you connect these servers together? One big switch or multiple switches that are bridged together. If they are bridged, the limitation will be the cable of the bridge, which is 125MB/s for gigabit network.

Again, this idea is just a proof of concept rather than for production purpose. If you decide to put this in a production environment, you may want to extend this idea further, such as:

Have fun!

Our sponsors:

How to install ZFS on RHEL / CentOS 7

A friend of mine likes to try ZFS on CentOS 7, therefore I decide to make a guide for him. The following instructions have been well tested on CentOS 7.

Before you decide to put ZFS in a production use, you should be aware of the following:

  • ZFS is originally designed to work with Solaris and BSD system. Because of the legal and licensing issues, ZFS cannot be shipped with Linux.
  • Since ZFS is open source, some developers port the ZFS the Linux, and make it run at the kernel level via dkms. This works great as long as you don’t update the kernel. Otherwise the ZFS will not be loaded with the new kernel.
  • In a ZFS/Linux environment, it is a bad idea to update the system automatically.
  • For some odd reasons, ZFS/Linux will work with server grade or gaming grade computers. Do not run ZFS/Linux on entry level computers.

Instructions

By default, ZFS is not available in the standard CentOS repository. We will need to include some 3rd party repositories here.

sudo rpm -Uvh http://www.elrepo.org/elrepo-release-7.0-2.el7.elrepo.noarch.rpm
sudo rpm -Uvh http://dl.fedoraproject.org/pub/epel/epel-release-latest-7.noarch.rpm
sudo rpm -Uvh https://forensics.cert.org/cert-forensics-tools-release-el7.rpm
sudo rpm -Uvh http://download.zfsonlinux.org/epel/zfs-release.el7_6.noarch.rpm

sudo yum update -y
sudo yum groupinstall -y "Development Tools" "Development Libraries" "Additional Development"
sudo yum install -y kernel-devel kernel-headers

It is very likely that the system will install a new kernel. You may want to reboot the computer before installing the ZFS.

sudo reboot

Please make sure that the system does not update automatically. If you need to update the system, please exclude the kernel and related modules from the update.

sudo nano /etc/yum.conf 
exclude=kernel*

Now you are on the latest kernel. Let’s install the ZFS:

sudo yum install -y zfs
sudo /sbin/modprobe zfs

Now, you can create a simple stripped ZFS. Stripped ZFS gives you the best performances and zero data protections. When referencing the disks, we don’t want to use /dev/sd*, instead, we want to use the device id directly, e.g., /dev/disk/by-id/wwn-0x8000c8004e8ac11a

ls /dev/disk/by-id/


lrwxrwxrwx 1 root root  9 Jan  3 21:49 wwn-0x8000c8004e8ac11a -> ../../sde
lrwxrwxrwx 1 root root  9 Jan  3 21:49 wwn-0x8000c8008ad0a22d -> ../../sdd
lrwxrwxrwx 1 root root  9 Jan  3 21:49 wwn-0x8000c8008b4f6338 -> ../../sda
lrwxrwxrwx 1 root root  9 Jan  3 21:49 wwn-0x8000c8008b52144c -> ../../sdc
lrwxrwxrwx 1 root root  9 Jan  3 21:49 wwn-0x8000c8008b59a553 -> ../../sdb

Once you identify the list of the hard disks, we can create a simple stripped ZFS. This will create a ZFS under /storage. You can replace storage to anything you like.

#We are going to create a ZFS pool with three disks. You can add more if you like. For stripped design, the higher number of disks, the faster the IO speed.
zpool create -f storage /dev/disk/by-id/device1 /dev/disk/by-id/device2 /dev/disk/by-id/device3 

storage is like a big umbrella. Under this umbrella, we will need to create multiple “partitions” for storing data.

zfs create storage/mydata

If you have a fast CPU like i7, you may want to turn on the compression. This will reduce the amount of data write to the system, and it will improve the overall performance.

sudo zfs set compression=lz4 storage

Finally we want to change the ownership and the permissions

#Assuming that you are part of the wheel group
sudo chown -R root:wheel /storage
sudo chmod -R g+rw /storage

Now, run df and you should be able to see the ZFS in your system.

#df -h
Filesystem                   Size  Used Avail Use% Mounted on
storage                      6.8T  128K  6.8T   1% /storage
storage/mydata                13T  6.1T  6.8T  48% /storage/mydata

You can monitor the health of the ZFS system.

#sudo zpool status


  pool: storage
 state: ONLINE
config:

        NAME                        STATE     READ WRITE CKSUM
        storage                     ONLINE       0     0     0
            wwn-0x8000c8004e8ac11a  ONLINE       0     0     0
            wwn-0x8000c8008ad0a22d  ONLINE       0     0     0
            wwn-0x8000c8008b4f6338  ONLINE       0     0     0
            wwn-0x8000c8008b52144c  ONLINE       0     0     0


errors: No known data errors

For some very odd reasons, ZFS will not be loaded automatically. We want to make sure that ZFS will be loaded after reboot.

#sudo nano /etc/crontab

#Add the following:
@reboot         root    sleep 10; zpool import -a;

Now you can try to test the ZFS by running dd or copying a big file to the ZFS. If you are not happy with the configurations, you can always destroy it and re-create the ZFS again.

sudo zpool destroy storage

Further Reading

Have fun!

Our sponsors:

CentOS/RHEL 7 – No ZFS After Updating the Kernel

Let’s all agree with this fact: ZFS is foreign to Linux. It is not native. You can’t expect that ZFS on Linux will run smoothly as FreeBSD or Solaris. Having using ZFS on Linux since 2013 (and ZFS on FreeBSD since 2009), I’ve noticed that ZFS does not like Linux (well, at least RHEL 7). Here are some few examples:

  • ZFS is not loaded at the boot time. You will need to manually start it or load it via cron. Good luck if you have other services (like Apache, MySQL, NFS, or even users’ home directories) that depend on the ZFS.
  • Every single time you update the kernel, ZFS will not work after the reboot without some manual work. What if the system runs the update automatically, and one day there is a power failure which makes your server to reboot to a new kernel? Your system will not be able to mount your ZFS volume. If you integrate ZFS with other service applications such as web, database or network drive, oh well, good luck and I hope you will catch this problem fast enough before receiving thousands of emails and calls from your end-users.
  • If you exclude the kernel from the updates (/etc/yum.conf), you will eventually run into trouble, because there are tons of other packages that require the latest kernel. In the other words, running the command: yum update -y will fail. You will need to run yum update –skip-broken, which means you will miss many latest packages. Here is an example:
    --> Finished Dependency Resolution
    Error: Package: hypervvssd-0-0.29.20160216git.el7.x86_64 (base)
               Requires: kernel >= 3.10.0-384.el7
               Installed: kernel-3.10.0-327.el7.x86_64 (@anaconda)
                   kernel = 3.10.0-327.el7
               Installed: kernel-3.10.0-327.22.2.el7.x86_64 (@updates)
                   kernel = 3.10.0-327.22.2.el7
    Error: Package: hypervfcopyd-0-0.29.20160216git.el7.x86_64 (base)
               Requires: kernel >= 3.10.0-384.el7
               Installed: kernel-3.10.0-327.el7.x86_64 (@anaconda)
                   kernel = 3.10.0-327.el7
               Installed: kernel-3.10.0-327.22.2.el7.x86_64 (@updates)
                   kernel = 3.10.0-327.22.2.el7
    Error: Package: hypervkvpd-0-0.29.20160216git.el7.x86_64 (base)
               Requires: kernel >= 3.10.0-384.el7
               Installed: kernel-3.10.0-327.el7.x86_64 (@anaconda)
                   kernel = 3.10.0-327.el7
               Installed: kernel-3.10.0-327.22.2.el7.x86_64 (@updates)
                   kernel = 3.10.0-327.22.2.el7
     You could try using --skip-broken to work around the problem
     You could try running: rpm -Va --nofiles --nodigest
    
  • If you are running the stable Linux distributions like RHEL 7, you can load a more recent kernel like 4.x by installing the package: kernel-ml. However, don’t expect that ZFS will work with version 4:
    Loading new spl-0.6.5.9 DKMS files...
    Building for 4.11.2-1.el7.elrepo.x86_64
    Building initial module for 4.11.2-1.el7.elrepo.x86_64
    configure: error: unknown
    Error! Bad return status for module build on kernel: 4.11.2-1.el7.elrepo.x86_64 (x86_64)
    Consult /var/lib/dkms/spl/0.6.5.9/build/make.log for more information.


Running ZFS on Linux is like putting a giraffe in the wild in Alaska. It is just not the right thing to do. Unfortunately, there are so many things that only available on Linux so we have to live with it. Just like FUSE (Filesystem in Userspace), many people feel hesitated to run their file systems on the userspace instead of kernel level, but hey, see how many people are happy with GlusterFS, a distributed file system that live on FUSE! Personally I just think it is not a right thing to do, especially in an enterprise environment. Running a production file system at the userspace level, seriously?

Anyway, if you are running into trouble after upgrading your Linux kernel (and you almost had a heart attack when you think your data may be lost), you have two choices:

  1. Simply boot to the previous working kernel if you need to get your data back in quick. However, keep in mind that this will create two problems:
    • Since you already update the system with the new kernel and the new packages, your new packages probably will not work with the old kernel, and that may give you extra headache.
    • Unless you manually overwrite the kernel boot order (boot loader config), otherwise you may get into the same trouble in the next boot.
  2. If you want a more “permanent” fix, you will need to rebuild the dkms ZFS and SPL modules. See below for the instructions. Keep in mind that you will have the same problem again when the kernel receives a new update.

You’ve tried to load the ZFS and realize that it is no longer available:

#sudo zpool import
The ZFS modules are not loaded.
Try running '/sbin/modprobe zfs' as root to load them.

#sudo /sbin/modprobe zfs
modprobe: FATAL: Module zfs not found.

You may want to check the dkms status. Write down the version number. In my case, it is 0.6.5.9

#sudo dkms status
spl, 0.6.5.9, 3.10.0-327.28.3.el7.x86_64, x86_64: installed (WARNING! Diff between built and installed module!) (WARNING! Diff between built and installed module!)
spl, 0.6.5.9, 3.10.0-514.2.2.el7.x86_64, x86_64: installed (WARNING! Diff between built and installed module!) (WARNING! Diff between built and installed module!)
zfs, 0.6.5.9, 3.10.0-327.28.3.el7.x86_64, x86_64: installed (WARNING! Diff between built and installed module!) (WARNING! Diff between built and installed module!) (WARNING! Diff between built and installed module!) (WARNING! Diff between built and installed module!) (WARNING! Diff between built and installed module!) (WARNING! Diff between built and installed module!)

Before running the following commands, make sure that you know what you are doing.


#Make sure that you reboot to the kernel you want to fix.
#Find out what is the current kernel
uname -a
Linux 3.10.0-514.2.2.el7.x86_64 #1 SMP Tue Dec 6 23:06:41 UTC 2016 x86_64 x86_64 x86_64 GNU/Linux

#In my example, it is:
3.10.0-514.2.2.el7.x86_64

#Now, let's get into the fun part. We will remove them and reinstall them.
#Don't forget to match your version, in my base, my version is: 0.6.5.9
sudo dkms remove zfs/0.6.5.9 --all
sudo dkms remove spl/0.6.5.9 --all
sudo dkms --force install spl/0.6.5.9
sudo dkms --force install zfs/0.6.5.9

#or you can run these commands in one line, so that you don't need to wait:
sudo dkms remove zfs/0.6.5.9 --all; sudo dkms remove spl/0.6.5.9 --all; sudo dkms --force install spl/0.6.5.9; sudo dkms --force install zfs/0.6.5.9;

And we will verify the result.

#sudo dkms status
spl, 0.6.5.9, 3.10.0-514.2.2.el7.x86_64, x86_64: installed
zfs, 0.6.5.9, 3.10.0-514.2.2.el7.x86_64, x86_64: installed

Finally we can start the ZFS again.

sudo /sbin/modprobe zfs

Your ZFS pool should back. You can verify it by rebooting your machine. Notice that Linux may not automatically mount the ZFS volumes. You may want to mount it manually or via cron job.

Here is how to mount the ZFS volumes manually.

sudo zpool import -a

You may want to remove all of the old kernels too.

sudo package-cleanup --oldkernels --count=1 -y

Our sponsors:

[Linux]/dev/sdb1: more filesystems detected. This should not happen,

I had a hard drive sitting around, and I decided to format it such that I could use it in my Linux CentOS box. When I decided to mount it, I got the following error message:

mount: /dev/sdb1: more filesystems detected. This should not happen,
       use -t  to explicitly specify the filesystem type or
       use wipefs(8) to clean up the device.

This message simply tells you that there are two or more file systems sitting in the hard drive partitions, and the system does not know which one to use to mount. We can take a closer look to see what’s going on:

sudo wipefs /dev/sdb1


offset               type
----------------------------------------------------------------
0x2d1b0fa8923        zfs_member   [raid]
                     LABEL: storage
                     UUID:  12661834248699203227

0x951                xfs   [filesystem]
                     UUID:  90295123-2395-7456-8521-9A1EE963ac53

As you can see, we have two file systems here. The easiest way is to wipe out the first few sectors of your disk, i.e.,

sudo dd if=/dev/zero of=/dev/sdb bs=1M count=10

And we will re-do everything again, i.e.,

sudo parted /dev/sdb1
...
...
sudo mkfs.xfs /dev/sdb1
sudo mount /dev/sdb1 /mnt/

That’s it!

Our sponsors:

Dropbox on FreeBSD

I put my personal websites on a FreeBSD server. One of my websites is a photo album, which I want to read the content from a Dropbox. That Dropbox primarily runs on Mac, iPhone and iPad. I was trying to explore the possibilities to set up a Dropbox on FreeBSD. Since Dropbox doesn’t support FreeBSD officially, I need to use 3rd party tools, most of them are basically based on the Dropbox developer API.

So I have tried several 3rd party tools, as you expect, none of them works. The primary problem is the synchronization, i.e., if my wife adds or deletes a photo on the Dropbox, I expect that the Dropbox folder on FreeBSD will get updated as well. Another problem is the speed. Looks like the Dropbox API is not as fast comparing to its own native application. On the same network, it took few hours to download the content (around 1GB of jpeg files) from Dropbox on FreeBSD, versus 10 minutes on a Mac/Windows/Linux machine using the native application.

So I came up few alternative solutions:

  1. Hosting my website on CentOS Linux. Since Dropbox supports Linux, I can easily read the Dropbox without any problem.
  2. Push the Dropbox content from Mac/Linux to FreeBSD using Rsync periodically (e.g., every 5 mins, hourly etc). That way FreeBSD will have access the Dropbox files.
  3. Set up a NFS service on a Linux box with access to Dropbox, and let the FreeBSD to mount the corresponding NFS share. This solution is okay if both machines are on the same network. It may raise some security concerns if both machines are connected via the public.

Another solution I think it may work is to install the Dropbox native application on FreeBSD. FreeBSD supports running Linux application via Linux emulation. Back in the old days (FreeBSD 8), it was pretty easy to include the Linux support on FreeBSD (one click in the sysinstall). Since the recent releases, they’ve made it harder because not many people wants to run Linux binary on FreeBSD. Based on my previous experience, I think it should work on the latest FreeBSD, but it may require some works.

Another crazy idea will be running Dropbox with Wine on FreeBSD. But this goes way too far from my original purpose, and I am not a big fan of Wine because it adds too many libraries to the system.

Our sponsors:

RHEL 7 / MariaDB / MySQL: ERROR 1018 (HY000): Can’t read dir of ‘.’ (errno: 24)

Recently, I decided to upgrade a database server from RHEL 6 (CentOS 6) to RHEL 7 (CentOS 7), which involves switching from MySQL 5.5 to MariaDB 5.5. Our server hosts about 100 databases, when I was testing them individually, I didn’t see any problem. However, when I ran the back up all databases one by one using mysqldump (i.e., running mysqldump command for each database, one after one, 100 times), something funny happened. Here is the error message:


#The system was running a brunch of mysqldump commands, one by one (not via background)

Got error: 1016: "Can't open file: './db_my_database/tbl_mytable.frm' (errno: 24)" when using LOCK TAB                                                                                                   LES
mysqldump: Error: 'Out of resources when opening file '/var/tmp/#sql_2d6c_2.MAI' (Errcode: 24)' when trying to dump tablespaces

At the mean time, I tried to access the database via MySQL terminal,

MariaDB [(none)]> SHOW DATABASES;
ERROR 1018 (HY000): Can't read dir of '.' (errno: 24)

This error message means the MySQL cannot access the file. If you google the message, you will notice that there are tons of solutions, and almost every of them suggests you to increase the open_files_limit variable in my.cnf.

Therefore, I checked my configurations (/etc/my.cnf), and I noticed that the value was already set to 30000. I also checked the lsof command and I found something very interesting. Notice that I have 100 database, each of them contains about 60 tables. Each table has about 3 files. Depending on the timeout settings, if all database and tables are opened, the total number of opened file will be 100x60x3 = 18,000

sudo lsof -u mysql | wc
1045   25811 239248

This result suggests that at the time of crashing, the mysql user (the system user that run the MariaDB service) was accessing 1045 files at the same time.

So I was scratching my head. Why I already set the open_files_limit value to 30000 already, and the system crashed at 1045th files? I also verified the memory (command: free) and current process (command: top), and I didn’t find anything unusual. One last thing, I checked the open_files_limit value using MySQL terminal, and this is what I found:

MariaDB [(none)]> SHOW VARIABLES LIKE 'open_files_limit';
+------------------+-------+
| Variable_name    | Value |
+------------------+-------+
| open_files_limit | 1024  |
+------------------+-------+

It seems that MariaDB didn’t honor the open_files_limit I set in config file, instead it uses the default one, which isn’t right. So after some investigations, I’ve noticed that RHEL 7 set up some security stuffs, such that you will need to set the open_file_limit variable at the system level rather than the application level. In the other words, whatever you put in the /etc/my.cnf, it won’t go through the security check at RHEL.

Here is how to set the equivalent open_files_limit at the system level:

sudo mkdir -p /etc/systemd/system/mariadb.service.d/
sudo nano /etc/systemd/system/mariadb.service.d/limits.conf
#Add the following, for me, I like to set the open_files_limit to 30000:
[Service]
LimitNOFILE=30000
sudo systemctl daemon-reload
sudo systemctl restart mariadb

I tried to rerun the command again and that’s what I got:

MariaDB [(none)]> SHOW VARIABLES LIKE 'open_files_limit';
+------------------+-------+
| Variable_name    | Value |
+------------------+-------+
| open_files_limit | 30000 |
+------------------+-------+
1 row in set (0.00 sec)

That’s it! Did I save you from heart attack?

One of the biggest selling points of RHEL is the stability. When we upgraded from RHEL 6 to RHEL 7 (clean install), we expected that everything should work fine without too much modifications. Unfortunately, what I saw is a broken system. I really don’t expect that this happens in an enterprise class product.

Our sponsors:

CentOS/RHEL 6: No ZFS after upgrading the kernel

This article is mainly for CentOS 6, please visit here for CentOS 7.

After I upgraded the CentOS / RHEL system to the latest kernel, the ZFS failed to start. The system was unable to load the ZFS module, i.e., I could not access my data. Here are some error messages I found on the system:

#sudo zpool status
The ZFS modules are not loaded.
Try running '/sbin/modprobe zfs' as root to load them.
#sudo /sbin/modprobe zfs
FATAL: Error inserting zfs (/lib/modules/2.6.32-573.7.1.el6.x86_64/weak-updates/zfs.ko): Unknown symbol in module, or unknown parameter (see dmesg)
#dmesg
zfs: disagrees about version of symbol vn_openat
zfs: Unknown symbol vn_openat
zfs: disagrees about version of symbol taskq_dispatch_delay
zfs: Unknown symbol taskq_dispatch_delay
zfs: disagrees about version of symbol taskq_cancel_id
zfs: Unknown symbol taskq_cancel_id
zfs: disagrees about version of symbol vn_open
zfs: Unknown symbol vn_open
zfs: disagrees about version of symbol vn_remove
zfs: Unknown symbol vn_remove
zfs: disagrees about version of symbol taskq_dispatch_ent
zfs: Unknown symbol taskq_dispatch_ent
zfs: disagrees about version of symbol taskq_dispatch
zfs: Unknown symbol taskq_dispatch
zfs: disagrees about version of symbol system_taskq
zfs: Unknown symbol system_taskq
zfs: disagrees about version of symbol taskq_wait
zfs: Unknown symbol taskq_wait
zfs: Unknown symbol __cv_wait_interruptible
zfs: disagrees about version of symbol taskq_wait_id
zfs: Unknown symbol taskq_wait_id
zfs: disagrees about version of symbol taskq_destroy
zfs: Unknown symbol taskq_destroy
zfs: disagrees about version of symbol vn_rdwr
zfs: Unknown symbol vn_rdwr
zfs: disagrees about version of symbol taskq_init_ent
zfs: Unknown symbol taskq_init_ent
zfs: disagrees about version of symbol taskq_create
zfs: Unknown symbol taskq_create
zfs: Unknown symbol __cv_timedwait_interruptible
zfs: disagrees about version of symbol taskq_member
zfs: Unknown symbol taskq_member

So what does these messages mean? Before I explain the details, let me explain how ZFS works on Linux. For legal reasons, unlike *BSD, Linux kernel does not support ZFS. In order to make Linux talks to ZFS, some people came up a very smart way: They inject the ZFS library at the kernel level, such that when Linux boots, it knows how to handle the ZFS. It sounds pretty ideal, isn’t it?

And now, we have a problem.

Many system administrators like to let the system upgrade automatically (such as running yum update -y in the cron job etc). Unlike *BSD, Linux bundles the kernel and application update together. In the other words, when you run the yum update, it will update both kernel and applications together, and there is no way for you to pick one and skip the other.

When the system upgrades the kernel, it refreshes everything, i.e., the new kernel will not know what is ZFS, because the process of injecting the ZFS happens when we install the ZFS on Linux. If there is no new version available, this process will not happen. So what happen after you reboot the computer, which by default, load the latest kernel? You got it, the ZFS won’t be loaded and your data is not accessible.

There are few ways to handle this. First, if you really want to keep your system up to dated (which I don’t recommend), exclude the kernel from the system update.

sudo nano /etc/yum.conf
[main]
.....
exclude=kernel*

It doesn’t mean your system is 100% safe from now on. You may still get some chances to break your ZFS. Here is some funny messages after I turn on the exclusion and run the yum update:

Loading new zfs-0.6.5.4 DKMS files...
Building for 2.6.32-504.23.4.el6.x86_64
Building initial module for 2.6.32-504.23.4.el6.x86_64
Done.

Adding any weak-modules
ERROR: modinfo: could not open /lib/modules/2.6.32-358.el6.x86_64/weak-updates/: Is a directory
ERROR: modinfo: could not open /lib/modules/2.6.32-504.23.4.el6.x86_64/zavl.ko: No such file or directory
FATAL: /lib/modules/2.6.32-504.23.4.el6.x86_64/zavl.ko: No such file or directory
Warning: Module zavl.ko from kernel  has no modversions, so it cannot be reused for kernel 2.6.32-358.el6.x86_64
ERROR: modinfo: could not open /lib/modules/2.6.32-358.el6.x86_64/weak-updates/: Is a directory
ERROR: modinfo: could not open /lib/modules/2.6.32-504.23.4.el6.x86_64/znvpair.ko: No such file or directory
FATAL: /lib/modules/2.6.32-504.23.4.el6.x86_64/znvpair.ko: No such file or directory
Warning: Module znvpair.ko from kernel  has no modversions, so it cannot be reused for kernel 2.6.32-358.el6.x86_64
ERROR: modinfo: could not open /lib/modules/2.6.32-358.el6.x86_64/weak-updates/: Is a directory
ERROR: modinfo: could not open /lib/modules/2.6.32-504.23.4.el6.x86_64/zunicode.ko: No such file or directory
FATAL: /lib/modules/2.6.32-504.23.4.el6.x86_64/zunicode.ko: No such file or directory
Warning: Module zunicode.ko from kernel  has no modversions, so it cannot be reused for kernel 2.6.32-358.el6.x86_64
ERROR: modinfo: could not open /lib/modules/2.6.32-358.el6.x86_64/weak-updates/: Is a directory
ERROR: modinfo: could not open /lib/modules/2.6.32-504.23.4.el6.x86_64/zcommon.ko: No such file or directory
FATAL: /lib/modules/2.6.32-504.23.4.el6.x86_64/zcommon.ko: No such file or directory
Warning: Module zcommon.ko from kernel  has no modversions, so it cannot be reused for kernel 2.6.32-358.el6.x86_64
ERROR: modinfo: could not open /lib/modules/2.6.32-358.el6.x86_64/weak-updates/: Is a directory
ERROR: modinfo: could not open /lib/modules/2.6.32-504.23.4.el6.x86_64/zpios.ko: No such file or directory
FATAL: /lib/modules/2.6.32-504.23.4.el6.x86_64/zpios.ko: No such file or directory
Warning: Module zpios.ko from kernel  has no modversions, so it cannot be reused for kernel 2.6.32-358.el6.x86_64

depmod...

DKMS: install completed.

The second thing you will need to do is to increase the /boot partition from the default 200MB to at least 2GB. By default, RHEL will create a 200MB /boot for storing the kernel files. Kernels are small and they rarely go beyond 40MB. However, RHEL will only keep up to 5 recent kernels (40MB x 5 = 200MB), and it will remove the rest. So what happen if it removes the one that works with ZFS? The only thing you can do is to reinstall the system and import your ZFS again.

sudo zpool import

Here is how to modify the number:

sudo nano /etc/yum.conf 
#Tell the system to keep the most 20 recent kernels
installonly_limit=20

Another thing you may want to do is to select the working kernel (instead of the latest) one when boot. Here is how to change it:

sudo nano /boot/grub/grub.conf

Notice that I comment out the most recent kernels:

# grub.conf generated by anaconda
#
# Note that you do not have to rerun grub after making changes to this file
# NOTICE:  You have a /boot partition.  This means that
#          all kernel and initrd paths are relative to /boot/, eg.
#          root (hd0,0)
#          kernel /vmlinuz-version ro root=/dev/sda3
#          initrd /initrd-[generic-]version.img
#boot=/dev/sda
default=0
timeout=5
splashimage=(hd0,0)/grub/splash.xpm.gz
hiddenmenu
#title CentOS (2.6.32-573.7.1.el6.x86_64)
#       root (hd0,0)
#       kernel /vmlinuz-2.6.32-573.7.1.el6.x86_64 ro root=UUID=325cc438-33a6-46ae-8f1a-443ebd77c70a rd_NO_LUKS rd_NO_LVM LANG=en_US.UTF-8 rd_NO_MD SYSFONT=latarcyrheb-sun16 crashkernel=128M  KEYBOARDTYPE=pc$
#       initrd /initramfs-2.6.32-573.7.1.el6.x86_64.img
#title CentOS (2.6.32-573.8.1.el6.x86_64)
#       root (hd0,0)
#       kernel /vmlinuz-2.6.32-573.8.1.el6.x86_64 ro root=UUID=325cc438-33a6-46ae-8f1a-443ebd77c70a rd_NO_LUKS rd_NO_LVM LANG=en_US.UTF-8 rd_NO_MD SYSFONT=latarcyrheb-sun16 crashkernel=128M  KEYBOARDTYPE=pc$
#       initrd /initramfs-2.6.32-573.8.1.el6.x86_64.img
#title CentOS (2.6.32-573.12.1.el6.x86_64)
#       root (hd0,0)
#       kernel /vmlinuz-2.6.32-573.12.1.el6.x86_64 ro root=UUID=325cc438-33a6-46ae-8f1a-443ebd77c70a rd_NO_LUKS rd_NO_LVM LANG=en_US.UTF-8 rd_NO_MD SYSFONT=latarcyrheb-sun16 crashkernel=128M  KEYBOARDTYPE=p$
#       initrd /initramfs-2.6.32-573.12.1.el6.x86_64.img
#title CentOS (2.6.32-573.18.1.el6.x86_64)
#       root (hd0,0)
#       kernel /vmlinuz-2.6.32-573.18.1.el6.x86_64 ro root=UUID=325cc438-33a6-46ae-8f1a-443ebd77c70a rd_NO_LUKS rd_NO_LVM LANG=en_US.UTF-8 rd_NO_MD SYSFONT=latarcyrheb-sun16 crashkernel=128M  KEYBOARDTYPE=p$
#       initrd /initramfs-2.6.32-573.18.1.el6.x86_64.img
title CentOS (2.6.32-573.3.1.el6.x86_64)
        root (hd0,0)
        kernel /vmlinuz-2.6.32-573.3.1.el6.x86_64 ro root=UUID=325cc438-33a6-46ae-8f1a-443ebd77c70a rd_NO_LUKS rd_NO_LVM LANG=en_US.UTF-8 rd_NO_MD SYSFONT=latarcyrheb-sun16 crashkernel=128M  KEYBOARDTYPE=pc$
        initrd /initramfs-2.6.32-573.3.1.el6.x86_64.img
title CentOS (2.6.32-573.1.1.el6.x86_64)
        root (hd0,0)
        kernel /vmlinuz-2.6.32-573.1.1.el6.x86_64 ro root=UUID=325cc438-33a6-46ae-8f1a-443ebd77c70a rd_NO_LUKS rd_NO_LVM LANG=en_US.UTF-8 rd_NO_MD SYSFONT=latarcyrheb-sun16 crashkernel=128M  KEYBOARDTYPE=pc$
        initrd /initramfs-2.6.32-573.1.1.el6.x86_64.img
title CentOS (2.6.32-504.30.3.el6.x86_64)
        root (hd0,0)
        kernel /vmlinuz-2.6.32-504.30.3.el6.x86_64 ro root=UUID=325cc438-33a6-46ae-8f1a-443ebd77c70a rd_NO_LUKS rd_NO_LVM LANG=en_US.UTF-8 rd_NO_MD SYSFONT=latarcyrheb-sun16 crashkernel=128M  KEYBOARDTYPE=p$
        initrd /initramfs-2.6.32-504.30.3.el6.x86_64.img

Do not bother to remove the ZFS libraries and reinstall them again. It won’t work and it will make you system only more messy.

That’s it! Hope this tutorial saves you from heart attack.

–Derrick

Our sponsors: