Why I Downgraded from AlmaLinux 10 x86_64_v2 to AlmaLinux 9

Recently, I installed AlmaLinux 10 x86_64_v2 on several servers, hoping it would breathe new life into my older hardware (purchased between 2010 and 2015). After a few days of testing, however, I decided to revert back to AlmaLinux 9. In this post, I’ll explain the reasons behind this decision.

The Challenge with RHEL 10 and Older CPUs

Starting with RHEL 10, Red Hat dropped support for older CPUs—specifically, those that don’t meet the x86_64_v3 instruction set requirements. This means that standard RHEL 10 (and derivatives like Rocky Linux) won’t run on many pre-2015 processors. AlmaLinux addressed this by releasing a special x86_64_v2 build, targeting older CPUs and giving them a new lease on life. I was optimistic that this would keep my perfectly functional servers out of the recycling bin.

How AlmaLinux 10 x86_64_v2 Works

Linux distributions are built from source code, with the kernel and applications compiled for specific CPU architectures. The standard RHEL 10 and Rocky Linux 10 use x86_64_v3+ compiler flags, while AlmaLinux 10 x86_64_v2 uses x86_64_v2+ flags, making it compatible with older CPUs.

To make this version usable, AlmaLinux provides its own set of repositories (Base, Extra, CRB, etc.) compiled for x86_64_v2. However, as of December 2025, AlmaLinux is the only major provider offering RHEL 10 x86_64_v2 repositories. Popular third-party repositories like ELRepo, RPM Fusion, Remi do not support x86_64_v2, which severely limits the available software.

The Dealbreaker: Limited Third-Party Support

The main issue I encountered was the lack of third-party repository support for x86_64_v2. Essential packages like ZFS, PHP (Remi PHP), Redis, MariaDB (their official repo) and many others are simply unavailable unless you’re willing to compile them from source. Some applications are working like handicap mode, such as Firefox, VLC because the required 3rd party plugins are not available (e.g., H264 library, from RPM Fusion). While I appreciate AlmaLinux’s effort to support older hardware, the ecosystem just isn’t there yet. If most third-party repositories don’t plan to support x86_64_v2, this version isn’t practical for my needs.

Which Version Should You Use?

Choose AlmaLinux 10 x86_64_v2 if you:

  • Only need applications from the AlmaLinux repositories
  • Don’t mind compiling software and drivers from source
  • Want the latest packages (e.g., kernel 6.12, gcc 14.3, OpenSSH 9.9)
  • Prefer a longer support lifecycle (EOL: 2030)

Stick with AlmaLinux 9 if you:

  • Rely on third-party repositories (e.g., ZFS, PHP 8.4, MariaDB 11, Redis 8.4)
  • Prefer not to compile software yourself
  • Are okay with older packages (e.g., kernel 5.14, gcc 11.5, OpenSSH 8.7)
  • Can accept a shorter support window (EOL: 2027)

In summary, while AlmaLinux 10 x86_64_v2 is a great initiative for legacy hardware, its limited third-party support makes AlmaLinux 9 the more practical choice for now—at least for those who depend on a broader software ecosystem.

Our sponsors:

How to Install Realtek 2.5G Ethernet driver r8125 on RHEL7

I am going to show you how to install TP-Link 2.5GB PCIe Network Card (TX201) in CentOS 7.

There are few methods. The first method is to compile the driver from the Realtek website. If you want to try it, don’t be fooled by the file name (r8125-9.016.01.tar.tgz). It is in bzip2 format. Also, good luck to compile from the source as it not compilable with the gcc installed in RHEL7.

Here are some errors if you are interested:

CC:  cc
CCVERSION:  4.8.5
KERNEL_GCC_VERSION:  4.8.5
KVER:  3.10.0-1160.119.1.el7.x86_64
KMAJ:  3
KMIN:  10
KREV:  0
BASEDIR:  /lib/modules/3.10.0-1160.119.1.el7.x86_64
DRIVERDIR:  /lib/modules/3.10.0-1160.119.1.el7.x86_64/kernel/drivers/net/ethernet/realtek
PWD:  /tmp/r8125/r8125-9.016.01/src
RTKDIR:  kernel/drivers/net/ethernet/realtek

make -C /lib/modules/3.10.0-1160.119.1.el7.x86_64/build M=/tmp/r8125/r8125-9.016.01/src clean
make[1]: Entering directory `/usr/src/kernels/3.10.0-1160.119.1.el7.x86_64'
  CLEAN   /tmp/r8125/r8125-9.016.01/src/.tmp_versions
make[1]: Leaving directory `/usr/src/kernels/3.10.0-1160.119.1.el7.x86_64'
make -C /lib/modules/3.10.0-1160.119.1.el7.x86_64/build M=/tmp/r8125/r8125-9.016.01/src modules
make[1]: Entering directory `/usr/src/kernels/3.10.0-1160.119.1.el7.x86_64'
  CC [M]  /tmp/r8125/r8125-9.016.01/src/r8125_n.o
In file included from /tmp/r8125/r8125-9.016.01/src/r8125_n.c:87:0:
/tmp/r8125/r8125-9.016.01/src/r8125.h:130:9: error: static declaration of ‘strscpy’ follows non-static declaration
 ssize_t strscpy(char *dest, const char *src, size_t count)
         ^
In file included from include/linux/bitmap.h:8:0,
                 from include/linux/cpumask.h:11,
                 from ./arch/x86/include/asm/cpumask.h:4,
                 from ./arch/x86/include/asm/msr.h:10,
                 from ./arch/x86/include/asm/processor.h:20,
                 from ./arch/x86/include/asm/cpufeature.h:7,
                 from ./arch/x86/include/asm/thread_info.h:22,
                 from include/linux/thread_info.h:66,
                 from include/linux/preempt.h:9,
                 from include/linux/spinlock.h:50,
                 from include/linux/seqlock.h:35,
                 from include/linux/time.h:5,
                 from include/linux/stat.h:18,
                 from include/linux/module.h:10,
                 from /tmp/r8125/r8125-9.016.01/src/r8125_n.c:39:
include/linux/string.h:31:9: note: previous declaration of ‘strscpy’ was here
 ssize_t strscpy(char *, const char *, size_t);
         ^
In file included from /tmp/r8125/r8125-9.016.01/src/r8125_n.c:87:0:
/tmp/r8125/r8125-9.016.01/src/r8125.h:157:30: error: redefinition of ‘skb_checksum_start’
 static inline unsigned char *skb_checksum_start(const struct sk_buff *skb)
                              ^
In file included from include/linux/if_ether.h:23:0,
                 from include/uapi/linux/ethtool.h:18,
                 from include/linux/ethtool.h:17,
                 from include/linux/netdevice.h:43,
                 from /tmp/r8125/r8125-9.016.01/src/r8125_n.c:42:
include/linux/skbuff.h:2347:30: note: previous definition of ‘skb_checksum_start’ was here
 static inline unsigned char *skb_checksum_start(const struct sk_buff *skb)
                              ^
In file included from /tmp/r8125/r8125-9.016.01/src/r8125_n.c:87:0:
/tmp/r8125/r8125-9.016.01/src/r8125.h:209:20: error: redefinition of ‘page_is_pfmemalloc’
 static inline bool page_is_pfmemalloc(struct page *page)
                    ^
In file included from ./arch/x86/include/asm/pci.h:4:0,
                 from include/linux/pci.h:1644,
                 from /tmp/r8125/r8125-9.016.01/src/r8125_n.c:41:
include/linux/mm.h:1161:20: note: previous definition of ‘page_is_pfmemalloc’ was here
 static inline bool page_is_pfmemalloc(struct page *page)
                    ^
In file included from /tmp/r8125/r8125-9.016.01/src/r8125_n.c:87:0:
/tmp/r8125/r8125-9.016.01/src/r8125.h:255:20: error: redefinition of ‘ether_addr_copy’
 static inline void ether_addr_copy(u8 *dst, const u8 *src)
                    ^
In file included from /tmp/r8125/r8125-9.016.01/src/r8125_n.c:43:0:
include/linux/etherdevice.h:246:20: note: previous definition of ‘ether_addr_copy’ was here
 static inline void ether_addr_copy(u8 *dst, const u8 *src)
                    ^
/tmp/r8125/r8125-9.016.01/src/r8125_n.c:16851:12: error: static declaration of ‘pci_enable_msix_range’ follows non-static declaration
 static int pci_enable_msix_range(struct pci_dev *dev, struct msix_entry *entries,
            ^
In file included from /tmp/r8125/r8125-9.016.01/src/r8125_n.c:41:0:
include/linux/pci.h:1336:5: note: previous declaration of ‘pci_enable_msix_range’ was here
 int pci_enable_msix_range(struct pci_dev *dev, struct msix_entry *entries,
     ^
/tmp/r8125/r8125-9.016.01/src/r8125_n.c:17066:9: error: unknown field ‘ndo_change_mtu’ specified in initializer
         .ndo_change_mtu     = rtl8125_change_mtu,
         ^
/tmp/r8125/r8125-9.016.01/src/r8125_n.c:17066:9: warning: missing braces around initializer [-Wmissing-braces]
/tmp/r8125/r8125-9.016.01/src/r8125_n.c:17066:9: warning: (near initialization for ‘rtl8125_netdev_ops.’) [-Wmissing-braces]
/tmp/r8125/r8125-9.016.01/src/r8125_n.c:17066:9: warning: initialization from incompatible pointer type [enabled by default]
/tmp/r8125/r8125-9.016.01/src/r8125_n.c:17066:9: warning: (near initialization for ‘rtl8125_netdev_ops..ndo_get_stats64’) [enabled by default]
/tmp/r8125/r8125-9.016.01/src/r8125_n.c: In function ‘rtl8125_rx_interrupt’:
/tmp/r8125/r8125-9.016.01/src/r8125_n.c:20713:20: error: ‘struct net_device’ has no member named ‘last_rx’
                 dev->last_rx = jiffies;
                    ^
make[2]: *** [/tmp/r8125/r8125-9.016.01/src/r8125_n.o] Error 1
make[1]: *** [_module_/tmp/r8125/r8125-9.016.01/src] Error 2
make[1]: Leaving directory `/usr/src/kernels/3.10.0-1160.119.1.el7.x86_64'
make: *** [modules] Error 2

The second method is here:

First, download the compiled driver from here. There are multiple versions, I suggest to pick the latest version (e.g., kmod-r8125-9.013.02-1.el7_9.elrepo.x86_64.rpm)

#wget ftp://ftp.icm.edu.pl/vol/rzm5/linux-elrepo/archive/elrepo/el7/x86_64/RPMS/kmod-r8125-9.013.02-1.el7_9.elrepo.x86_64.rpm
#sudo yum install kmod-r8125-9.013.02-1.el7_9.elrepo.x86_64.rpm

After that, verify the driver has been installed:

#kmod list | grep r8125
r8125                 208216  0

To load the driver, run the following:

#sudo modprobe r8125

To verify the driver is loaded:

#ifconfig
p4p1: flags=4163  mtu 1500
        inet 192.168.1.123  netmask 255.255.255.0  broadcast 192.168.1.255
        inet6 fe80::8e78:31b7:7130:f1e9  prefixlen 64  scopeid 0x20
        ether 00:11:22:33:44:55  txqueuelen 1000  (Ethernet)

Verify the speed is correct:

ethtool p4p1 | grep Speed
Cannot get wake-on-lan settings: Operation not permitted
        Speed: 2500Mb/s

That’s it, hope it helps.

Our sponsors:

HighPoint RocketRAID 2640X4SGL, 2720 and Rocky Linux 9

Recently, I discovered that Rocky Linux 9 has removed support for the HighPoint RocketRAID 2640X4SGL 4-Channel PCI-Express x4 SAS 3Gb/s RAID Controller and RocketRAID 2720A 8-Channel 6Gb/s SAS/SATA RAID Controller from the default Linux kernel. Unfortunately, the official drivers from HighPoint no longer compile on these newer distributions. Since my RAID card is still functioning perfectly, I saw no reason to replace it just because of
missing drivers. If you’re in the same situation, here’s how you can get your controller working again:

Visit the following URLs:

Find your OS version:

cat /etc/redhat-release

Download the dd-mvsas.iso for your version:

#For Rocky Linux 9.7:
wget https://elrepo.org/linux/dud/el9/x86_64/dd-mvsas-0.8.16-10.el9_7.elrepo.iso

Once you’ve downloaded the ISO file, mount it and install the RPM package inside:

# Mount the ISO
sudo mount dd-mvsas-0.8.16-10.el9_7.elrepo.iso /mnt/

# Navigate to the RPM directory
cd /mnt/rpms/x86_64

# Install the driver package
sudo rpm -i kmod-mvsas-0.8.16-10.el9_7.elrepo.x86_64.rpm

# Reboot your system
sudo reboot

That’s it! Your HighPoint RocketRAID 2640X4SGL / 2720A controller should now be recognized and working as expected. I hope this helps anyone facing the same issue. Let me know if you have any questions or run into any issues!

Our sponsors:

XRDP: error-problem connecting

Every once a while, I experience problem to connecting to my Linux servers via Windows Remote Desktop. This is a very annoying issue, because all servers use the same configurations, and some servers throw error while some servers are doing okay. After spending countless of hours, here are my solutions:

  • Add delay_ms=2000 to /etc/xrdp/xrdp.ini
  • Remove and rebuild the user’s home directory
  • Set the color depth of Windows Remote Desktop Client to 24

For the first solution, it is pretty straight forward:

sudo nano /etc/xrdp/xrdp.ini
delay_ms=2000

sudo systemctl restart xrdp.service; 

For the second solution, I cloned my home directory and delete all other hidden files, e.g.,

sudo su

#Make a copy first
rsync -avr /home/myuser/ /home/myuser_old/

Then I deleted most of the files such as .vnc/, .Xauthority/, .xsession-errors/. Here are the files I started with:

drwx------  19 myuser myuser 4096 Apr  9 10:12 .
drwxr-xr-x.  5 root      root        59 Apr  9 09:26 ..
-rw-------   1 myuser myuser 7409 Apr  9 09:26 .bash_history
-rw-r--r--   1 myuser myuser   18 Oct 30  2018 .bash_logout
-rw-r--r--   1 myuser myuser  193 Oct 30  2018 .bash_profile
-rw-r--r--   1 myuser myuser  231 Oct 30  2018 .bashrc
drwx------   2 myuser myuser   25 May 11  2022 .ssh

After I successfully logged in via xRDP, the system generated all of these files:

drwx------  19 myuser myuser 4096 Apr  9 10:12 .
drwxr-xr-x.  5 root      root        59 Apr  9 09:26 ..
-rw-------   1 myuser myuser 7409 Apr  9 09:26 .bash_history
-rw-r--r--   1 myuser myuser   18 Oct 30  2018 .bash_logout
-rw-r--r--   1 myuser myuser  193 Oct 30  2018 .bash_profile
-rw-r--r--   1 myuser myuser  231 Oct 30  2018 .bashrc
drwx------  16 myuser myuser 4096 Apr  9 10:05 .cache
drwxrwxr-x  15 myuser myuser  279 Apr  9 09:29 .config
drwx------   3 myuser myuser   25 Apr  9 09:27 .dbus
drwxr-xr-x   2 myuser myuser    6 Apr  9 09:27 Desktop
drwxr-xr-x   2 myuser myuser    6 Apr  9 09:27 Documents
drwxr-xr-x   2 myuser myuser    6 Apr  9 09:27 Downloads
dr-x------   2 myuser myuser    0 Apr  9 09:27 .gvfs
-rw-------   1 myuser myuser 1252 Apr  9 10:05 .ICEauthority
drwx------   3 myuser myuser   19 Apr  9 09:27 .local
drwxr-xr-x   2 myuser myuser    6 Apr  9 09:27 Music
drwxrwxr-x   2 myuser myuser    6 Apr  9 09:27 perl5
drwxr-xr-x   2 myuser myuser    6 Apr  9 09:27 Pictures
drwxr-xr-x   2 myuser myuser    6 Apr  9 09:27 Public
drwx------   2 myuser myuser   25 May 11  2022 .ssh
drwxr-xr-x   2 myuser myuser    6 Apr  9 09:27 Templates
drwxr-xr-t   2 myuser myuser    6 Apr  9 09:27 thinclient_drives
drwxr-xr-x   2 myuser myuser    6 Apr  9 09:27 Videos
drwx------   2 myuser myuser  316 Apr  9 10:04 .vnc
-rw-------   1 myuser myuser  242 Apr  9 10:04 .Xauthority
-rw-------   1 myuser myuser    0 Apr  9 10:04 .xsession-errors

That’s it, hope it helps.

Our sponsors:

Google One VPN: How to by pass VPN in Windows

Recently I started using the Google One VPN service. I love it because of its simplicity. However, I quickly ran into problem because some services require my real IP addresses. Since the Google One VPN is designed for average Joe, it doesn’t have any advanced features. It is either all or nothing. Therefore I came up a way to solve this problem.

My goal is pretty simple. I want to enable/disable the VPN based on the application. For example, I want to disable VPN for my SSH client, my Remote Desktop, Portable Firefox, while I want to enable VPN for my another Portable Firefox and Google Chrome. My solution is pretty simple. I did this by creating a brunch of ports via SSH tunneling.

By default, Google One VPN routes most of traffics to the VPN based on the IP address you visit, with few exceptions, such as those on your local network (e.g., 192.168.1.X), or your own computer (e.g., 127.0.0.1). I realized that I can use this trick to achieve my goal. Of course, you will need another Linux/Mac/BSD computer or any server that support SSH to do it.

Goal #1: Using my real (home) IP address

In this case, my goal is very simple. I want to access certain websites using my real IP address. Here is the theory:

  • I make a SSH connection to my local Linux box.
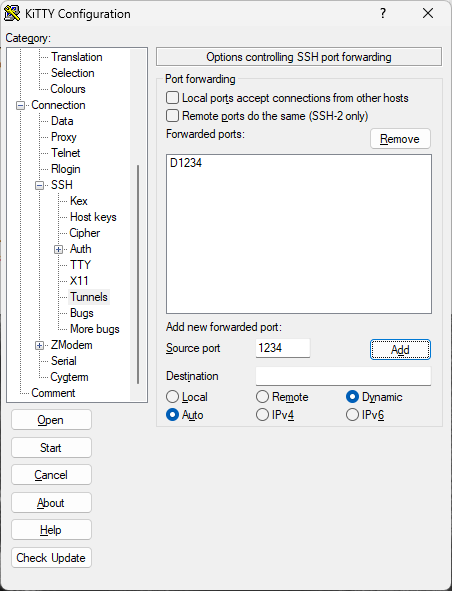
  • I create a SSH tunnel, e.g., port 1234
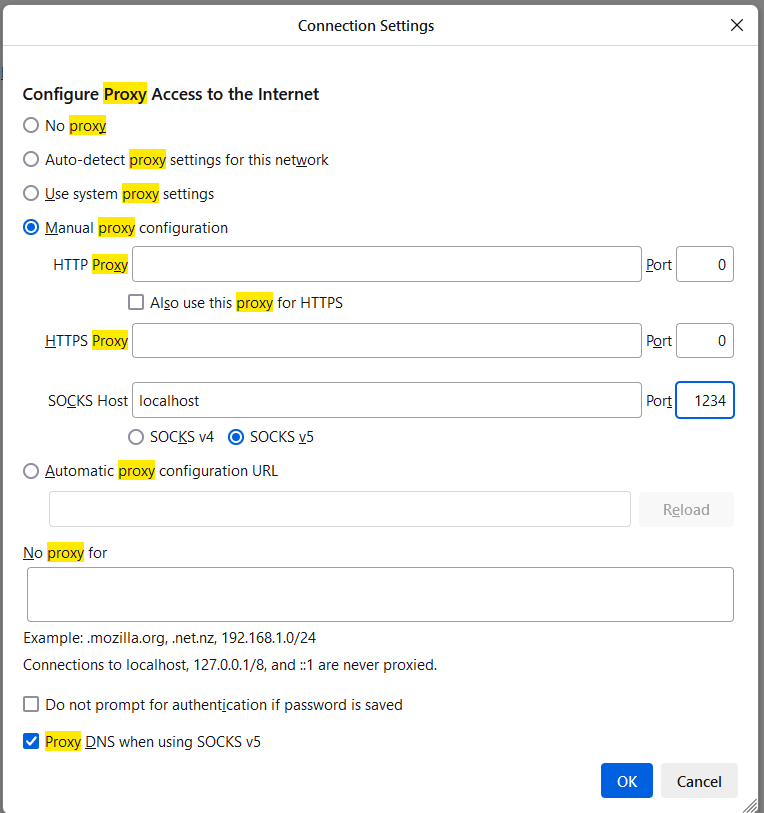
  • For my application, I turn on the proxy option and route the traffic through that port, e.g., localhost:1234


Goal #2: Using my work IP address

In this case, I will need to SSH to my office front end server first. Then I create a number of SSH tunnels to connect to the devices/services in my work intranet. Notice that my office front end server has IP address restriction. It only allows certain IP addresses to make the connection. If I try to SSH to the server with my VPN IP address, it will be blocked. Even if I try to make the SSH connection before running the VPN software, my SSH connection will be disconnected after I turn on the VPN software. My solution is pretty simple. I route the traffic through my local Linux box.

Suppose I need to connect to my office workstation. Previously, I connected to the front end server first (e.g., 123.123.123.1). I created two SSH tunnels, one for my Firefox to consume, so that I can access certain website using my office IP address, another one to access my office workstation (e.g., 10.0.0.101) via Remote Desktop.

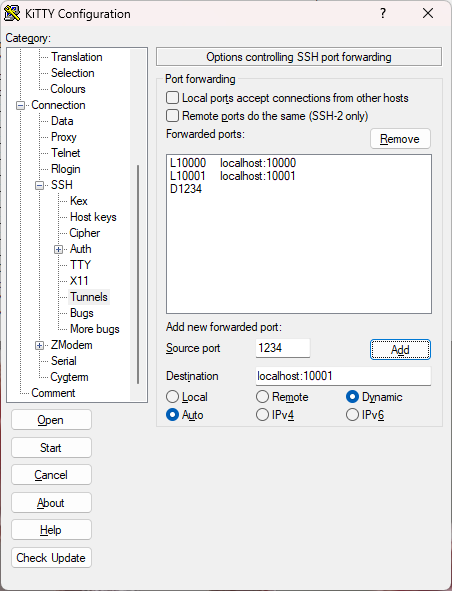
The idea is pretty simple. When I SSH to my Linux box on my local server, I create two ports in my SSH client (e.g., Putty). Here is my setup. Notice that I create two ports: 10001 and 10002. These create two ports on my Windows computer. Putty will forward the traffic to my Linux box. To keep things simple, I use the same port number, e.g., port 10001 on my Windows points to the port 10001 on my Linux box.

Once I connect to my local Linux box, I run the following commands.

#This will create a tunnel for the web browser to consume, i.e., browsing the website using office IP address.
#10001: The port created on the Linux box.
#123.123.123.1: The IP of my office front end server.
#This assumes that I can SSH to my office front end server using keys (no password)
nohup ssh -C -D 10001 123.123.123.1 -N > /dev/null &
#This will create a tunnel for the Remote Desktop to consume, i.e., I can connect to my office workstation.
#10002: The port created on the Linux box.
#10.0.0.101: The local IP of my office workstation
#3389: The port of my office workstation
#123.123.123.1: The IP of my office front end server.
#This assumes that I can SSH to my office front end server using keys (no password)
nohup ssh -C -L 10002:10.0.0.101:3389 123.123.123.1 -N > /dev/null &

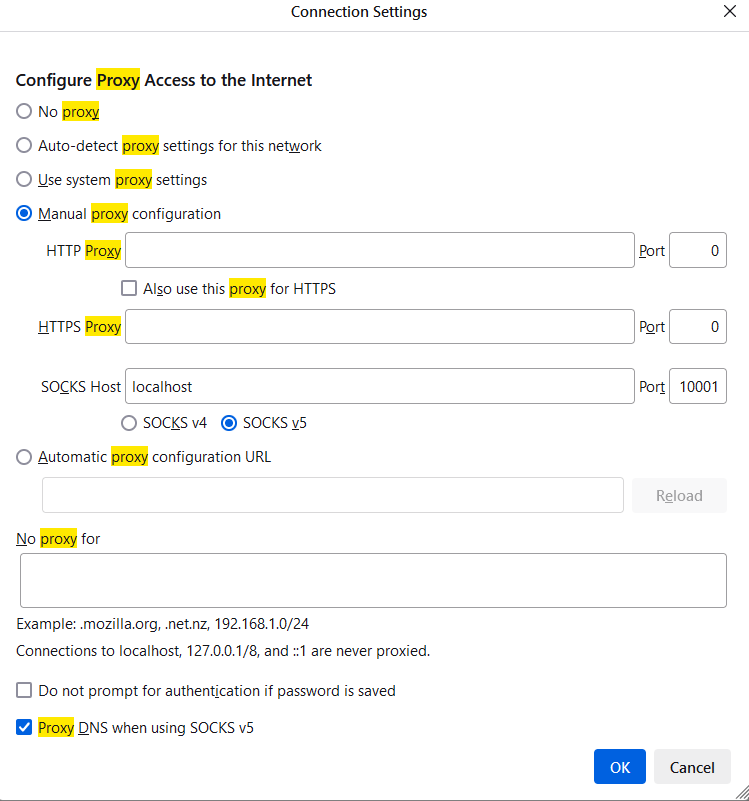
Here is my proxy settings of my Portable Firefox

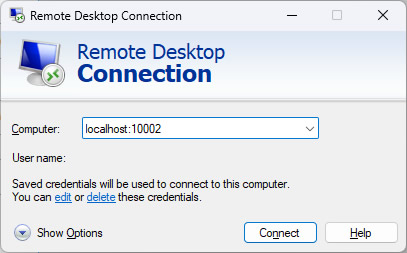
When I connect to my office workstation, I can do the following:

That’s it, have fun with your VPN.

Our sponsors:

[Wyze]How to control a lamp socket with a physical button

I wanted to install a Wyze camera outside my house. The location do not have any standard 120V outlet, so I ended up connecting a Wyze v3 camera via a Wyze lamp socket. This solveed the power problem of my camera, but it created another problem. My light was either always ON or always OFF. Since I had to keep the power always available for the camera, I had to keep the switch in an ON position all the time. Although I can control the lamp socket via the Wyze app, I think there must be an easy way to solve this problem, just like how I control the light before setting this up.

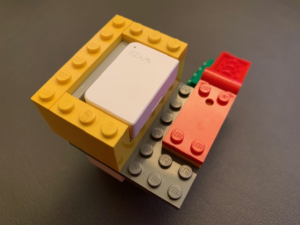
My idea is pretty simple. I have some older Wyze v2 camera laying around. I also have a door sensor and a Wyze accessory bridge available. I can turn these into a physical switch with some help using LEGO.

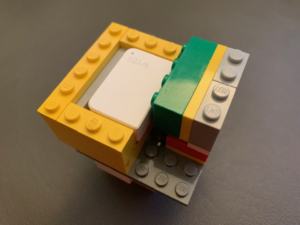
The door sensor has two parts. The circuit / sensor and the magnet. If the sensor measures the strength of the magnetic fields, if it is high (i.e., the magnet is attached, like the door is closed), then it emits a signal to the bridge sensor. If the value is low (i.e., the magnet is not attached, like door is opened), and it emits another sign to to tell the bridge sensor. We can build a LEGO physical button. Here is my setup:

Wyze Switch for Lamp Socket using LEGO

It houses a Wyze door sensor

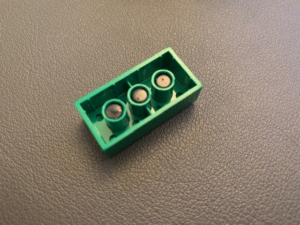
The green block is used as a magnet

The green block has three magnets

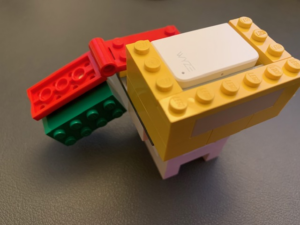
This is how the switch is opened.

This is how the switch is opened.

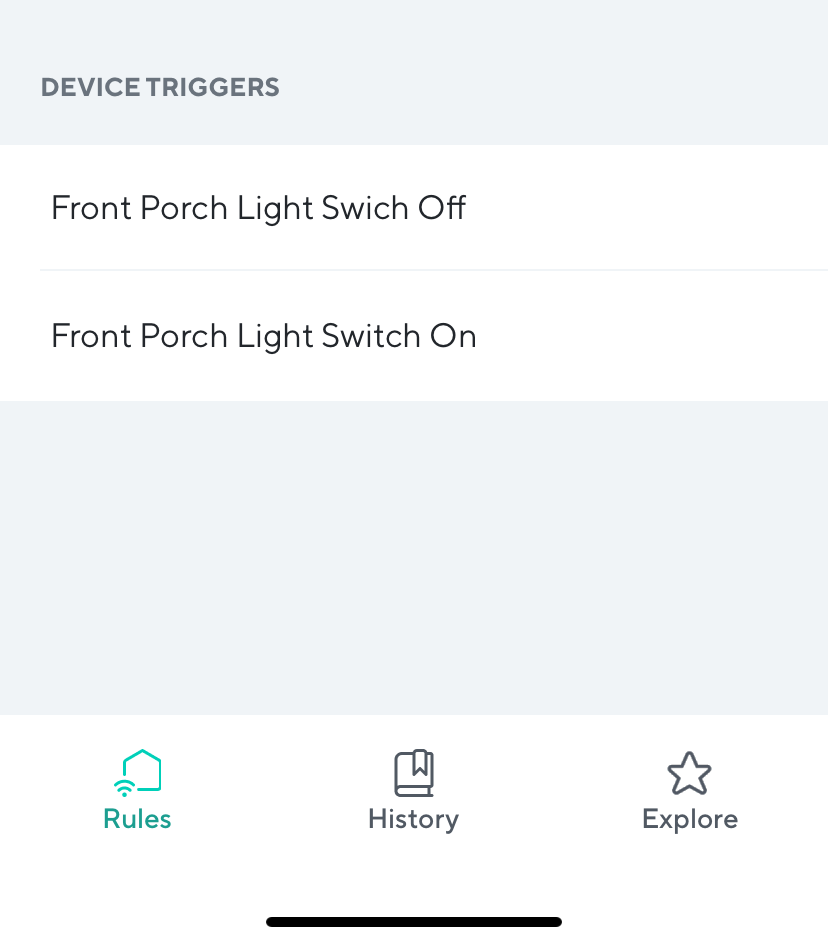
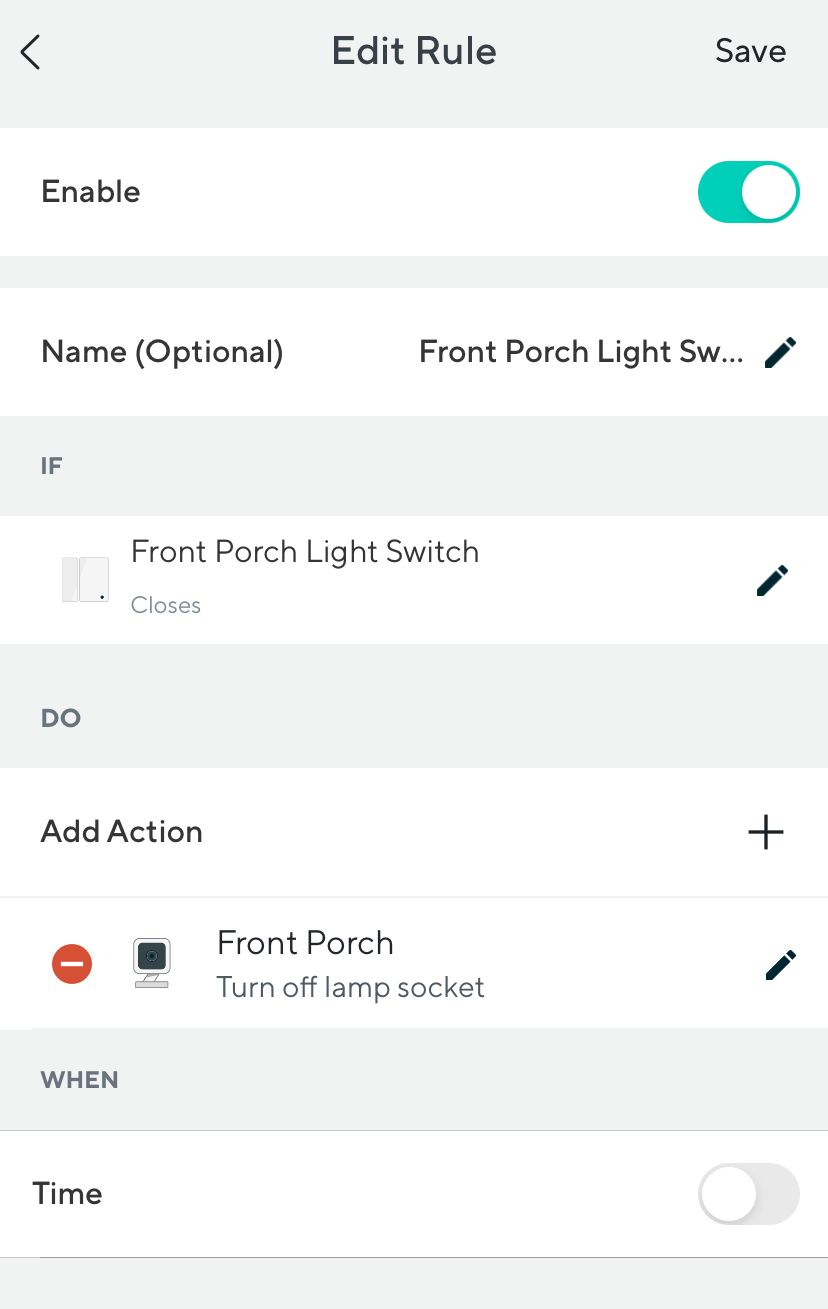
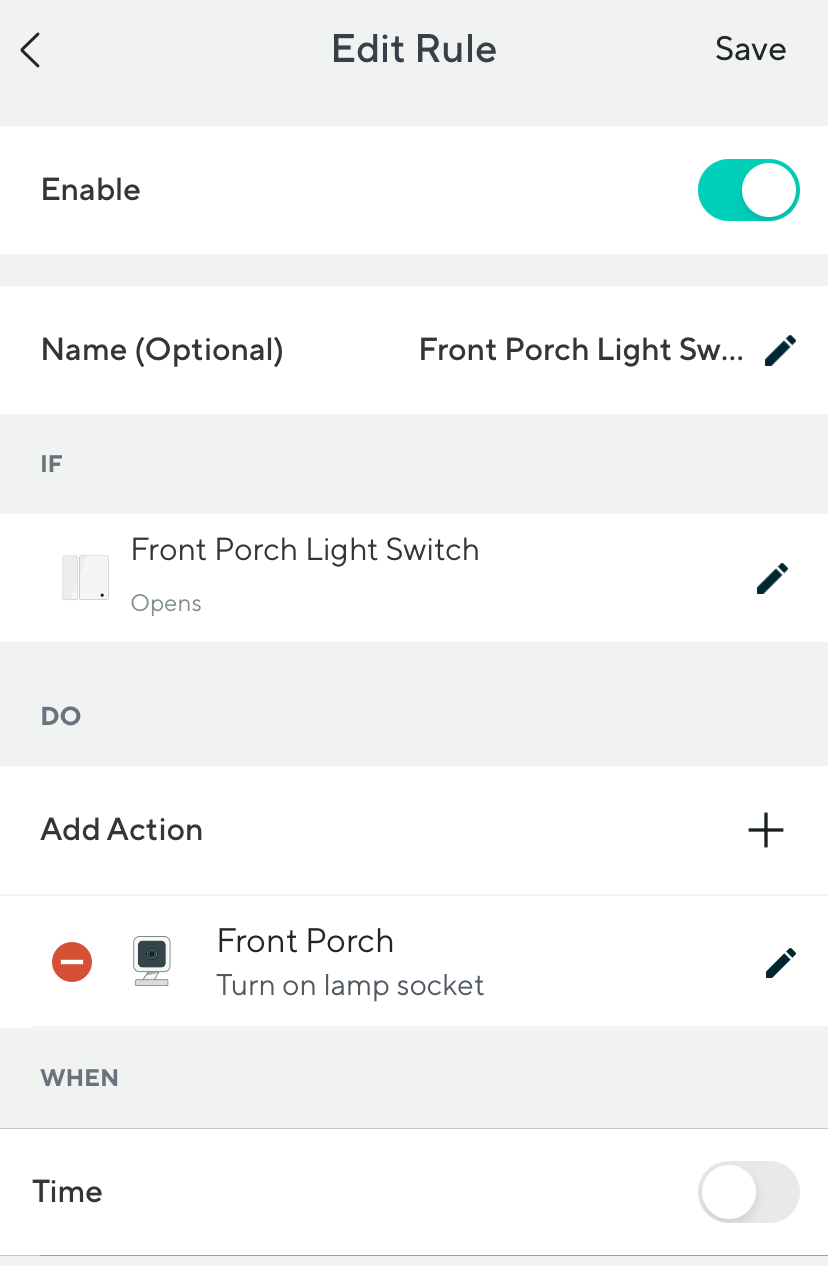
Here are the software part:

That’s it. Have fun.

Our sponsors:

[Amazon Athena][ErrorCode: INTERNAL_ERROR_QUERY_ENGINE] Amazon Athena experienced an internal error while executing this query. Please contact AWS support for further assistance. You will not be charged for this query. We apologize for the inconvenience.

In the past couple months, I was developing an application that uses Amazon Athena. Amazon Athena is basically their own version of MariaDB ColumnStore, which is more integrated with their own infrastructures. Long story short, it is Amazon’s own MySQL database for big data engine. While I was checking out its new features, I tried some simple queries such as SELECT count(*) from my_table, and it throws out the following error:

Here is the error message:

[ErrorCode: INTERNAL_ERROR_QUERY_ENGINE] Amazon Athena experienced an internal error while executing this query. Please contact AWS support for further assistance. You will not be charged for this query. We apologize for the inconvenience.

Obviously, the error message didn’t tell much about what was the problem.

Here is my input:

$athenaClient->startQueryExecution(
		array(
			'QueryExecutionContext' => array(
				'Catalog' 	=> 'AwsDataCatalog',
        		        'Database' 	=> 'my_database',
			),
			'QueryString' => 'SELECT * FROM "my_database"."my_table" limit 10;',

			'ResultConfiguration' => array(
				'OutputLocation' => 'S3://s3bucket/my_folder/', 
			),
			'WorkGroup' => 'primary',
			
		)

Here is my output:

$athenaClient->GetQueryResults()

[Status] => Array
                (
                    [State] => FAILED
                    [StateChangeReason] => [ErrorCode: INTERNAL_ERROR_QUERY_ENGINE] Amazon Athena experienced an internal error while executing this query. Please contact AWS support for further assistance. You will not be charged for this query. We apologize for the inconvenience.
                    [SubmissionDateTime] => Aws\Api\DateTimeResult Object
                        (
                            [date] => 2022-11-24 15:51:13.344000
                            [timezone_type] => 3
                            [timezone] => UTC
                        )

                    [CompletionDateTime] => Aws\Api\DateTimeResult Object
                        (
                            [date] => 2022-11-24 15:51:14.488000
                            [timezone_type] => 3
                            [timezone] => UTC
                        )

                    [AthenaError] => Array
                        (
                            [ErrorCategory] => 1
                            [ErrorType] => 401
                            [Retryable] => 
                            [ErrorMessage] => [ErrorCode: INTERNAL_ERROR_QUERY_ENGINE] Amazon Athena experienced an internal error while executing this query. Please contact AWS support for further assistance. You will not be charged for this query. We apologize for the inconvenience.
                        )

                )


So what was the problem? The problem had nothing to do with the query. Instead, it was my S3 bucket URL. The protocol of the URL needed to be in lower case, i.e., s3://, not S3://. After I changed it to lower case, everything worked fine.

Our sponsors:

Apple M1 Chip CPU and GPU Benchmark Results

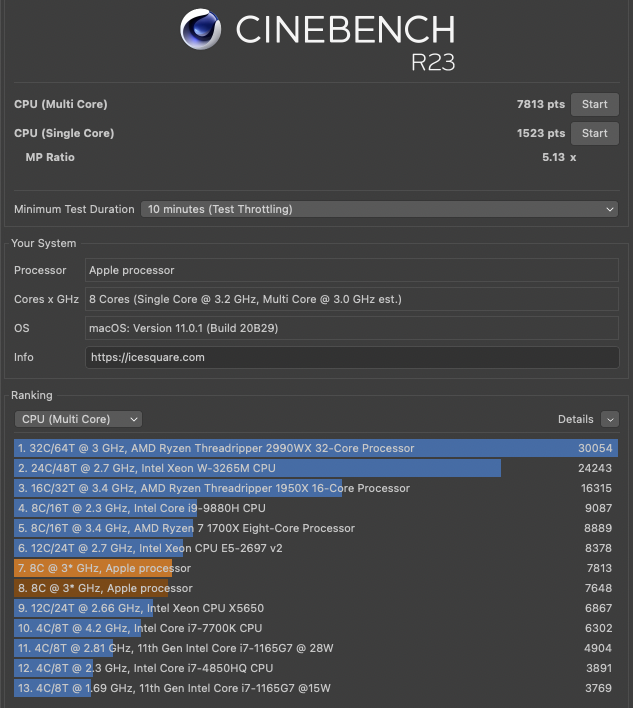
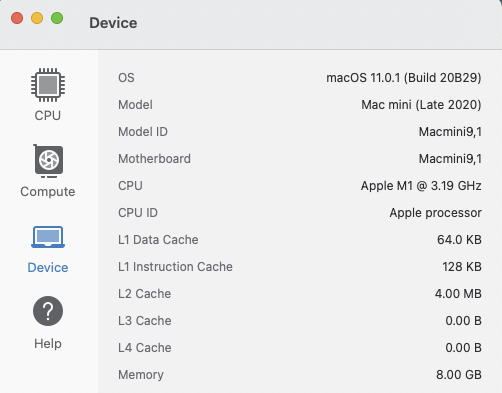
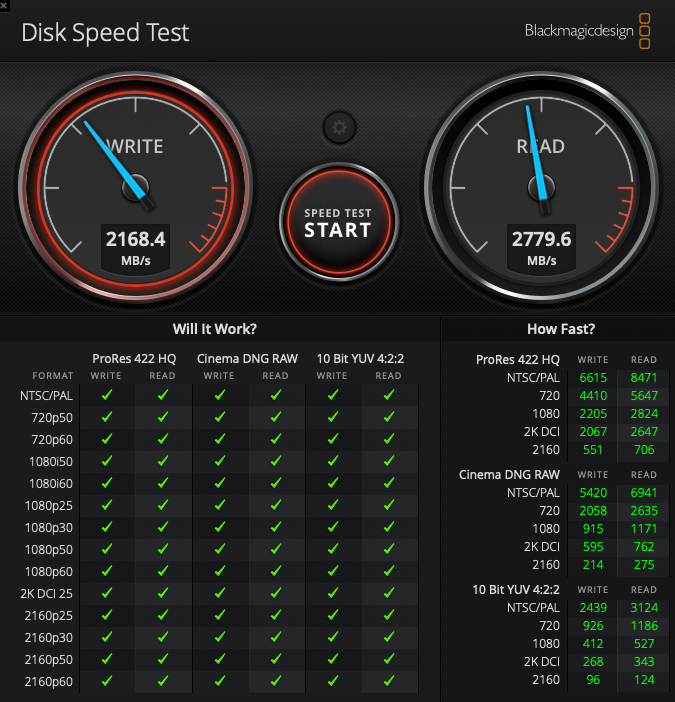
I received my 2020 mac mini today (US$ 699). Since this is the first product with Apple M1 chip CPU, I am curious to find out its performance. I ran some tests using benchmark apps including Blackmagic and Cinebench.

This Apple M1 chip is 8 cores and 8 threads. FYI, Apple said it has 25000 concurrent threads, it means the CPU can execute 25k jobs at the same time. Its like a kitchen with 8 chefs working on 25k orders. It doesn’t mean there are 25k chefs in the kitchen.

Here are the specification of this CPU (Source):

  • 8-core CPU with 4 performance cores and 4 efficiency cores
  • 8-core GPU (A nVidia GPU such as the one in GeForce RTX 2060 has 1920 cores)
  • 16-core Neural Engine

Testing Multi Core Performance of Apple M1 Chip Using Cinebench R23


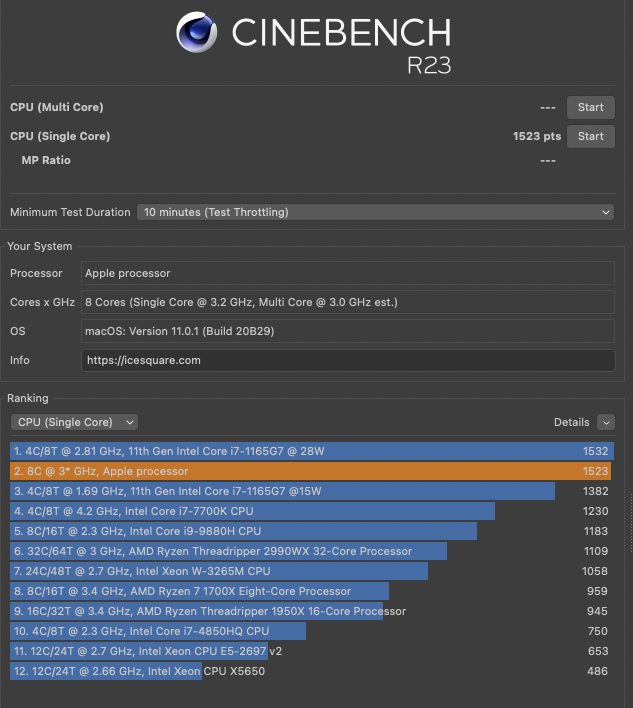
Testing Single Core Performance of Apple M1 Chip Using Cinebench R23


Testing CPU and GPU Performance of Apple M1 Chip Using GeekBench 5

Results:


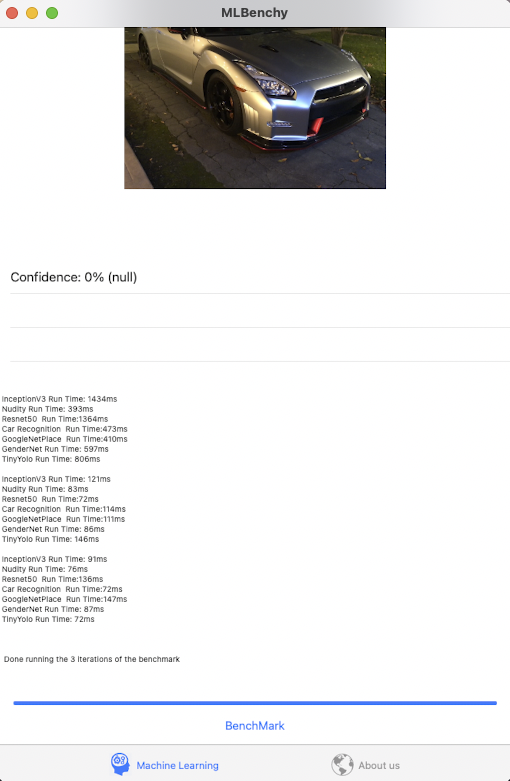
Testing Machine Learning Performance Using MLBenchy

Here is the result:

InceptionV3 Run Time: 1434ms
Nudity Run Time: 393ms
Resnet50  Run Time:1364ms
Car Recognition  Run Time:473ms
GoogleNetPlace  Run Time:410ms
GenderNet Run Time: 597ms
TinyYolo Run Time: 806ms

InceptionV3 Run Time: 121ms
Nudity Run Time: 83ms
Resnet50  Run Time:72ms
Car Recognition  Run Time:114ms
GoogleNetPlace  Run Time:111ms
GenderNet Run Time: 86ms
TinyYolo Run Time: 146ms

InceptionV3 Run Time: 91ms
Nudity Run Time: 76ms
Resnet50  Run Time:136ms
Car Recognition  Run Time:72ms
GoogleNetPlace  Run Time:147ms
GenderNet Run Time: 87ms
TinyYolo Run Time: 72ms


Done running the 3 iterations of the benchmark 

And finally, if you are curious about the SSD performance of the mac mini…

Testing Disk Performance of Mac Mini SSD Using Blackmagic Speed Test

I am quite surprise about its overall performance. The single core performance of Apple M1 chip is better than Intel i9-9880 and i7-1165. It will be quite useful if I need to perform some non-parallel computations. The multiple core performance of Apple M1 is quite impressive too. If you take a look to the result, you will notice that most of the CPUs that have better scores have more cores and threads. I really don’t expect a $700 computer that can beat the CPU that costs a thousand dollars or more.

Our sponsors:

[ZFS]How to repair a ZFS pool if one device was damaged

Today, I accidentally dd’ed a disk which was part of an active ZFS pool on my test server. I dd’ed the first and the last 10 sectors of the disk. Technically I didn’t lose any data because my ZFS configuration was RAIDZ. However once I rebooted my computer, my ZFS complained:

#This is what I did:
sudo dd if=/dev/zero of=/dev/sda bs=512 count=10
sudo dd if=/dev/zero of=/dev/sda bs=512 seek=$(( $(blockdev --getsz /dev/sda) - 4096 )) count=1M
sudo zpool status
  pool: storage
 state: DEGRADED
status: One or more devices could not be used because the label is missing or
        invalid.  Sufficient replicas exist for the pool to continue
        functioning in a degraded state.
action: Replace the device using 'zpool replace'.
   see: http://zfsonlinux.org/msg/ZFS-8000-4J
  scan: resilvered 2.40T in 1 days 00:16:34 with 0 errors on Fri Nov 13 20:05:53 2020
config:

        NAME                                 STATE     READ WRITE CKSUM
        storage                              DEGRADED     0     0     0
          raidz1-0                           DEGRADED     0     0     0
            ata-ST4000DM000-1F2168_S30076XX  ONLINE       0     0     0
            ata-ST4000DX001-1CE168_Z3019CXX  ONLINE       0     0     0
            ata-ST4000DM000-2AE166_WDH0S9YY  ONLINE       0     0     0
            ata-ST4000DM000-2AE166_WDH0SXZZ  ONLINE       0     0     0
            ata-ST4000DM000-2AE166_WDH0SXDD  ONLINE       0     0     0
            412403026512446213               UNAVAIL      0     0     0  was /dev/disk/by-id/ata-ST4000NM0033-9ZM170                                                                                                                         _Z1Z3RR74-part1

So I checked the problematic device, and I see the problem:

ls /dev/disk/by-id/

#This is normal disk:
lrwxrwxrwx 1 root root  10 Nov 13 20:58 ata-ST4000DX001-1CE168_Z3019CXX-part1 -> ../../sdd1
lrwxrwxrwx 1 root root  10 Nov 13 20:58 ata-ST4000DX001-1CE168_Z3019CXX-part9 -> ../../sdd9


#This is the problematic disk, part1 and part9 are missing.
lrwxrwxrwx 1 root root   9 Nov 13 20:58 ata-ST4000NM0033-9ZM170_Z1Z3RR74 -> ../../sdf

It is pretty easy to fix this problem. All you need is to bring the device offline and bring it back.

#First, offline the problematic device:
sudo zpool offline storage 412403026512446213
sudo zpool status
  pool: storage
 state: DEGRADED
status: One or more devices could not be used because the label is missing or
        invalid.  Sufficient replicas exist for the pool to continue
        functioning in a degraded state.
action: Replace the device using 'zpool replace'.
   see: http://zfsonlinux.org/msg/ZFS-8000-4J
  scan: resilvered 2.40T in 1 days 00:16:34 with 0 errors on Fri Nov 13 20:05:53 2020
config:

        NAME                                 STATE     READ WRITE CKSUM
        storage                              DEGRADED     0     0     0
          raidz1-0                           DEGRADED     0     0     0
            ata-ST4000DM000-1F2168_S30076XX  ONLINE       0     0     0
            ata-ST4000DX001-1CE168_Z3019CXX  ONLINE       0     0     0
            ata-ST4000DM000-2AE166_WDH0S9YY  ONLINE       0     0     0
            ata-ST4000DM000-2AE166_WDH0SXZZ  ONLINE       0     0     0
            ata-ST4000DM000-2AE166_WDH0SXDD  ONLINE       0     0     0
            412403026512446213               OFFLINE      0     0     0
#Then bring back the device:
sudo zpool online ata-ST4000NM0033-9ZM170_Z1Z3RR74 

#Resilver it
sudo zpool scrub storage

sudo zpool status
  pool: storage
 state: ONLINE
  scan: resilvered 36K in 0 days 00:00:01 with 0 errors on Fri Nov 13 21:03:01 2020
config:

        NAME                                  STATE     READ WRITE CKSUM
        storage                               ONLINE       0     0     0
          raidz1-0                            ONLINE       0     0     0
            ata-ST4000DM000-1F2168_S30076XX   ONLINE       0     0     0
            ata-ST4000DX001-1CE168_Z3019CXX   ONLINE       0     0     0
            ata-ST4000DM000-2AE166_WDH0S9YY   ONLINE       0     0     0
            ata-ST4000DM000-2AE166_WDH0SXZZ   ONLINE       0     0     0
            ata-ST4000DM000-2AE166_WDH0SXDD   ONLINE       0     0     0
            ata-ST4000NM0033-9ZM170_Z1Z3RR74  ONLINE       0     0     0

errors: No known data errors

That’s it.

Our sponsors: