ZFS+USB: Building a Super Large Server Using USB Memory, CF Card and SD Card.

I got a lot of unused USB thumb drives, CF flash card and SD cards sitting in my drawer. The sizes range from 8MB to 8GB. Unlike few years ago, it is getting a lot easier to access to the Internet, so I no longer need to carry my data via memory device any more. Instead, I simply connect to the Internet and the data is with me. That’s why my USB thumb drivers / CF flash cards / SD cards have been sitting in my drawer for few years.

I got an idea one day. It would be a waste to let them sitting in my drawer (or waiting to be sent to landfill). Why not I use them to build a file server. At least I can test out whether the idea is doable or not. So here are the candidates:

  • USB Thumb drives

    1. 8GB x 2
    2. 1GB x 1
    3. 256MB x 2
  • CF Flash Card

    1. 2GB x 1
    2. 1GB x 1
    3. 512MB x 2
  • SD Card

    1. 4GB x 2

As you can see from my list, the size of each candidates varies from 256MB to 8GB. So it will be interesting to put them together and build a super large file server.

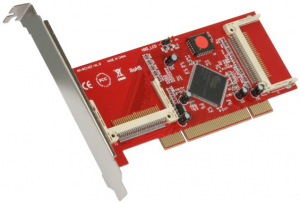
Most computer has multiple USB ports available. If you don’t have enough USB port, get a powered USB hub (i.e., the USB hub has it own power unit), it will be more efficient then getting the power from the computer. For the CF card, I use a SYBA SY-PCI48001 PCI to Compact Flash Adapter to connect my CF Flash cards to my computer. For the SD cards, I simply connect each of them to a Sandisk USB SD card reader.

Okay, let’s talk about the software. I am going to use ZFS to implement it, because it is quick and simple. First, connect all devices to your computer, and make sure that your operating systems can recognize all of them. In this tutorial, I am using FreeBSD as a tutorial. However, the idea should be the same in other ZFS ready system, such as Solaris.

Make sure that all USB devices are recognized by your operating system. In FreeBSD, the devices are registered as /dev/da* or /dev/ad*:

dmesg | egrep 'ad|da'

Now, you need to think about how to group your devices together. Do you simply want to build a pure USB ZFS pool, or a hybrid hard drive/USB pool. To keep thing simple, I will go with pure USB ZFS pool.

Suppose I am going to create a pure USB pool, which simply include every device in one single place:

zpool create myzpool /dev/ad0 /dev/ad1 /dev/ad2 /dev/da0 /dev/da1 /dev/da2

where the ad* and da* are the locations of my devices.

This will create a big pool. When you write some data to this pool, e.g.,

sudo dd if=/dev/random of=/myzpool/test_file count=10g bs=1M

The system will simply split the file into multiple chunks, and write all chunks to each USB devices at the same time.

Now let’s verify the pool information:

zpool iostat -v
               capacity     operations    bandwidth
pool         used  avail   read  write   read  write
----------  -----  -----  -----  -----  -----  -----
myzpool
  ad12       969M   112K      0      0  1.15K  66.4K
  ad13      1.90G   112K      0      0  1.74K  66.4K
  ad14       480M    11K      0      0  3.08K  66.9K
  da0          1G  2.78G      0      0  5.55K  66.1K
  da1          1G  2.78G      0      0  5.55K  66.1K
  da2        240M    80K      0      0  2.41K  66.8K
  da3        240M   112K      0      0  1.87K  66.8K
  da4       7.50G    80K      0      0  4.35K  66.5K
  da5       7.50G    96K      0      0  2.98K  66.3K
  da6        972M   112K      0      0    278  39.9K
----------  -----  -----  -----  -----  -----  -----

As you can see, the system is split the data and write it to each devices. ZFS is very smart to adjust the number of split to optimize the performance.

Okay, what about the performance? Honestly you can’t expect too much from a pure-USB zpool, because the write speed is limited to 40MB/s, which is way too slow compared to the disk. The only advantage is that there is no moving parts, which significant decrease the failure rate, and the overall cost is cheap. Now, let’s make talk about the hybrid pool, a combination of USB and hard drive pool.

A hybrid ZFS pool is a combination of hard drives and USB drives. In my experiment, I put the USB devices as log and cache devices, while the hard drives are used as main storage. If you don’t know what is ZFS log or ZFS cache, you can think about a ZFS log devices is a buffer for writing the data, while a ZFS cache is for reading the data.

Ideally, you should use two identical devices (same size) for ZFS log (writing the data). For ZFS cache, it doesn’t matter.

First, let’s create our ZFS pool with the storage devices (i.e., hard drives) only.

zpool create myzpool raidz /dev/ad0 /dev/ad1 /dev/ad2

Next, we need to add the ZFS log. We are going to create a mirror, so that they have to be identical.

zpool add myzpool log mirror /dev/da0 /dev/da1

Finally, we add the ZFS cache.

zpool add myzpool cache /dev/da2 /dev/da3 /dev/da4

And let’s take a look to the whole picture:

zpool iostat -v
               capacity     operations    bandwidth
pool         used  avail   read  write   read  write
----------  -----  -----  -----  -----  -----  -----
myzpool     5.83T  6.79T      9      2  1.03M   311K
  raidz1    5.83T  6.79T      9      1  1.03M   179K
    ad0         -      -      2      0   171K  29.9K
    ad1         -      -      2      0   171K  29.9K
    ad2         -      -      2      0   171K  29.9K
    ad3         -      -      2      0   171K  29.9K
    ad4         -      -      2      0   171K  29.9K
    ad5         -      -      2      0   171K  29.9K
    ad6         -      -      2      0   171K  29.9K
  da0        128K  3.78G      0      0      0  65.9K
  da1           -      -      0      0      0  65.9K
cache           -      -      -      -      -      -
  da2        961M     8M      0      0  1.14K  66.6K
  da3       1.89G     8M      0      0  1.73K  66.6K
  da4        472M     8M      0      0  3.06K  67.0K
  da5        232M     8M      0      0  2.40K  66.9K
  da6        232M     8M      0      0  1.86K  66.9K
  da7       7.50G     8M      0      0  4.33K  66.6K
  da8       7.50G     8M      0      0  2.96K  66.5K
  da9        964M     8M      0      0    276  39.6K
----------  -----  -----  -----  -----  -----  -----

With this combination, I get a pretty good performance (both read/write). When I copy the data from Windows to this ZFS pool using Samba, I can get a pretty high transfer speed (Over 100MB/s). Sometimes it get even close to 110MB/s. This result is very amazing given that my hard drives are the standard SATA drives (non-SSD) only.

The reliability of the USB devices / CF card / SD card sometimes questionable. That’s one of the reason why I don’t use them as the permanent storage media (using as Cache / log is okay). In this design, I use two SD cards (4GB x 2 = 8GB) as the ZFS log devices. Since they are set up as mirror, if one dies, the other one will kick in, which will minimize the data lost. For the cache devices, if one device is failed, I can remove it from the ZFS pool at any time. There will be no data lost so it will be okay.

I have run this super large server for few months already. There is about 200GB data I/O everyday, so far I am very happy with the overall performance. The most important thing is, those unused memory devices are now very happy as they don’t need to be sent to landfill.

Our sponsors:
[Solved]TFTP: Error code 2: Access violation

This post is an extension of my original post on TFTP: How to Setup TFTP. Although the post was written for Ubuntu, the same idea can be applied to all systems.

So, here is our problem. You set up a TFTP server. It starts fine. You upload a file, it gives no error. Now, you try to download a file, it throws you an error:

tftp> get myfile.jpg
Error code 2: Access violation

If you google the error message, Error code 2: Access violation on the web, you’ve probably noticed many solutions, some of them are very creative, such as running a touch command to create the file before downloading it etc. Before you try those solutions, ask yourself this question first: Do you want to touch 100 files before you download 100 files?

Anyway. I am not sure what cause the TFTP gives the error message: Error code 2: Access violation. However I never experienced this error in my system before with my configurations and settings. Therefore, I am going to share you my configurations for your reference.

My TFTP Configuration:

service tftp
{
   protocol = udp
   port = 69
   socket_type = dgram
   wait = yes
   user = nobody
   server = /usr/sbin/in.tftpd
   server_args = var/lib/tftpboot -s
   disable = no
}

There are couple things you need to pay attention. First, my TFTP root directory is /var/lib/tftpboot, and in my configuration file, I skip the first /. Second, I put a flag, -s in the server_args. That helps to keep TFTP from complain.


Next, the permission of the TFTP root directory plays an important role. Make sure that the permission and ownership are set correctly.

sudo chown -R nobody:nobody /var/lib/tftpboot
sudo chmo7 -R 777 /var/lib/tftpboot

Now, you can simply restart the system:

sudo service xinetd stop
sudo service xinetd start

and try to put a file and download it back:

tftp localhost
tftp> put myfile.jpg
Sent 56733279 bytes in 5.7 seconds

tftp> get myfile.jpg
Received 56733279 bytes in 5.7 seconds

That’s it.

Happy TFTP.

–Derrick

Our sponsors:

Natural Sort. MySQL. Sorting a 2D Array By Multiple Columns in PHP Naturally. Array_MultiSort with Natural Sort

MySQL has a biggest missing feature: It does not sort naturally. This has been an opened request since 2003, and MySQL team has no plan to fix this in a near future. I have looked for a solution to solve this problem for a while. Unfortunately, I found nothing useful. Here is a summary:

The + 0 Trick

Many developers suggest this solution:

SELECT names FROM your_table ORDER BY age + 0 ASC

This is not a good solution because it only works in some very specific situations. This query fails in most general cases.

Drupal Patch

Some developers suggest to use the patch from Drupal. Forget it, I could not even install it in my system.

My solution: Let PHP to handle the dirty work

So I decide to move the process to PHP. Before you say something about the performance issue, please keep reading my story first. I will talk about it in the later section.

MySQL is a relational database, it stores everything in a table. If we express that in an array, it will look something like this:

Array
(
    [1] => Array
        (
            [Name] => John
            [Identification] => 10
            [Address] => 100 Michigan Ave.
        )

    [2] => Array
        (
            [Name] => Peter
            [Identification] => 1000
            [Address] => 1 Michigan Ave.
        )

    [3] => Array
        (
            [Name] => Tom
            [Identification] => 2
            [Address] => 10 Michigan Ave.
        )

    [4] => Array
        (
            [Name] => Paul
            [Identification] => 1
            [Address] => 10 Michigan Ave.
        )

)

where the array key represents the record ID in the table.

Now, let say I want to sort the contents in the following orders:

  1. Sort by Identification: Ascending
  2. Then by Address: Descending
  3. Then by Name: Ascending

I specify the orders in an array:

$order = array('Identification' => 'ASC',
			   'Address' => 'DESC',
			   'Name' => 'ASC');

And include the following function in my code:

//array_multiSort with natural sort
function naturalSort2D(&$array){

   if (!function_exists(naturalSort2DCompare)){
	function naturalSort2DCompare($a, $b){
		global $order;

		foreach($order as $key => $value){
			
			if (!isset($a[$key])) continue;

			unset($compareResult);

                        //Case insensitive string comparisons using a "natural order" algorithm
			$compareResult = strnatcasecmp($a[$key], $b[$key]);
			
			if ($compareResult === 0) continue;
			
			$value = strtoupper(trim($value));
			
			if ($value === 'DESC'){
				$compareResult = $compareResult*-1;
			}
			
			return $compareResult;
		}
		
		return 0;
	}
   }
	
   //Maintain index association
   //Preserve array keys
   //Use usort if you don't care about key index
   uasort($array, 'naturalSort2DCompare');
	
   return true;
}

Now I sort the array:

naturalSort2D($array);

And I get my result like the following:

Array
(
    [4] => Array
        (
            [Name] => Paul
            [Identification] => 1
            [Address] => 10 Michigan Ave.
        )

    [3] => Array
        (
            [Name] => Tom
            [Identification] => 2
            [Address] => 10 Michigan Ave.
        )

    [1] => Array
        (
            [Name] => John
            [Identification] => 10
            [Address] => 100 Michigan Ave.
        )

    [2] => Array
        (
            [Name] => Peter
            [Identification] => 1000
            [Address] => 1 Michigan Ave.
        )

)

Performance

Before we talk about the performance issue, I like to talk about my database design first. In my application, the records are stored in a table. It is a multiple user system. Each user can access their own records only. Each user has about 3000 records, and we have 1000 users. Therefore we have about 3 millions of records in one table.

Here is a data structure:

#Information input by users
Name
Identification
Address

#Information input by system
ID
UserID

So the SQL quere is nothing more than something like:

Select * FROM `database`.`table` WHERE `UserID` = '1'

Previously, I let MySQL to handle the filter and sorting, i.e.,

Select * FROM `database`.`table` WHERE (`UserID` = '1') AND (`Address` LIKE `%Michigan%`) ORDER BY `Identification` ASC LIMIT 5, 10

After moving to PHP, I just let MySQL to handle the filter,

Select * FROM `database`.`table` WHERE (`UserID` = '1') AND (`Address` LIKE `%Michigan%`)

Notice that I will get all qualified records, could be few thousands. Then I let PHP to do the sorting:

$order = array('Identification' => 'ASC');
naturalSort2D($array);

Now I have a sorted array. Next I need to slice the records:

$array = array_slice($array, 5, 10);

Sounds like lots of work huh? Now let’s talk about the performance impact. Guess what, I see performance improvement for about 15%!

In the new approach, MySQL does lesser work. PHP does more work. Apparently, PHP works more effectively than MySQL. However, this may not true for all database model. Remember that in my situation, the system needs to handle at most few thousands records at a time? So I think PHP is doing better in this range. If your application needs to handle millions of records at a time, e.g., bookstore, then you better let MySQL to do the work.

By the way, the new approach allows to sort the dynamic generated content, which is a big plus in my situation. That is something I cannot do in MySQL approach.

Have fun.

–Derrick

Our sponsors:

[PHP]How to get the number of CPU cores in Fedora, Ubuntu, and FreeBSD

I am working on a PHP application which needs to be deploy to multiple places. One of the variables is the number of CPU core. Since each server has different number of CPU cores, I need to specify the number of CPU core in my application for each server. I think there should be a smarter way to do it.

PHP is a scripting language, it has limit support on accessing the hardware level information. In short, there is no library or function to do it. Fortunately, we can do it via shell command. In the other words, the following methods are not limited to PHP, it will work in any languages, as long as your language supports running the UNIX command and catch the return.

Getting the number of CPU Cores – Linux

(Tested on Fedora, Ubuntu Linux, should work on other Linuxs because they all use the same Linux kernel.)

cat /proc/cpuinfo | grep processor | wc -l

This will return something like this:

8

Getting the number of CPU Cores – FreeBSD

sysctl -a | grep 'hw.ncpu' | cut -d ':' -f2

which will return something like this (notice the extra space before the number):

8

Now, let’s put everything together. Run the command inside your application (Here I am using PHP for example):

//Linux
$cmd = "cat /proc/cpuinfo | grep processor | wc -l";

//FreeBSD
$cmd = "sysctl -a | grep 'hw.ncpu' | cut -d ':' -f2";

$cpuCoreNo = intval(trim(shell_exec($cmd)));

Of course, you can make the application to detect the system automatically:

$cmd = "uname";
$OS = strtolower(trim(shell_exec($cmd)));

switch($OS){
   case('linux'):
      $cmd = "cat /proc/cpuinfo | grep processor | wc -l";
      break;

   case('freebsd'):
      $cmd = "sysctl -a | grep 'hw.ncpu' | cut -d ':' -f2";
      break;

   default:
      unset($cmd);
}

if ($cmd != ''){
   $cpuCoreNo = intval(trim(shell_exec($cmd)));
}

That’s it! Happy PHPing.

–Derrick

Our sponsors:

[Solved]Fedora 16 /etc/rc.local is missing

Finally, I got a chance to try the new Fedora 16. The overall experience is pretty good, except that it comes with some troublesomes. I guess it is a bonus feature to test your troubleshooting skills. No problem, those are piece of cake to me. After trying for about 15 mins, I found two minor computer problem so far: Missing rc.local and ntpdate.

How to fix Missing rc.local

By default, rc.local is missing in Fedora 16. To create it, simply do the following:

sudo nano /etc/rc.d/rc.local

and include your start-up script in the file, e.g.,

#!/bin/sh
/opt/lampp/lampp startapache

Next, we need to change the ownership:

sudo chmod a+x /etc/rc.d/rc.local

and create a symbolic link:

sudo ln -s /etc/rc.d/rc.local /etc

Now, try to reboot your computer. The script should start at the boot.

Missing ntpdate

Typically I manually synchronize the computer time with a reference server, e.g.,

sudo ntpdate time.nist.gov

However, I guess Fedora team wants to move to NTP service, so they decide to take the ntpdate command away. All you need to do is to install it back, i.e.,

sudo yum install ntpdate -y

Enjoy the new Fedora 16.

–Derrick

Our sponsors:

How to Open / Take Apart a Western Digital Elements Hard Drive Case

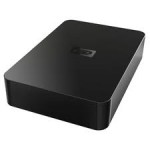
Recently I decide to add more space to my server. For some reasons, the internal hard drives are always more expensive than the external one, even the hard drives are exact the same thing. So I decide to buy an external hard drives first, and disassemble the case and take the hard drive out. I guess Western Digital doesn’t want you to do it, so there is no easy way to open the case. In fact, it is pretty easy to take out the hard drive without breaking the case. And I am going to show you how to open the Western Digital Elements hard drive case. The whole process should take no more than 5 minutes.

Open a Western Digital Elements Hard Drive Case:

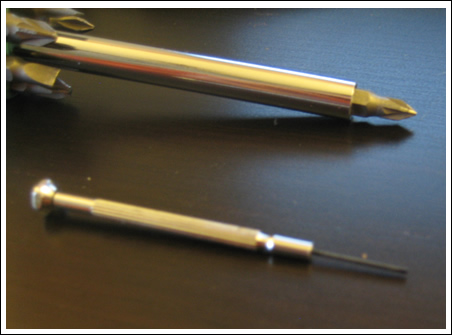
Step 1 – Get the Tools Ready

You don’t need any fancy tool to get the job done. Simply use a precision screw driver such as 1/32″ flat and a regular Philip screw driver (PZ1) are enough.

Open a Western Digital Elements Hard Drive Case

Open a Western Digital Elements Hard Drive Case:

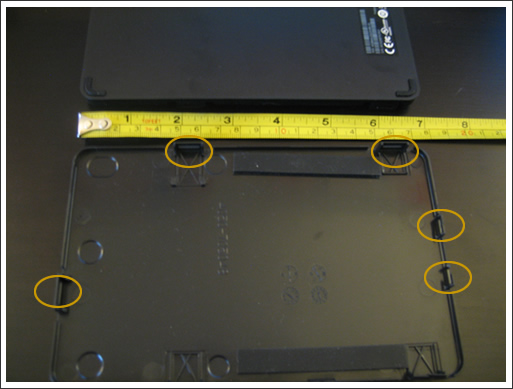
Step 2 – Knowing the Plan

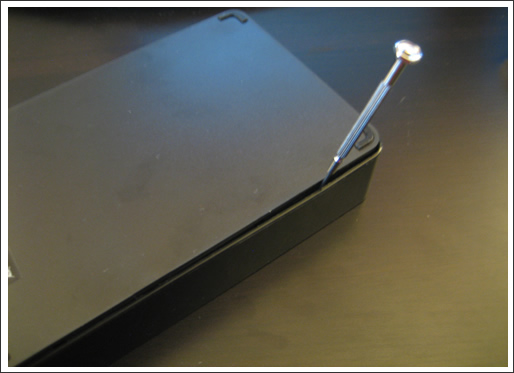
Since Western Digital uses a self-snapping cover to snap on the case, it is good to know where are these clips.

Open a Western Digital Elements Hard Drive Case

Open a Western Digital Elements Hard Drive Case:

Step 3 – Open the Case

After knowing the locations of these clips, simply use a screw driver to open the case carefully on these locations.

Open a Western Digital Elements Hard Drive Case

Open a Western Digital Elements Hard Drive Case:

Step 4 – Almost Done

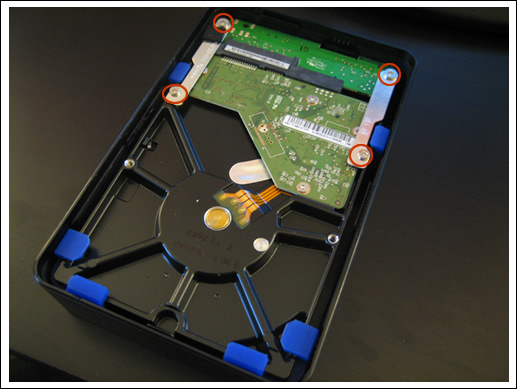
After removing the cover, you will see something like this. Unscrew the 4 circled screws with the Phillip screw driver and take out the hard drive very carefully.

Open a Western Digital Elements Hard Drive Case

Open a Western Digital Elements Hard Drive Case:

Step 5 – Remove the Connectors and Protections

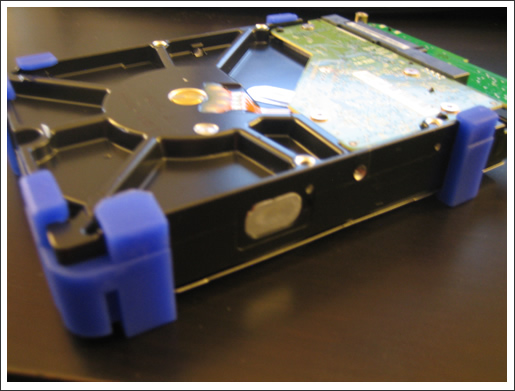
We are almost there. All you need to do is to remove the blue protections and the circuit board.

Open a Western Digital Elements Hard Drive Case

Open a Western Digital Elements Hard Drive Case:

Step 6 – Completed!

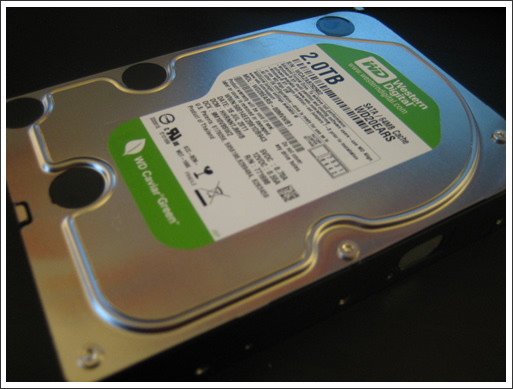
Now the hard drive is ready. Simply snap it into your desktop and it is ready to go!

Open a Western Digital Elements Hard Drive Case

Open a Western Digital Elements Hard Drive Case:

The Adapter

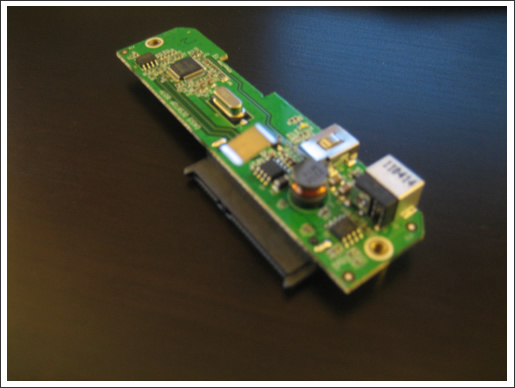
Now you have an extra USB-SATA adapter available. You can simply build you own Lego SATA enclosure with it. However, keep in mind that it only works with Western Digital hard drives. If you plug in a non-Western Digital hard driver such as Seagate, it won’t recognize it at all.

Open a Western Digital Elements Hard Drive Case

Updated on June 25, 2023

WD is doing something weird to their hard drives since 8TB. You can’t directly plug the WD hardrive to your power supply. There are three methods:

1.) Tape or strip out the connector on the power port to disable the 3.3V pin. Google: “How to disable the 3.3v pin on Western Digital USB White Label Drives”. Personally I think this is a bit unreliable (if you tape to cover the connector) or risky (if you strip out the connector)

2.) Use a “SATA to PATA power converter” and “PATA to SATA power converter”, i.e., Power supply -> SATA to PATA power converter -> PATA to SATA power converter -> Hard Drive. You can find them on Amazon.

3.) If you use server grade components, such as Dell PowerEdge servers, typically it comes with a hard drive bay, i.e., it comes with a hard drive enclosure and you need to slide your hard drives into the big box. The big box contains everything including the data and power supply. Based on my experience, it works great with the new WD hard drives.

4.) Get a power supply that work with WD hard drive. Some people say Consair works with the WD hard drive. I have exact the same model but I can’t get it work.

Have fun.

–Derrick

Our sponsors:

How to Setup TFTP on Ubuntu 11.10

Recently I decide to jump into the pool of using diskless Ubuntu. Basically the client computer downloads the necessary files from the Ubuntu server every time during the boot. To keep things simple and easy, Ubuntu does that by using TFTP. So the first step is to set up a TFTP server on the server. For those who haven’t heard of TFTP, it is similar to FTP, except that it has no security feature, and the function is extremely limited. Anyway, here is how to set up a TFTP server on Ubuntu 11.10:

Installing TFTP sounds easy. However, I’ve heard that many people experienced many issues during the installation, such as Error code 2: Access violation issue. That’s why I create this tutorial. If you follow exact the same steps, you will not experience any problem.

First, let’s install all the necessary packages:

sudo apt-get install xinetd tftpd tftp -y

Next, we need to create a configuration file:

sudo nano /etc/xinetd.d/tftp

Put the following content into the file.


service tftp
{
   protocol = udp
   port = 69
   socket_type = dgram
   wait = yes
   user = nobody
   server = /usr/sbin/in.tftpd
   server_args = var/lib/tftpboot -s
   disable = no
}

In the server_args, I have var/lib/tftpboot, which represents the location of the tftp root, i.e., /var/lib/tftpboot. Notice that I skip the root /.

Now let’s change the ownership of the directory:


sudo mkdir /var/lib/tftpboot
sudo chown -R nobody:nobody /var/lib/tftpboot
sudo chmod -R 777 /var/lib/tftpboot

and start the TFTP service:

sudo service xinetd stop
sudo service xinetd start

Verify the TFTP is running correctly or not:

netstat -na | grep LIST | grep 69

You should see something like this:

tcp        0      0 0.0.0.0:69              0.0.0.0:*     LISTEN

Test: Upload a file to TFTP Server

Now let’s test the TFTP server by logging into the server first:

tftp localhost

and upload a file:

tftp> put myfile.jpg
Sent 56733279 bytes in 5.7 seconds

Quit:

q

Make sure that file has been uploaded:

ls -l /var/lib/tftpboot

Test: Download a file from TFTP Server

Now, let’s go to a different directory and download the file we just upload.

cd some_other_directory

and log in to the tftp server again:

tftp localhost

and get the file:

tftp> get myfile.jpg
Received 56733279 bytes in 5.7 seconds

You are done.

Troubleshooting (e.g., Error code 2: Access violation)

If you see a message like: Error code 2: Access violation

Make sure that you:
– Follow the exact procedure in this tutorial
– Make sure that the tftp is started with -s flag.
– Check the permission of the directory, i.e., 777
– After you’ve made any changes to the TFTP configuration, make sure that you stop and start the inet service again.
– Don’t forget to quit tftp before retrying the command.

That’s it!

Enjoy TFTP.

–Derrick

Our sponsors:

These files might be harmful to your computer – Your internet security settings suggest that one of more files may be harmful. Do you want to use it anyway?

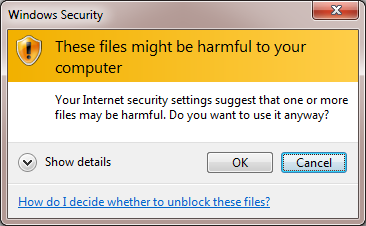
I run my own network drive such that all computers in my network can access the same files. Every time when I try to access the shared files from Windows 7, it comes with nightmare (a gift from Microsoft). For example, if I move files within the network drive, Windows 7 will display a very annoying box like the one showing on the right.

These files might be harmful to your computer.

Your internet security settings suggest that one of more files may be harmful. Do you want to use it anyway?

If you click the help link below the message, you will find nothing but junk.

So how to get rid of this annoying box? You know, and we all know that Microsoft product is buggy and with lots of security problem. This box does nothing more than telling you:

Hey we are buggy. If your network drives contain virus or worm, that’s your problem, nothing to do with us. Do it at your own risk.

(And don’t forget that other operating system such as OS X, Linux etc do not have any annoying box, nor they do have any virus.)

To get kill this annoying box, simply following these steps:

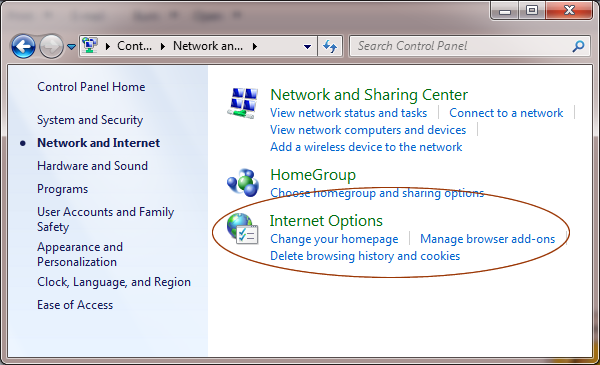
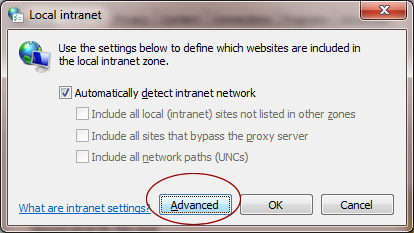
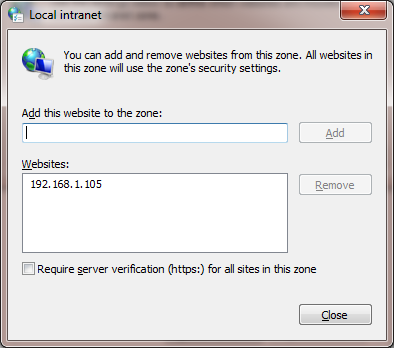
1. Go to Internet Options (Control Panel -> Network and Internet -> Internet Options)

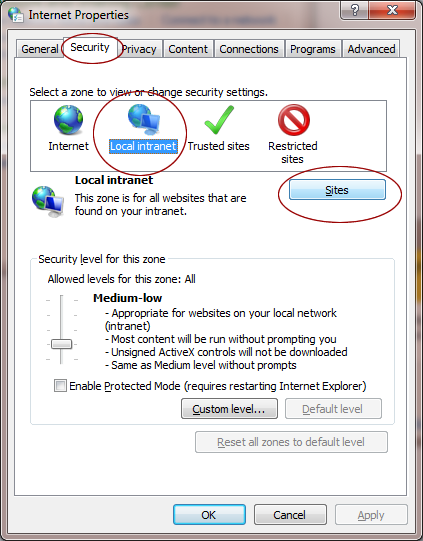
2. Open the Security tab and select Local Intranet

3. Click Local Intranet

4. Type the IP address of your network drive

That’s it!

Happy file sharing.

–Derrick

Our sponsors:

Upgrading Ubuntu to 11.10 via Command Line

Ubuntu was out today, and I could not wait to try out the new features. However I am in the office now and I have no physical access to my Ubuntu box in my kitchen, so using the graphic interface is not an option to me. I searched online and I couldn’t find any tutorial about upgrading the Ubuntu via command line. So I decided to try my own:

First, make sure that your Ubuntu box is up-to-date:

sudo apt-get update
sudo apt-get upgrade -y
sudo apt-get dist-upgrade -y

Then, do some preparation work:

sudo apt-get install update-manager-core

Make sure that:

sudo nano /etc/update-manager/release-upgrades
Prompt=normal

Next, we are ready to start the journey:

sudo do-release-upgrade -d

Notice that Ubuntu will complain if you do it via SSH. I don’t care, so I choose “YES”.

Later, it will ask you whether you want to remove the old packages and install the new one. Of course the answer is Yes.

Depending on your CPU and internet connection speed. It can range from 30 minutes to few hours. After everything is done, make sure that you upgrade the system again:

sudo apt-get update -y
sudo apt-get dist-upgrade -y

That’s it! Have fun with Ubuntu 11.10!

–Derrick

Our sponsors:

How to Set up a Pure-FTPd Server with Virtual User on FreeBSD

This tutorial is for FreeBSD. If you are looking for setting up Pure-FTPd on Linux, click here.

My client likes to send me a huge data file (More than 10GB after compressed). Since I don’t care about the security during the transfer, I decide to go with the old school technology: FTP.

Basically, I need to set up a FTP server with virtual user. In the other words, the log in used by the FTP server has nothing to do with my system login, and I can easily disable that at any time.

1.) Install Pure-FTPd

sudo pkg_add -r pure-ftpd

2.) Create a user for Pure-FTPd, here I simply call it ftpuser.

sudo adduser ftpuser

3.) Let say, we want to create a user called guest to access the ftp server. guest is a virtual user, and its virtual home is in /home/ftpuser/guest

sudo mkdir /home/ftpuser/guest
sudo chown -R ftpuser:ftpuser  /home/ftpuser/
sudo chmod a+rw -R /home/ftpuser/

4.) Edit /etc/inetd.conf and add the following:

ftp     stream  tcp     nowait  root    /usr/local/sbin/pure-ftpd -O stats:/var/log/pureftpd.log       pure-ftpd -l puredb:/usr/local/etc/pureftpd.pdb

5.) Restart inetd

ps -ax | grep inetd
sudo killall -HUP inetd
sudo /usr/sbin/inetd -wW -C 6

6.) Edit /etc/syslog.conf

sudo nano /etc/syslog.conf

7.) Restart syslog

ps -ax | grep syslog
killall -HUP syslogd
/usr/sbin/syslogd -ss

8.) Create a user and add it into the Pure-FTPd database:

sudo pure-pw useradd guest -u ftpuser -d /home/ftpuser/guest/

You can also set the quota and maximum space:
1000 files, 100MB quota

pure-pw useradd guest -u ftpuser -d /home/ftpuser/guest/ -n 1000 -N 100 

9.) Set the password in case you forget the enter the password:

pure-pw passwd guest

10.) Update the database:

pure-pw mkdb

11.) If the system could not update the database, try this instead (One command, not two):

sudo pure-pw mkdb /usr/local/etc/pureftpd.pdb -f /usr/local/etc/pureftpd.passwd

That’s it!

–Derrick

Our sponsors: