[FreeBSD-update]Installing updates…install: ///usr/src/lib/libc/gen/libc_dlopen.c: No such file or directory

When I tried to upgrade my FreeBSD system today, I received a last minute Christmas gift from the FreeBSD team. 🙂

#sudo freebsd-update fetch
Looking up update.FreeBSD.org mirrors... 4 mirrors found.
Fetching metadata signature for 8.2-RELEASE from update4.FreeBSD.org... done.
Fetching metadata index... done.
Inspecting system... done.
Preparing to download files... done.

The following files will be added as part of updating to 8.2-RELEASE-p5:
/usr/src/lib/libc/gen/libc_dlopen.c

I got the following error:

#sudo freebsd-update install
Installing updates...install: ///usr/src/lib/libc/gen/libc_dlopen.c: No such file or directory
 done.

Initially, I thought the problem was a typo in the freebsd-update profile, so I gave this a try:

sudo cat /var/db/freebsd-update/* | grep libc_dlopen.c

Unfortunately, I couldn’t find anything. So I investigated the problem, and I found that it was caused by the missing source. In a nut shell, if you did not install the FreeBSD with the source (i.e., /usr/src is empty), this problem will show up.

To fix this problem, simply create a dummy directory:

sudo mkdir -p /usr/src/lib/libc/gen

and re-run everything once again, i.e.,

#sudo freebsd-update fetch
#sudo freebsd-update install
#sudo reboot

After the computer finishes rebooting, verify that the upgrade is done:

# sudo freebsd-update fetch
Looking up update.FreeBSD.org mirrors... 4 mirrors found.
Fetching metadata signature for 8.2-RELEASE from update2.FreeBSD.org... done.
Fetching metadata index... done.
Inspecting system... done.
Preparing to download files... done.

No updates needed to update system to 8.2-RELEASE-p5.

That’s it!

Enjoy this last minute Christmas gift from the FreeBSD team. Merry Christmas! 🙂

–Derrick

Our sponsors:

How to Delete System Mail / Empty System Mail box in FreeBSD / Linux?

When I checked my FreeBSD system mail box today, I found that there were 8000 system mails sitting my mail box:

mail
Mail version 8.1 6/6/93.  Type ? for help.
"/var/mail/root": 8182 messages 8182 new
>N  1 [email protected]  Fri Sep 30 03:02  44/1330  "x.com output"
 N  2 [email protected]  Fri Sep 30 03:02  72/2464  "x.com output"
 N  3 [email protected]  Sat Oct  1 03:01  35/1075  "x.com output"
...
Another 8000 lines go here

There are several ways you can do. Either you can go through them one by one and delete them one at a time, i.e.,

d
[Hit the ENTER Key]

Or specify which mails you like to delete by ID, e.g.,

d x-y
[Hit the ENTER Key]

where x and y are the start and end of the mail ID, respectively.

For example, if you want to empty your FreeBSD mail box, you can do the following:

d 1-8182
[Hit the ENTER Key]

where 8182 is the number of mails I have.

You can find the number of your emails when you open your mail box:

"/var/mail/root": 8182 messages 8182 new

Hit the enter key again to confirm that the mail box is empty:

At EOF

And leave the mail box.

q

Now, try to access your mail box again, and the system should tell you that you have no system mail.

# mail
No mail for root

That’s it.

How to stop generating the system mails

Whenever the system run a background job, it will store the output of the program and email to the system mail box for auditing purposes. However, you can disable this feature if you don’t care the output.

Normally, we run a script this way:

start.sh

To avoid any output, we do the following instead:

start.sh > /dev/null 2>&1

For example, if you run many cron jobs, you need to go over your cron job list and add this to every single script, i.e.,

sudo nano /etc/crontab
or
crontab -e

and add /dev/null 2>&1 to every command.

Hope it helps.

–Derrick

Our sponsors:

ZFS+USB: Building a Super Large Server Using USB Memory, CF Card and SD Card.

I got a lot of unused USB thumb drives, CF flash card and SD cards sitting in my drawer. The sizes range from 8MB to 8GB. Unlike few years ago, it is getting a lot easier to access to the Internet, so I no longer need to carry my data via memory device any more. Instead, I simply connect to the Internet and the data is with me. That’s why my USB thumb drivers / CF flash cards / SD cards have been sitting in my drawer for few years.

I got an idea one day. It would be a waste to let them sitting in my drawer (or waiting to be sent to landfill). Why not I use them to build a file server. At least I can test out whether the idea is doable or not. So here are the candidates:

  • USB Thumb drives

    1. 8GB x 2
    2. 1GB x 1
    3. 256MB x 2
  • CF Flash Card

    1. 2GB x 1
    2. 1GB x 1
    3. 512MB x 2
  • SD Card

    1. 4GB x 2

As you can see from my list, the size of each candidates varies from 256MB to 8GB. So it will be interesting to put them together and build a super large file server.
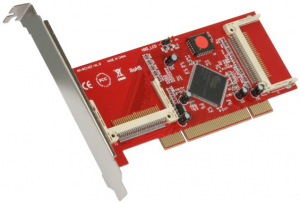
Most computer has multiple USB ports available. If you don’t have enough USB port, get a powered USB hub (i.e., the USB hub has it own power unit), it will be more efficient then getting the power from the computer. For the CF card, I use a SYBA SY-PCI48001 PCI to Compact Flash Adapter to connect my CF Flash cards to my computer. For the SD cards, I simply connect each of them to a Sandisk USB SD card reader.

Okay, let’s talk about the software. I am going to use ZFS to implement it, because it is quick and simple. First, connect all devices to your computer, and make sure that your operating systems can recognize all of them. In this tutorial, I am using FreeBSD as a tutorial. However, the idea should be the same in other ZFS ready system, such as Solaris.

Make sure that all USB devices are recognized by your operating system. In FreeBSD, the devices are registered as /dev/da* or /dev/ad*:

dmesg | egrep 'ad|da'

Now, you need to think about how to group your devices together. Do you simply want to build a pure USB ZFS pool, or a hybrid hard drive/USB pool. To keep thing simple, I will go with pure USB ZFS pool.

Suppose I am going to create a pure USB pool, which simply include every device in one single place:

zpool create myzpool /dev/ad0 /dev/ad1 /dev/ad2 /dev/da0 /dev/da1 /dev/da2

where the ad* and da* are the locations of my devices.

This will create a big pool. When you write some data to this pool, e.g.,

sudo dd if=/dev/random of=/myzpool/test_file count=10g bs=1M

The system will simply split the file into multiple chunks, and write all chunks to each USB devices at the same time.

Now let’s verify the pool information:

zpool iostat -v
               capacity     operations    bandwidth
pool         used  avail   read  write   read  write
----------  -----  -----  -----  -----  -----  -----
myzpool
  ad12       969M   112K      0      0  1.15K  66.4K
  ad13      1.90G   112K      0      0  1.74K  66.4K
  ad14       480M    11K      0      0  3.08K  66.9K
  da0          1G  2.78G      0      0  5.55K  66.1K
  da1          1G  2.78G      0      0  5.55K  66.1K
  da2        240M    80K      0      0  2.41K  66.8K
  da3        240M   112K      0      0  1.87K  66.8K
  da4       7.50G    80K      0      0  4.35K  66.5K
  da5       7.50G    96K      0      0  2.98K  66.3K
  da6        972M   112K      0      0    278  39.9K
----------  -----  -----  -----  -----  -----  -----

As you can see, the system is split the data and write it to each devices. ZFS is very smart to adjust the number of split to optimize the performance.

Okay, what about the performance? Honestly you can’t expect too much from a pure-USB zpool, because the write speed is limited to 40MB/s, which is way too slow compared to the disk. The only advantage is that there is no moving parts, which significant decrease the failure rate, and the overall cost is cheap. Now, let’s make talk about the hybrid pool, a combination of USB and hard drive pool.

A hybrid ZFS pool is a combination of hard drives and USB drives. In my experiment, I put the USB devices as log and cache devices, while the hard drives are used as main storage. If you don’t know what is ZFS log or ZFS cache, you can think about a ZFS log devices is a buffer for writing the data, while a ZFS cache is for reading the data.

Ideally, you should use two identical devices (same size) for ZFS log (writing the data). For ZFS cache, it doesn’t matter.

First, let’s create our ZFS pool with the storage devices (i.e., hard drives) only.

zpool create myzpool raidz /dev/ad0 /dev/ad1 /dev/ad2

Next, we need to add the ZFS log. We are going to create a mirror, so that they have to be identical.

zpool add myzpool log mirror /dev/da0 /dev/da1

Finally, we add the ZFS cache.

zpool add myzpool cache /dev/da2 /dev/da3 /dev/da4

And let’s take a look to the whole picture:

zpool iostat -v
               capacity     operations    bandwidth
pool         used  avail   read  write   read  write
----------  -----  -----  -----  -----  -----  -----
myzpool     5.83T  6.79T      9      2  1.03M   311K
  raidz1    5.83T  6.79T      9      1  1.03M   179K
    ad0         -      -      2      0   171K  29.9K
    ad1         -      -      2      0   171K  29.9K
    ad2         -      -      2      0   171K  29.9K
    ad3         -      -      2      0   171K  29.9K
    ad4         -      -      2      0   171K  29.9K
    ad5         -      -      2      0   171K  29.9K
    ad6         -      -      2      0   171K  29.9K
  da0        128K  3.78G      0      0      0  65.9K
  da1           -      -      0      0      0  65.9K
cache           -      -      -      -      -      -
  da2        961M     8M      0      0  1.14K  66.6K
  da3       1.89G     8M      0      0  1.73K  66.6K
  da4        472M     8M      0      0  3.06K  67.0K
  da5        232M     8M      0      0  2.40K  66.9K
  da6        232M     8M      0      0  1.86K  66.9K
  da7       7.50G     8M      0      0  4.33K  66.6K
  da8       7.50G     8M      0      0  2.96K  66.5K
  da9        964M     8M      0      0    276  39.6K
----------  -----  -----  -----  -----  -----  -----

With this combination, I get a pretty good performance (both read/write). When I copy the data from Windows to this ZFS pool using Samba, I can get a pretty high transfer speed (Over 100MB/s). Sometimes it get even close to 110MB/s. This result is very amazing given that my hard drives are the standard SATA drives (non-SSD) only.

The reliability of the USB devices / CF card / SD card sometimes questionable. That’s one of the reason why I don’t use them as the permanent storage media (using as Cache / log is okay). In this design, I use two SD cards (4GB x 2 = 8GB) as the ZFS log devices. Since they are set up as mirror, if one dies, the other one will kick in, which will minimize the data lost. For the cache devices, if one device is failed, I can remove it from the ZFS pool at any time. There will be no data lost so it will be okay.

I have run this super large server for few months already. There is about 200GB data I/O everyday, so far I am very happy with the overall performance. The most important thing is, those unused memory devices are now very happy as they don’t need to be sent to landfill.

Our sponsors:

[PHP]How to get the number of CPU cores in Fedora, Ubuntu, and FreeBSD

I am working on a PHP application which needs to be deploy to multiple places. One of the variables is the number of CPU core. Since each server has different number of CPU cores, I need to specify the number of CPU core in my application for each server. I think there should be a smarter way to do it.

PHP is a scripting language, it has limit support on accessing the hardware level information. In short, there is no library or function to do it. Fortunately, we can do it via shell command. In the other words, the following methods are not limited to PHP, it will work in any languages, as long as your language supports running the UNIX command and catch the return.

Getting the number of CPU Cores – Linux

(Tested on Fedora, Ubuntu Linux, should work on other Linuxs because they all use the same Linux kernel.)

cat /proc/cpuinfo | grep processor | wc -l

This will return something like this:

8

Getting the number of CPU Cores – FreeBSD

sysctl -a | grep 'hw.ncpu' | cut -d ':' -f2

which will return something like this (notice the extra space before the number):

8

Now, let’s put everything together. Run the command inside your application (Here I am using PHP for example):

//Linux
$cmd = "cat /proc/cpuinfo | grep processor | wc -l";

//FreeBSD
$cmd = "sysctl -a | grep 'hw.ncpu' | cut -d ':' -f2";

$cpuCoreNo = intval(trim(shell_exec($cmd)));

Of course, you can make the application to detect the system automatically:

$cmd = "uname";
$OS = strtolower(trim(shell_exec($cmd)));

switch($OS){
   case('linux'):
      $cmd = "cat /proc/cpuinfo | grep processor | wc -l";
      break;

   case('freebsd'):
      $cmd = "sysctl -a | grep 'hw.ncpu' | cut -d ':' -f2";
      break;

   default:
      unset($cmd);
}

if ($cmd != ''){
   $cpuCoreNo = intval(trim(shell_exec($cmd)));
}

That’s it! Happy PHPing.

–Derrick

Our sponsors:

How to Set up a Pure-FTPd Server with Virtual User on FreeBSD

This tutorial is for FreeBSD. If you are looking for setting up Pure-FTPd on Linux, click here.

My client likes to send me a huge data file (More than 10GB after compressed). Since I don’t care about the security during the transfer, I decide to go with the old school technology: FTP.

Basically, I need to set up a FTP server with virtual user. In the other words, the log in used by the FTP server has nothing to do with my system login, and I can easily disable that at any time.

1.) Install Pure-FTPd

sudo pkg_add -r pure-ftpd

2.) Create a user for Pure-FTPd, here I simply call it ftpuser.

sudo adduser ftpuser

3.) Let say, we want to create a user called guest to access the ftp server. guest is a virtual user, and its virtual home is in /home/ftpuser/guest

sudo mkdir /home/ftpuser/guest
sudo chown -R ftpuser:ftpuser  /home/ftpuser/
sudo chmod a+rw -R /home/ftpuser/

4.) Edit /etc/inetd.conf and add the following:

ftp     stream  tcp     nowait  root    /usr/local/sbin/pure-ftpd -O stats:/var/log/pureftpd.log       pure-ftpd -l puredb:/usr/local/etc/pureftpd.pdb

5.) Restart inetd

ps -ax | grep inetd
sudo killall -HUP inetd
sudo /usr/sbin/inetd -wW -C 6

6.) Edit /etc/syslog.conf

sudo nano /etc/syslog.conf

7.) Restart syslog

ps -ax | grep syslog
killall -HUP syslogd
/usr/sbin/syslogd -ss

8.) Create a user and add it into the Pure-FTPd database:

sudo pure-pw useradd guest -u ftpuser -d /home/ftpuser/guest/

You can also set the quota and maximum space:
1000 files, 100MB quota

pure-pw useradd guest -u ftpuser -d /home/ftpuser/guest/ -n 1000 -N 100 

9.) Set the password in case you forget the enter the password:

pure-pw passwd guest

10.) Update the database:

pure-pw mkdb

11.) If the system could not update the database, try this instead (One command, not two):

sudo pure-pw mkdb /usr/local/etc/pureftpd.pdb -f /usr/local/etc/pureftpd.passwd

That’s it!

–Derrick

Our sponsors:

FreeBSD: Unable to find device node for /dev/ad0s1b in /dev!

While I reinstalled the FreeBSD on my FreeBSD box, I got the following error message:

Unable to find device node for /dev/ad0s1b in /dev!

I searched online and I found different solutions. The most popular one is about using the command, dd, to clean up the first and the last 35 blocks. However, this solution doesn’t always work.

The 35 block trick is mainly for GPT partition, which was created under Linux. However, my harddrive was used in FreeBSD last time. So the GPT problem doesn’t apply. Even I tried the solution to wipe out the first and the last 100 (which is more than 35) blocks, it didn’t work either. Therefore, I tried to wipe out the entire harddrive. It works.

1. Set up an environment such that you can use the command, dd, to wipe out your harddrive. You can either connect your harddrive to a working machine, or boot the system using Live CD.

2. Run the following command to determine the correct location of your harddrive:

su
fdisk -l

Let say, it is on /dev/sda

3. Find out how many partitions have been created in this harddrive:

ls /dev/sda*

Let say there are two: /dev/sda, /dev/sda1

4. Wipe out each partition one by one:

dd if=/dev/zero /dev/sda bs=512
dd if=/dev/zero /dev/sda1 bs=512

5. After everything is done, you can verify it by running fdisk again:

fdisk -l

and it should say something like partition table not found, which is what we expect.

That’s it! Try to install FreeBSD again and everything should be fine.

If you still experience any difficulties, try the following trick:

1. After defining the geometry, don’t press the “w” key.
2. After creating the partitions, don’t press the “w” key.
3. When selecting the media, instead of choosing CD, try to use Network.

That should avoid most possible potential issues.

–Derrick

Our sponsors:

rm: /var/empty: Operation not permitted

I was trying to remove a folder at /var/empty with no success (Operation not permitted):

ls -al
dr-xr-xr-x  2 root     wheel     512B Jul 18  2010 empty
sudo rm -Rf empty
rm: /var/empty: Operation not permitted

So I decided to change the permission:

sudo chmod a+rw empty/

and it did not work either:

chmod: empty/: Operation not permitted

Finally, I gave chflags a try:

chflags -R noschg empty/
sudo rm -Rf empty/

Done!

–Derrick

Our sponsors:

panic: ffs_blkfree: freeing free block

In the last few days, my FreeBSD box drove me crazy with the kernel panic. The error message is shown below:

dev = ad14s1f, block = 1, fs = /usr
panic: ffs_blkfree: freeing free block
cpuid = 4
KDB: stack backtrace:
...

I am not sure what caused this kernel panic, but it happened few times a day for a week. Every time it happened, I had to reboot my machine manually. After some investigations, I found the following solution:

1. Boot into the single user mode.
2. Run the following command to force (-f) the system to check the system. It is likely that you will get a lot of error, so adding a -y option (which assume yes to all the questions) will make your life easier:

fsck -f -y

After the check is done, reboot the system to normal mode:

reboot

The reason why my system had this kind of issue was due to the filesystem inconsistency. Even the fsck was trigger after each system was crashed, it could not detect or repair the problem (fsck will not fix any problem on a mounted partition on a running system.). That’s why we need to do it in the single user mode.

–Derrick

Our sponsors:

FreeBSD Startup Script – How to Start a Script on Boot in FreeBSD (An Alternative Solution to /etc/rc.local)

I want to start a script when booting my FreeBSD box automatically. Unlike Linux, FreeBSD does not honor the script you put in /etc/rc.local. Usually it is recommended to use the rc service (See here for details), however I think it is too complicated to convert my script to a rc compatible version. I decide to explore more simple solutions. I found that it can be done via Cron.

Suppose I have a script in the following location. I decide to run it when booting the machine automatically:

/script/myscript.sh

First, I need to include this script in the Cron:

sudo nano /etc/crontab

And add the following to the end of the file:

@reboot root /script/myscript.sh

That will make the system to execute this script.

However, the system may not run your script correctly because the Cron job uses a different shell and the path information may be missing. You can fix it by modifying the SHELL and PATH variables in /etc/crontab:

In my case, I uses Bash and I like my script executed by Bash:

SHELL=/usr/local/bin/bash

And my script needs to execute some commands that locate in /usr/local/bin:

PATH=/etc:/bin:/sbin:/usr/bin:/usr/sbin:/usr/local/bin

That’s it! Have fun with FreeBSD.

–Derrick

Our sponsors:

The devel/automake110 port has been deleted: No longer required by any port…Aborting update

My FreeBSD box must be sick today. For some reasons, when I ran the portsnap command (i.e., portsnap fetch update), it removed the entire port directory (i.e., rm /usr/ports -Rf). Therefore, I decided to build the entire port tree:

sudo su
cd /var/db/portsnap
rm -Rf *
portsnap fetch extract

I decided to run portmaster to update my system, I got the following error:

===>>> The devel/automake110 port has been deleted: No longer required by any port
===>>> Aborting update
Terminated

Well, the problem looks pretty simple. FreeBSD found an out-dated package installed in my system, and it could not find any corresponding port (Already deleted in the repository), that’s why it stops there and doesn’t know what to do next.

To solve this problem, the solution is very simple:

First, let’s see what version of automake we have in our system:

pkg_info | grep auto

which return:

autoconf-2.62       Automatically configure source code on many Un*x platforms
autoconf-2.68       Automatically configure source code on many Un*x platforms
autoconf-wrapper-20101119 Wrapper script for GNU autoconf
automake-1.10.1     GNU Standards-compliant Makefile generator (1.10)
automake-1.11.1     GNU Standards-compliant Makefile generator (1.11)
automake-wrapper-20101119 Wrapper script for GNU automake

Apparently, the older version of autoconf and automake cause the issues. Why not remove them?

sudo pkg_delete autoconf-2.62 automake-1.10.1

I re-ran the portmaster to update the system. Everything worked fine again!

–Derrick

Our sponsors: