cups-client-1.4.8 is marked as broken: gnutls does not support threads yet; disable the GNUTLS.

I saw this message twice on two machines on two different days, end up using the same way to fix it.

Case 1: Samba

My Samba was down today, so I tried to start it manually:

/usr/local/etc/rc.d/samba start

And I got the following error message:

Removing stale Samba tdb files:  done
nmbd already running? (pid=1074).
Starting smbd.
/libexec/ld-elf.so.1: Shared object "libcups.so.2" not found, required by "smbd"
/usr/local/etc/rc.d/samba: WARNING: failed to start smbd

Initially, I thought the problem was about missing the file. So I did a search and soft-link it:

find / -name "libcups.so*"

Surprisingly, there is no such file in my system. I think I don’t have this file. So I tried to compile the Samba again:

cd /usr/ports/net/samba35
sudo make

and I got the following message:

===>  cups-client-1.4.8 is marked as broken: gnutls does not support threads yet disable the GNUTLS.
*** Error code 1

Stop in /usr/ports/print/cups-client.

Case 2: Upgrading Port

When I upgraded my FreeBSD system via portmaster, I found the following messages:

portmaster -Da
===>  cups-client-1.4.8 is marked as broken: gnutls does not support threads yet disable the GNUTLS.
*** Error code 1

Stop in /usr/ports/print/cups-client.

Initially, I tried to by-pass upgrading the cups-client using:

portmaster -Dai

However, it is very annoying to do it everyday, therefore I decide to solve this problem.

Solution

From the error message, it seems that the problem is caused by the additional option in cups-client: GNUTLS. So I decide to disable this option in the GNUTLS:

cd /usr/ports/print/cups-client
sudo make config

Uncheck “GNUTLS: Build with GNUTLS instead of OpenSSL”

and try to compile it again:

sudo make

Now re-run the portmaster:

sudo portmaster -Da

The problem is gone.

Our sponsors:

How to clean up the dmesg message

Recently, I found that my dmesg log are filled of junk. Or I should say it contains lots of errors and complains that I already fix. However, I don’t want to reboot the machine to get rid of these error messages. How can I do it? The solution is very simple.

For FreeBSD and other BSD members, run the following:

sudo sysctl kern.msgbuf_clear=1

For Fedora / Ubuntu Linux, run the following instead:

sudo dmesg -c

Easy?

–Derrick

Our sponsors:

PHP Warning: PHP Startup: Unable to load dynamic library ‘/usr/local/lib/php/20090626/tokyo_tyrant.so’ – /usr/local/lib/php/20090626/tokyo_tyrant.so: Undefined symbol “ps_globals” in Unknown on line 0

Every time I upgrade the PHP and related extensions, I always run into the same problem with some PHP-PECL modules. Recently with the new release of PHP 5.3.7, there is no exception for the trouble. So what kind of trouble I have today? The Tokyo Tyrant (The middleman between my program and Tokyo Cabinet).

#php -v

PHP Warning:  PHP Startup: Unable to load dynamic library '/usr/local/lib/php/20090626/tokyo_tyrant.so' - /usr/local/lib/php/20090626/tokyo_tyrant.so: Undefined symbol "ps_globals" in Unknown on line 0

This problem was caused by a version mis-match. PHP is running at a later version, which the Tokyo Tyrant extension is running at an earlier version. To solve this computer problem, all you need is to re-install the PHP-Tokyo-Tyrant extension, i.e.,

cd /usr/ports/databases/pecl-tokyo_tyrant
suod make deinstall clean
sudo make install

And later, you may or may not get the following error message:

...
cc -shared  .libs/tokyo_tyrant.o .libs/tokyo_tyrant_funcs.o .libs/connection.o .libs/session_funcs.o .libs/server_pool.o .libs/failover.o .libs/session.o  -Wl,--rpath -Wl,/usr/local/lib -Wl,--rpath -Wl,/usr/local/lib -L/usr/local/lib -ltokyotyrant -llua -ltokyocabinet /usr/local/lib/liblzo2.so -llzma -lbz2 -lz -lrt -lm  -Wl,-soname -Wl,tokyo_tyrant.so -o ./.libs/tokyo_tyrant.so
/usr/bin/ld: cannot find -llua
*** Error code 1

Stop in /usr/ports/databases/pecl-tokyo_tyrant/work/tokyo_tyrant-0.6.0.
*** Error code 1

Stop in /usr/ports/databases/pecl-tokyo_tyrant.

The problem is related to Lua. By default, the extension enable the Lua option, which I have a hard time to make it run properly on FreeBSD box. Since my website does not use the Lua with Tokyo Cabinet, I simply disable it:

sudo nano /usr/ports/databases/pecl-tokyo_tyrant/work/tokyo_tyrant-0.6.0/Make

Look for the keyword: lua
And you will find something like the following:

TOKYO_TYRANT_SHARED_LIBADD = -R/usr/local/lib -L/usr/local/lib -R/usr/local/lib -L/usr/local/lib -ltokyotyrant -llua -ltokyocabinet -lbz2 -lz -lrt -lm -ltokyocabinet -llzo2 -llzma -lbz2 -lz -lrt -lm

Delete the option: “-llua”, i.e.,

TOKYO_TYRANT_SHARED_LIBADD = -R/usr/local/lib -L/usr/local/lib -R/usr/local/lib -L/usr/local/lib -ltokyotyrant -ltokyocabinet -lbz2 -lz -lrt -lm -ltokyocabinet -llzo2 -llzma -lbz2 -lz -lrt -lm

and re-start the installation:

cd /usr/ports/databases/pecl-tokyo_tyrant
sudo make install clean

Now re-run the php, and you may see the following error:

#php -v

PHP Warning:  PHP Startup: Unable to load dynamic library '/usr/local/lib/php/20090626/tokyo_tyrant.so' - /usr/local/lib/php/20090626/tokyo_tyrant.so: Undefined symbol "ps_globals" in Unknown on line 0
Segmentation fault: 11

That’s because the Tokyo Tyrant module is placed at a wrong position in the PHP extension file. Edit the file:

sudo nano /usr/local/etc/php/extensions.ini

and move the following code to the END of the file (Yes, order does matter):

extension=tokyo_tyrant.so

And re-check your php:

#php -v

PHP 5.3.7 with Suhosin-Patch (cli) (built: Aug 23 2011 10:33:12)
Copyright (c) 1997-2011 The PHP Group
Zend Engine v2.3.0, Copyright (c) 1998-2011 Zend Technologies

Now everything is all set.

Unfortunately, you pretty much need to do the same thing every time when upgrading your PHP on FreeBSD box.

–Derrick

Our sponsors:

How to install HighPoint RocketRAID 2640X4SGL on FreeBSD 8.X

This tutorial is for FreeBSD 8. If you are looking for the driver for FreeBSD 9, you can forget about it. According to HighPoint, there are no plans to update the RocketRaid 26XX driver to FreeBSD 9. Since it is a binary driver, there are very limited things we can do. FYI, here is the reply from their support team:

New Priority: Medium

Status: Active -> Awaiting Customer Action

Dear customer there are no plans to update the RocketRAID driver to support FreeBSD 9.0.

Note: Our RocketRAID 27xx series controllers have native support in FreeBSD 9.0.

Regards

HighPoint Support Team

I will never purchase any product from this HighPoint.


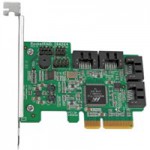
Recently I decide to upgrade my file server. I decide to get a PCI-Express SATA controller, and attach my hard-drives to it. After researching some cards, I finally decide to buy this one:

HighPoint RocketRAID 2640X4SGL

What it differentiates with other similar cards is the number of PCI-express channel. It comes with 4 channels while the other cards only carry one. In the other words, it will make transfer speed higher.

Anyway, long story short. FreeBSD does not recognize this card by default. You need to install a driver to support it. Unfortunately, the driver is version specific, and the driver on the web only supports up to FreeBSD 7. I have two choices – Switch to the legacy Microsoft Windows / Linux, or downgrade to FreeBSD 7.0. One way or the other, I need to say Goodbye to ZFS.

After some searches and hacks, finally I found the hidden driver. Here you are: Driver For FreeBSD 8.X

1. Extract the driver

tar -zxvf rr26xx-bsd-8.0-v1.2.tgz

2. Copy the driver (64-bit)

cp rr26xx-8.0-amd64.ko /boot/kernel/rr26xx.ko

3. Add the following in /boot/defaults/loader.conf

rr26xx_load="YES"

4. Reboot

reboot

4. After the reboot is done, you can see the hard-drives (/dev/da*) by running the following commands:

dmesg | grep da

That’s it! Have fun.

–Derrick

Our sponsors:

[Solved]Harddrive disappears or got deteched in FreeBSD

Have you experienced these computer problems like mine before? You got some error messages that your system cannot read your harddrives, or your harddrives suddenly got detached by your system. You have no clue why it happens because it is a fairly new harddrive. Before you decide to discard, return or RMA your harddrive, let me share you my experience first because it may save your harddrive (and your bank).

Recently, I found several harddrive related computer problems in my FreeBSD systems. These includes:

Symptom: Harddrive seems failing

When I boot the computer, it threw me the following messages:

ad0: FAILURE - READ_DMA status=51 ready ,DSC,ERROR error=40 uncorrectable LBA=sector

If you miss these messages during the boot process, you can review these messages using the following command:

sudo dmesg | grep ad | less

Symptom: Harddrive is disappeared or got detached

When I tried to test the harddrive using dd, e.g.,

dd if=/dev/random of=/dev/ad0

(This command will wipe the entire disk with random data until the disk is full. The reason why I do it because I want to test every single sector of the disk.)

It gave the following message:

dd: /dev/ad0: open: I/O error

and I checked the /dev/ad0, e.g.,

ls -al /dev/ad0

The file was disappeared.

Apparently, the device was detached by the system automatically.

So, how do you solve this computer problem? Here are few methods I recommend you to try:

Solution: Check the SMART Status

You can check the SMART status of the harddrive using the following command:

smartctl -a /dev/ad

Make sure that the test result is PASSED.

If you don’t have smartctl installed, it is available in the following port:

/usr/ports/sysutils/smartmontools

Solution: How do you connect your harddrive?

Sometimes, connecting the harddrive through PCI card can cause issue (at least in my case). After connecting the harddrive to a different port, such as switching from port 1 of the card to port 3 of the motherboard, the computer problem is solved and gone. If the computer problem still exists, the next thing I will try is to connect the harddrive using USB or firewire. You can do it by getting an harddrive enclosure.

Solution: Replacing harddrive cables

Old harddrive cables can be the source of the computer problems too. Since the temperature inside the computer chassis is high, and the harddrive cables are usually bended, these can soften the cable and may break the metal wire inside the cable. Try replacing it by new cables and see the computer problem is gone or not. Also, check the power adapter as well. Sometimes this computer problem is caused by loose power connectors.

Solution: Have you installed any new harddrive recently?

Sometimes, the system will behave abnormally because of newly installed hardware. It can be any reason such as conflicting hardware etc. Recently, I installed a PCI flash card adapter, which caused the system very unstable. After I removed the card, the computer problem is solved and gone.

Solution: Is your Motherboard doing okay?

Although it is not likely, but this computer problem can caused by the burned motherboard. Sometimes, if a mother board is getting old, it can be unstable and not reliable (Heavy usage such as gaming can generate high temperature, which will decrease the life span of a motherboard). To determine the root of the computer problem, I will replace a motherboard and test the system again.

How do you know if your system is stable or not?

Here are few things I usually do to test the stability of a system:

1. Run the machine for at least a week.

2. Wipe all non-system harddrives using dd:

sudo dd if=/dev/random of=/dev/ad0 &
sudo dd if=/dev/random of=/dev/ad2 &
sudo dd if=/dev/random of=/dev/ad4 &

etc.

where ‘&’ at the end of the command means running it in background.

3. If possible, always keep your system in a cool place such as basement. It helps to keep the harddrive healthy.

–Derrick

Our sponsors:

Building a Super Large and Reliable File Server with Mixed Size of Harddisks

In this article, I am going to show you how to build a super large, ultra reliable, expandable file server with mixed size of hard drives.

Here is my criteria:

  • Large Storage Capacity. At this moment, the largest hard drive is 2TB. I am looking for at least 10TB.
  • Great Performance. The users should not feel any delay when multiple users are reading/writing to the file server at the same time.
  • Reliable. No data loss or inconsistent. The file system should repair by itself.
  • Expandable. The file system must be expandable. During the upgrade, the data should be preserved (i.e., don’t need to wipe out the original data)
  • Client Independent / Cross Platform. The user should be able to access the file server from any OS.
  • Software based / Hardware Independent. In case of hardware failure, it will be easy to transfer the entire system to a different computer.

I am going to show you how to implement all of these using FreeBSD and ZFS. The idea of the implementation is the same on other operating systems that support ZFS, such as *Solaris, *BSD etc. However, using ZFS on Linux (via Linux FUSE) is not recommended given the performance / stability issues (See Wikipedia for details). I personally do not recommend running ZFS on Linux in production environment.

Before I talk about how I do it, I like to go over what other technologies I tried before, and why they are not qualified.

RAID + LVM on Linux

This is one of the most common techniques used by many people on building file server. First, you need to build a RAID device using mdadm on the selected harddrives with identical size. If you have different size of harddrive, you will need to put them on a separated RAID device because mdadm does not support mixing different size of harddrive in a single RAID device without losing usable space. Later, you combine multiple devices (RAID, single harddrives etc) into a single partition using LVM.

The good thing about this technique is the expandability, i.e., you can add any hard drive to the partition at any time without losing any data at any time. However, there are few disadvantages of this combination:

Poor reliability
The reliability is handled at the RAID level. If your setup is not 100% RAID, such as the following example, the reliability can be discounted.
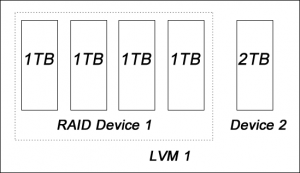
In this example, if the device 2 (2TB) is failed, the data that is stored on device 2 will be lost, because the data redundancy is only available on device 1.

Performance is not optimized
Data redundancy helps to improve the performance especially on reading. Again, if the setup is not one single RAID device, the performance can be discounted too.

So, let’s see how ZFS can solve these issues.

ZFS

ZFS is the next generation file system developed by Sun. It comes with all advantages of mdadm + LVM, plus a lot of features such as compression, encryption, power failure handling, checksum etc. So why this setup is better than the LVM one? Let’s take a look to the following example:
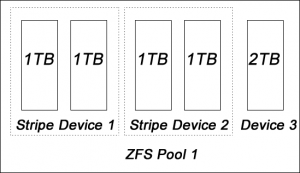
In this example, all devices in the ZFS pool are protected against data failure.

Let’s Start Building A Super Large File Server Now!

First, let’s assume that I have the following hardware:

  1. A 64-bit system with at least 2GB memory. Although ZFS will do fine on 32-bit system with 512MB memory, I recommend going with higher configurations because ZFS uses a lot of resources. In my case, I use an AMD Dual Core 4600+ (manufactured in 2006) with 3GB memory.
  2. Mixed size of harddrives, the size of the larger harddrive has to be divisible by the smaller one. In my case, I have 2TB and 1TB harddrives. Keep in mind that 2x1TB = 2TB.
  3. The harddrives are connected to the system using IDE/SATA. No firewire or USB.
  4. Four 1TB harddrives (A, B, C, D)
  5. Three 2TB harddrives (E, F, G)
  6. One extra harddrive, any size, reserved for the system uses. (H)

Using this combination(10GB in total), you can build a big file server with 8GB or 6GB, depending on your preference of data security.

I am going to build a RAIDZ2 device using FreeBSD and ZFS. In general ZFS is only available on the harddrives with the same size (without losing harddrive space). Since I want to put my 1TB and 2TB harddrives in the same pool, I first create couple RAID0 drives first. Then I add them together to make a big ZFS device. Here is the big picture:
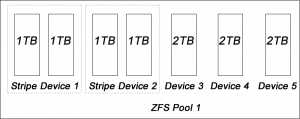
Building RAID0 Devices

As usual, login as root first.

sudo su

And load the stripe module:

kldload geom_stripe

Now we need to create a RAID0 device from /dev/ad1(A: 1TB) and /dev/ad2(B:1TB). If you are unsure about the device name, try running dmesg for details:

dmesg | grep ad
gstripe label -v st0 /dev/ad1 /dev/ad2

And label the new device: /dev/stripe/st0

bsdlabel -wB /dev/stripe/st0

Format the new device:

newfs -U /dev/stripe/st0a

Mount the device for testing:

mount /dev/stripe/st0a /mnt

Verify the size:

df -h

Add the following into /boot/loader.conf:

geom_stripe_load="YES"

Now, reboot your machine. If /dev/stripe/st0 is available, then your RAID0 device is ready.

If you need to build more RAID0 devices, repeat the above steps. Keep in mind that you need to change the device name from st0 to st1.

Putting all devices together into ZFS Pool

First, let’s enable ZFS first:

echo 'zfs_enable="YES"' >> /etc/rc.conf

and start ZFS:

/etc/rc.d/zfs start

Get your devices ready. In my cases, my devices name are:
/dev/ad5: 2TB
/dev/ad6: 2TB
/dev/ad7: 2TB
/dev/stripe/st0: 2TB (RAID0: 2x1TB)
/dev/stripe/st1: 2TB (RAID0: 2x1TB)

Create the ZFS pool, which will mount on /storage/data
Note that I use raidz2 here for extra protection against data failure. Basically, raidz (single parity) allows up to 1 failed harddrives while raidz2 (double parity) allows up to 2 failed harddrives.

  • RAIDZ: Usable space: 8GB, allow up to one 2TB harddrive group failed (i.e., one 2TB or two 1TB in the same group)
  • RAIDZ2: Usable space: 6GB, allow up to two 2TB harddrive groups failed (i.e., two 2TB or two 1TB in the different groups)
zpool create storage raidz2 /dev/ad5 /dev/ad6 /dev/ad7 /dev/stripe/st0 /dev/stripe/st1
zfs create storage/data

Verify the result:

zpool status
df -h

We need to make some performance tweaking first, otherwise the system will be very unstable. Add the following to the /boot/loader.conf

#Your Physical Memory minus 1 GB
vm.kmem_size="3g"
vm.kmem_size_max="3g"

vfs.zfs.arc_min="512m"

#Your Physical Memory minus 2GB
vfs.zfs.arc_max="2048m"


vfs.zfs.vdev.min_pending="1"
vfs.zfs.vdev.max_pending="1"

Now reboot the system:

reboot

To test the stability of the system, I recommend saving some files into the ZFS pool and run it for few days.

Why Running ZFS on Linux is not a Solution?

ZFS is not supported by Linux natively due to legal issue. In the other words, it is not supported by Linux kernel. Although ZFS has been ported to Linux via FUSE, which is running ZFS as an application, it will introduce the performance and efficiency penalties. (Source: ZFS Wiki). So I don’t recommend running ZFS on Linux.

Enhancement Idea

  1. You can use Samba to share the files with Windows users.
  2. To secure your data, I recommend set up another system on a separate machine and mirror the data using rsync.

Further Readings

  1. FreeBSD Handbook: RAID0 – Striping
  2. FreeBSD Handbook: The Z File System (ZFS)
  3. ZFS Tuning Guide

Our sponsors:

How to Install FreeBSD on Sun Blade 100

Recently, I received a Sun Blade 100 as a gift. After doing some research on which OS is the best for this machine, I decide to go with FreeBSD. So, my journey with Sun began here.

I only used Sun/Solaris in my engineering courses in college, I don’t have much experience with Sun hardware. I assumed that the experience should be similar – I was wrong.

So, here is what I have: A Sun Blade 100 connected with a regular USB PC keyboard. Note that Sun comes with its own keyboard, which has additional keys like STOP.

Anyway, after downloading the image of FreeBSD 8.1 Sparc64 and burning it into a DVD (You can burn it on any OS), I tried to boot the machine from DVD (Note that Sun Blade was release in 2002. You may need to verify that it is a DVD reader. You can replace the CD reader by any IDE DVD reader if needed.). And I received the following error messages:

Boot device: net  File and args:
Timeout waiting for ARP/RARP packet

Apparently, this machine does not know how to boot from CD/DVD automatically. After reading 20 posts, I finally got a solution:

If you have a Sun Keyboard:
1.) Push the power button to turn on the machine
2.) Pressing STOP and A key together

Otherwise:
1.) Push the power button to turn on the machine
2.) After the beeping sound, push the power button twice in a short time.

After trying it for few times, I finally got into the OpenBoot:

Aborting auto-boot sequence.
ok

So, I want to boot from CD:

boot cdrom

That’s it. The installation of FreeBSD on Sun is pretty much the same as on PC, except that the color of the installation menu looks a little bit weird.

If you experience any difficulties on booting from CD, make sure that both harddrive and DVD drive are jumpered to Cable Select, also you can verify the connections by running this command in the OpenBoot:

probe-ide

which will return something like:

Device 0 (Primary Master)
   ATA Mode: XXX
Device 1 (Primary Slave)
   Removeable ATAPI Model: YYY

Now you can install FreeBSD on your sparc64 machine!

Few things I’ve learned from running FreeBSD on Sun Machine (Sparc64)

  • Sun Blade 100 uses ECC (Error Correction Codes) memory. It doesn’t like the regular desktop memory.
  • Sun Blade 100 is old, the CPU speed is equivalent to Pentium II. It takes a long time to compile applications from ports. I recommend to install the applications using pkg_add first, and then run portmaster to update all apps. It will save you lots of time.
  • freebsd-update does not work on sparc64 machine. If you want to upgrade the FreeBSD system, you need to rebuild the kernel.
  • Sun Blade 100 is a heavy duty snail. For example, it can handle lots of inquires at the same time without crashing, but the processing speed is extremely slow. I don’t recommend using it for any applications that use more than 10% of CPU resource, e.g., Webserver (dynamic content), Database or Web Framework. I tried running all of my websites (including this blog) on Sun, which resulted terribly slow. My recommendations: Firewall, Router, Load Balancer.

That’s it! Have fun with Sun + FreeBSD.

–Derrick

Our sponsors:

Update for xz-4.999.9_1 failed

Recently, I tried to upgrade the installed port on my FreeBSD:

portmaster -Da

and I got the following message:

===>>> Launching child to update xz-4.999.9_1 to xz-5.0.0

===>>> Port directory: /usr/ports/archivers/xz

        ===>>> This port is marked IGNORE
        ===>>> is already in the base system

        ===>>> If you are sure you can build it, remove the
               IGNORE line in the Makefile and try again.

===>>> Update for xz-4.999.9_1 failed
===>>> Aborting update


===>>> You can restart from the point of failure with this command line:
       portmaster  ports-mgmt/portmaster

I google it and someone suggested to do the following:

Just run a

portmaster -e xz-4.999.9_1

And say yes to the prompt. 

Don’t do it!
I tried that and the nightmare began. It will first ask you whether you want to remove xz. Then it will go through every package that depends on xz, and ask you whether you want to delete them or not. If you accidentally click yes, your system will get into trouble.

Instead, try to deinstall it from port:

cd /usr/ports/archivers/xz
sudo make deinstall

This is a lot safer.

Our sponsors:

MySQL: Starting MySQL….. ERROR! The server quit without updating PID file

This step-by-step guide is mainly for FreeBSD, however the idea is the same for Linux. Every once a while, when I update my FreeBSD box, the system likes to shutdown my MySQL server. Therefore, I need to start it again after the update is done. Unfortunately, the upgrade process is not smooth every time. Sometimes it will throw me some error.

/usr/local/etc/rc.d/mysql.server start

Oh well, I got the following error messages:

Starting MySQL..... ERROR! The server quit without updating PID file.

Sometimes, the message will tell you the exact location of which PID file:

Starting MySQL..... ERROR! The server quit without updating PID file (/var/db/mysql/www.icesquare.com.pid).

There are several solutions to troubleshoot these problems. I will go over each one by one.

Solution 1: Reboot The Computer

Although it sounds simple, but it really works. During the system upgrade, the OS may disable some of your daemons. Instead of troubleshooting each one by one, the easiest way is to start everything over. For example, I experienced this problem today after upgrading the Apache and Ruby (Yes, MySQL is not part of the update), and I got this error message afterward. After rebooting the computer, the error message is gone.

Solution 2: Remove Your MySQL Config File

If you have modified your MySQL configuration file, MySQL may not like it few versions after (MySQL is not backward compatibility friendly). It can be the problem of using an unsupported variable, or something similar. The easiest way is to remove your configuration file, and try to start the MySQL server again:

Backup your MySQL configuration first.

mv /etc/my.cnf /etc/my.cnf.backup

And restart the MySQL server again:

/usr/local/share/mysql/mysql.server start

Hopefully you will see the following message:

Starting MySQL. SUCCESS!

Solution 3: Upgrade Your Database File

Sometimes, the newer MySQL doesn’t like the database created in earlier version. I discovered this when I upgrade to MySQL 5.5.7:

Starting MySQL..... ERROR! The server quit without updating PID file (/var/db/mysql/www.icesquare.com.pid).

Since MySQL tells me which PID file causes the problem, I open the file and take a look what’s going on:

sudo tail /var/db/mysql/www.icesquare.com.err

And I saw something interesting: tables: Table ‘mysql.proxies_priv’ doesn’t exist:

101112 10:49:16  InnoDB: Initializing buffer pool, size = 128.0M
101112 10:49:16  InnoDB: Completed initialization of buffer pool
101112 10:49:16  InnoDB: highest supported file format is Barracuda.
101112 10:49:17  InnoDB: 1.1.3 started; log sequence number 1589404
101112 10:49:17 [ERROR] Fatal error: Can't open and lock privilege tables: Table 'mysql.proxies_priv' doesn't exist
101112 10:49:17 mysqld_safe mysqld from pid file /var/db/mysql/www.icesquare.com.pid ended

The reason is very simple. MySQL could not open a table created in the earlier version (< 5.7.7) because it is not compatible with the current version. So, we can try to start the MySQL in safe mode through rc.d. First, you can edit the /etc/rc.conf and put the following into the file:

mysql_enable="YES"
mysql_args="--skip-grant-tables --skip-networking"

Restart MySQL through rc.d:

/usr/local/etc/rc.d/mysql-server start

If you did it right, you should see something like the following:

Starting MySQL.. SUCCESS!

Now, MySQL is already running the safe-mode. We want to perform a MySQL upgrade on all tables:

sudo mysql_upgrade

You should see something like this:

Looking for 'mysql' as: mysql
Looking for 'mysqlcheck' as: mysqlcheck
Running 'mysqlcheck' with connection arguments: '--port=3306' '--socket=/tmp/mysql.sock'
mysql.columns_priv                                 OK
mysql.db                                           OK
mysql.event                                        OK
mysql.func                                         OK
mysql.general_log                                  OK
mysql.help_category                                OK
mysql.help_keyword                                 OK
mysql.help_relation                                OK
mysql.help_topic                                   OK
mysql.host                                         OK
mysql.ndb_binlog_index                             OK
mysql.plugin                                       OK
mysql.proc                                         OK
mysql.procs_priv                                   OK
mysql.servers                                      OK
mysql.slow_log                                     OK
mysql.tables_priv                                  OK
mysql.time_zone                                    OK
mysql.time_zone_leap_second                        OK
mysql.time_zone_name                               OK
mysql.time_zone_transition                         OK
mysql.time_zone_transition_type                    OK
mysql.user                                         OK
Running 'mysql_fix_privilege_tables'...
OK

Now, we want to switch the MySQL back to normal mode by commenting the extra options in /etc/rc.conf:

mysql_enable="YES"
#mysql_args="--skip-grant-tables --skip-networking"

And restart MySQL through /etc/rc.d:

/usr/local/etc/rc.d/mysql-server restart

Now the MySQL is up and running again!

Happy MySQLing.

–Derrick

Our sponsors:

What can you do with A8M2N-LA / NodusM-GL8E?

Recently, I decided to turn my HP m7557c computer (motherboard: A8M2N-LA / NodusM-GL8E) to an Unix server. The nightmare began. After trying nearly 10 different operating systems and distributions, I found that only very few of them worked with A8M2N-LA / NodusM-GL8E. I think it is worth to share my experience with this beast – an experiment result that took more than 100 hours.

I have not failed. I've just found 10,000 ways that won't work.
-- Thomas A. Edison
The following operating system are listed in alphabetically:

Fedora 13
Status: No
Comment: Installation went well, but the system was very unstable due to kernel panic. This mother board may not compatible with the newer Linux kernel.

FreeBSD 7.3
Status: No
Comment: Does not support USB keyword, i.e., can’t start the installation.

FreeBSD 8.1
Status: Yes
Comment: Stable, however the harddrives are very unstable. Sometimes the system complains about the harddrive. See the full story here.

FreeBSD 8.2
Status: Yes
Comment: Very stable. No problem found so far.

OS X 10.4
Status: No
Comment: Installation failed.

OS X 10.5.8
Status: No
Comment: Installation completed, but very unstable. The system reboots itself.

OS X 10.6
Status: No
Comment: Installation failed

Ubuntu 9.10
Status: Yes, stable.

Ubuntu 10.04
Status: No
Comment: If install directly from the disk, the system will not boot. The only possible way is to upgrade from an earlier version. See Ubuntu 10.04 – Can’t boot / Can’t install for details.

Ubuntu 10.10
Status: No
Comment: Cannot even load the installation disk.

Hope my experience is helpful to you.

–Derrick

Our sponsors: