iLeopard Mail for Thunderbird 3.1

iLeopard Mail has been my favorite Thunderbird theme for a long time. Recently, I upgraded to Thunderbird 3.1 and I found that this theme is no longer available. Since I cannot find any theme that is similar to iLeopard Mail, I decide to upgrade the theme and make it compatible with Thunderbird 3.1.

Here is the instructions on how to make iLeopard Mail compatible with Thunderbird 3.1:

1. Click here to download iLeopard Mail for Thunderbird 3.1

2. Open Thunderbird

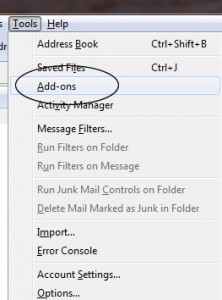
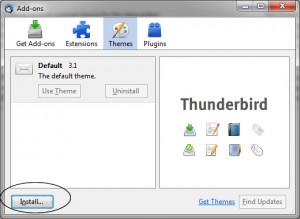
3. Tools –> Add-ons –> Themes

4. Click the Install button

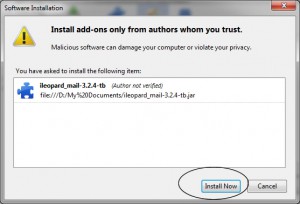
5. Select the file you just downloaded, i.e., ileopard_mail-3.2.4-tb.jar

6. Click the Install button again

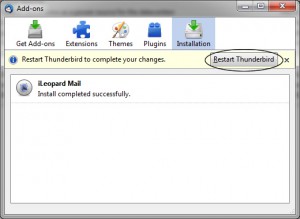
7. Restart Thunderbird if needed

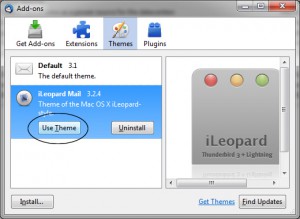
8. Depends on how many theme is installed in your Thunderbird, it may or may not load the new theme automatically. You may need to activate the theme:

Enjoy your iLeopard Mail on Thunderbird 3.1!

Our sponsors:

Copycat is the royal road to success

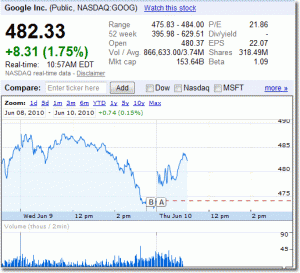
After Google followed Bing to put the wallpaper on their page, its stock price has grown up for $8.31 in about 90 minutes today.

Update an hour after the post: It seems that the stock price has something to do with the quality of the wallpaper:

Our sponsors:

fetch: ftp://ftp.FreeBSD.org/pub/FreeBSD/ports/distfiles/ngx-fancyindex-0.2.2.tar.bz2: File unavailable (e.g., file not found, no access)

Today I tried to run the upgrade my nginx on my FreeBSD box, and I received the following message:

===>  Vulnerability check disabled, database not found
===>  License accepted by the user
===>  Found saved configuration for nginx-0.7.66
=> ngx-fancyindex-0.2.2.tar.bz2 doesn't seem to exist in /usr/ports/distfiles/.
=> Attempting to fetch from http://connectical.com/attachments/download/26/.
fetch: http://connectical.com/attachments/download/26/ngx-fancyindex-0.2.2.tar.bz2: Not Found
=> Attempting to fetch from ftp://ftp.FreeBSD.org/pub/FreeBSD/ports/distfiles/.
fetch: ftp://ftp.FreeBSD.org/pub/FreeBSD/ports/distfiles/ngx-fancyindex-0.2.2.tar.bz2: File unavailable (e.g., file not found, no access)
=> Couldn't fetch it - please try to retrieve this
=> port manually into /usr/ports/distfiles/ and try again.

Obviously, the FreeBSD box could not download the file. To fix this problem, simply run the following commands:

cd /usr/ports/distfiles/
sudo wget http://files.connectical.com/gentoo/ngx-fancyindex-0.2.2.tar.bz2

This will allow FreeBSD to skip downloading the file from a wrong URL. Now, go back to the nginx port:

cd /usr/ports/www/nginx

and try to install nginx again:

sudo make install clean

Our sponsors:

-bash: /dev/null: Permission denied

Recently, I found that Ubuntu gives the following error when I log in to the system:

-bash: /dev/null: Permission denied

After I run the following command, the problem is gone:

sudo chmod 0666 /dev/null

Our sponsors:

Softlink / Symbolic Link doesn’t work on Samba – Solved

After upgrading my Samba servers (One is Ubuntu Linux, and the other one on Fedora Linux), I found that I can no longer access the symbolic links / soft links from Windows. It keeps returning “permission error”, “You don’t have permission to access this folder” etc. I am pretty sure that it has nothing to do with my user permission settings because it was working just fine before the upgrade. After trying several solutions, here is what I come up:

Edit your samba configuration file:

sudo nano /etc/samba/smb.conf

Add the following into the global section, i.e.,

[global]
...
follow symlinks = yes
wide links = yes
unix extensions = no
...

Save your file and restart Samba:

sudo /etc/init.d/samba restart

It should work now.

Our sponsors:

Ubuntu 10.04 – Can’t boot / Can’t install – Solved

Since Ubuntu 10.04 is out officially, I like to give it a try on my media server.

FYI, here is the specification of my media server:

Athlon 64 X2 4600
Chipset: GeForce 6150 LE
Motherboard: Asus A8M2N-LA
Harddrive format: IDE

Note that this is a 2006 model and the system was installed on an IDE drive. That may be the reason why the new Ubuntu 10.04 doesn’t like. Anyway, I tried to install Ubuntu 10.04 using three different methods. Here is the detail:

Trial 1 – Fresh install with Ubuntu 64-bit Desktop installation

Won’t even get into the installation menu.
After selecting to boot from CD, the system was stuck in the blank screen. It couldn’t even go further to the installation welcome menu. So I moved to the the next option.

Trial 2 – Fresh install with Ubuntu 64-bit Alternate installation

Better – But can’t reboot.
The installation went very smooth without a single problem. However, after the installation was completed, it couldn’t boot to the Ubuntu system.

Trial 3 – Upgrade from Ubuntu 9.10 64-bit Desktop installation

Works!
This time, I performed a fresh install using Ubuntu 9.10 64-bit Desktop first. The installation went very smooth. After the installation, I did the following in order:

  1. Updated the hardware driver such as graphic and audio.
  2. Updated the the package information:

    sudo apt-get update -y
  3. Upgraded the system to the latest kernel:
    sudo apt-get dist-upgrade -y
  4. Reboot
  5. Now the Ubuntu 9.10 should be ready to move on the next version.

Next, go to System -> Admin -> Software Update

It will give prompt you that a new version of Ubuntu is available. Click that, follow the instructions and you are done!

Note: I’ve tried upgrading the Ubuntu from command line but it failed. Probably there are some differences between the GUI upgrade and the command line upgrade tool.

Enjoy your new Ubuntu, it is really cool!

What about upgrading from Ubuntu 9.04?

I haven’t tried upgrading from Ubuntu 9.04 to Ubuntu 10.04 before, so I cannot comment. However – I tried upgrading from 9.04 to 9.10 and it failed (from command line and GUI). The system could not boot after the upgrade. FYI, here is the specification of my machine:

Mac G3 400MHz
Harddrive format: IDE

It could be the reason of a different architecture (It is a Power PC instead of i386/amd64). Since it is a 10 yrs old machine, I didn’t spend too much effort to investigate.
By the way, I also tried to install Fedora 12 on this machine and it gives the same problem, i.e., Installation goes fine but the system could not boot.

Our sponsors:

MediaWiki Error: “Parse error: syntax error, unexpected T_NAMESPACE, expecting T_STRING in /usr/local/www/apache22/data/wiki/includes/Namespace.php on line 46”


After upgrading my PHP to 5.3.2, I received the following error when accessing MediaWiki (1.6.12):

Parse error: syntax error, unexpected T_NAMESPACE, expecting T_STRING in /usr/local/www/apache22/data/wiki/includes/Namespace.php  on line 46

There are three solutions:

  1. Downgrade your PHP from 5.3 back to 5.2
  2. Upgrade your MediaWiki to a newer version.
  3. Fix the codes.

In my case, the first couple solutions do not work for me, and therefore I choose 3.

  1. Backup your wiki file first.
  2. Access your webserver and go to the MediaWiki/includes directory.
    For example:

    cd /usr/local/www/apache22/data/wiki/includes
  3. Edit Namespace.php
    nano Namespace.php
  4. Go to line 46, change the following from:
    class Namespace {

    to:

    class MWNamespace {

    Save the file.

  5. Now, let’s create a script:
    nano wikifix.sh

    Copy and paste the following:

    for fl in *.php; do
    mv $fl $fl.old
    sed 's/Namespace::/MWNamespace::/g' $fl.old > $fl
    done

    Save the file.

  6. Change the file to executable by:
    chmod u+x wikifix.sh
  7. Search the keyword Namespace:: and replace it by MWNamespace:::
    ./wikifix.sh

    Warning: Don’t run the script twice!

  8. Delete the script.
    rm wikifix.sh

Try to access the MediaWiki again and the problem should be gone.

Enjoy Wiki.

–Derrick

Our sponsors:

How to free up space on your iPod?

I have a 30GB iPod and I am always running out of space. Recently I found that iTune 9.1.079 comes with a new feature. This features simply converts high quality music file to standard quality music. By doing this, which results in decreasing the file size and free up the space for other music.

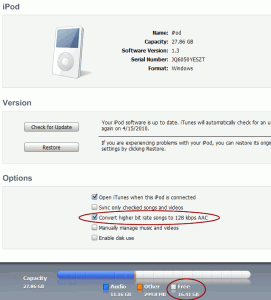
To enable this feature, simply open your iTune –> iPod –> Summary tab –> Options section –> Check the option: “Convert higher bit rate songs to 128 kbps AAC”

Click below to enlarge the screenshot:

How to save space on your iPod?

How to save space on your iPod?

Before I enabled this option, there were only 2GB left on my iPod. Now I have 16.41GB free space, which is 8 times more than before!

Our sponsors:

ERROR 2006 (HY000) at line 172: MySQL server has gone away

Today I imported the MySQL database and I got the following error:

# mysql -u root -p db_test < test.db
Enter password:
ERROR 2006 (HY000) at line XX: MySQL server has gone away

It is because the data (SQL query) is too large to imported. To solve this problem, simply edit the MySQL configuration files: /etc/my.cnf

Replace the following from:

max_allowed_packet = 1M

To:

max_allowed_packet = 16M

Or something higher.

Restart the MySQL server again and the problem will be gone.

/usr/local/share/mysql/mysql.server restart

–Derrick

Our sponsors:

Thought on Opera Mini for iPhone

After trying the Opera Mini for iPhone, here is my comment:

  1. Zoom is missing. You can’t use finger to zoom in/out the page. It makes it very hard to browse the full-size page from the phone.
  2. Poor support on JavaScript. Website that works fine on Safari doesn’t mean they will do fine on Opera Mini.
  3. Lack of support. Many iPhone-friendly websites do not support Opera mini.

Suggested headline news for Opera.com:

  • There are over million of download of Opera Mini in 2 hours.

Suggested headline for Apple.com:

  • Safari is still the best iPhone browser on the planet.
  • 80% of the iPhone users remove the Opera Mini within 5 minutes.
  • Since Opera Mini cannot do the zoom and render JavaScript correctly, it should be recalled and removed from the iPhone App store.

Suggested response to Opera:

  • Opera Mini is still the 2nd best (and 2nd most popular) browser for iPhone on the planet.
  • (Keep in mind that  there are only two browsers for iPhone…)

Our sponsors: