[Solved]Problem to Update OpenLDAP in FreeBSD

Recently, I found the following error message when updating my FreeBSD system regarding to the OpenLDAP:

===>  Installing for openldap-client-2.4.31
===>   Generating temporary packing list
===>  Checking if net/openldap24-client already installed
===> Creating users and/or groups.
Using existing group `ldap'.
Creating user `ldap' with uid `389'.
pw: user 'ldap' already exists
*** Error code 74

Stop in /usr/ports/net/openldap24-client.
*** Error code 1

Stop in /usr/ports/net/openldap24-client.

And I don’t use LDAP in particular, however it affects other applications that use LDAP, e.g., PHP

php -v
PHP Warning:  PHP Startup: Unable to load dynamic library '/usr/local/lib/php/20090626/ldap.so' - Shared object "libldap-2.4.so.8" not found, required by "ldap.so" in Unknown on line 0
PHP 5.3.10 with Suhosin-Patch (cli) (built: Feb 14 2012 16:59:15)
Copyright (c) 1997-2012 The PHP Group
Zend Engine v2.3.0, Copyright (c) 1998-2012 Zend Technologies
    with eAccelerator v0.9.6.1, Copyright (c) 2004-2010 eAccelerator, by eAccelerator

It is very simple to solve this problem. All you need is to remove the user ‘ldap’, and install the port again. First, let’s remove the user ‘ldap’ first:

sudo vipw

You will see this line:

ldap:*:389:389::0:0:OpenLDAP Server:/nonexistent:/usr/sbin/nologin

Remove the line by pressing ‘dd’, hit ‘ESC’ button, and then press ‘:wq’ to save the file and quit the editor.

After that, let’s clean the port and run the update again:

cd /usr/ports/net/openldap24-client
sudo make clean
sudo make install clean

That’s it. Your LDAP will be happy and your applications (such as PHP) will not complain.

Our sponsors:


–Derrick

[FreeBSD] Samba does not start after updating to 3.5.14

After I updated my Samba to 3.5.14 on my FreeBSD box today, it stopped working. I couldn’t connect to the Samba server from my Windows clients. Initially, I thought it was the memory cache issues, and I thought the problem would be solved by rebooting both machines. Unfortunately, it didn’t work. Therefore, I accessed to the server and check the cause of the problem.

First, I found that Samba was not evening running.

ps -ax | grep smb

So I started the Samba service manually:

sudo /usr/local/etc/rc.d/samba start

And it returned me the following message:

Cannot 'start' samba. Set winbindd_enable to YES in /etc/rc.conf or use 'onestart' instead of 'start'.

Oh that was easy. All I need to do was to modify my rc.conf:

#Samba service
samba_enable="YES"
winbindd_enable="YES"

And then I started the Samba again:

sudo /usr/local/etc/rc.d/samba start

Yay, Samba is up and running again!

–Derrick

Our sponsors:

[FreeBSD+ZFS]One or more devices has experienced an error resulting in data corruption. Applications may be affected.

When you check the ZFS status, you may find the following error message: One or more devices has experienced an error resulting in data corruption. Applications may be affected.. There can be million reasons to cause this error message showing up. Of course, 99% of them are caused by hardware failure, such as bad hard drives, broken cables, defective motherboard, or even bad memory. In this article, I am assuming that you already eliminated these possibilities, and have scratched your head for hours, and still have no clue which part went wrong. In fact, that’s what I did today.

Long story short. Here is how I experienced this error:

FreeBSD: 8.2-> 9.0
ZFS: 4 -> 5
ZPool: 15 -> 28

My system was working fine (FreeBSD 8.2; ZFS ver. 4, Zpool ver. 15), everything seems perfect. After I upgraded my system to FreeBSD 9, I upgraded the ZFS and Zpool to ver.5 and ver. 28, respectively. Everything seemed working fine until I check the status:

sudo zpool status -v
#sudo zpool status -v
  pool: storage
 state: ONLINE
status: One or more devices has experienced an error resulting in data
        corruption.  Applications may be affected.
action: Restore the file in question if possible.  Otherwise restore the
        entire pool from backup.
   see: http://www.sun.com/msg/ZFS-8000-8A
config:

        NAME        STATE     READ WRITE CKSUM
        storage     ONLINE       0     0     0
          raidz1-0  ONLINE       0     0     0
            ada0    ONLINE       0     0     0
            ada2    ONLINE       0     0     0
            ada3    ONLINE       0     0     0
            ada4    ONLINE       0     0     0
            ada5    ONLINE       0     0     0
            ada6    ONLINE       0     0     0
            ada7    ONLINE       0     0     0

errors: Permanent errors have been detected in the following files:

        storage/data:<0x0>

There are few things you need to pay attention:

The pool seems working fine, otherwise you will see FAULTED instead of ONLINE:

state: ONLINE

The system has no problem to read/write the data. Doesn’t seem to be hardware problem:

NAME        STATE     READ WRITE CKSUM
        storage     ONLINE       0     0     0
          raidz1-0  ONLINE       0     0     0
            ada0    ONLINE       0     0     0
            ada2    ONLINE       0     0     0
            ada3    ONLINE       0     0     0
            ada4    ONLINE       0     0     0
            ada5    ONLINE       0     0     0
            ada6    ONLINE       0     0     0
            ada7    ONLINE       0     0     0

This error message may give you some clue what’s wrong. Notice that storage and data are the pool names.

errors: Permanent errors have been detected in the following files:

        storage/data:<0x0>

The <0x0> represents the meta data of the pool. I think the problem may come from the upgrade process. Here are the steps how to solve this problem.

Force Clearing the Error

You can try to clear the error by running:

sudo zpool clear -F mypool

If it can clear the error, you are done. However, it is likely that it won’t work, and you need to move to the next step.

Scrubbing the Pool

You can try to scrub the entire pool by running:

sudo zpool scrub mypool

This will make the system to inspect every single block and correct the error. Although this process is long (It took 5 hours to inspect my 10TB pool), there is a very high chance that the problem will be corrected. Don’t forget to clear error after scrubbing the pool.

Making each devices online again

If the error still exists after scrubbing the entire pool (and clearing the error), you can try to force making each device go online:

sudo zpool online mypool /dev/ada0 /dev/ada2 /dev/ad4 ...

Try to reboot the computer

This is the last thing you can try. This will force the computer to mount the pool again. Hopefully it will clear the error and error status.

Rebuild the pool

If none of the method works, the only solution left is to rebuild the pool.

#Backup your data first
#sudo zpool destroy mypool
#sudo zpool create mypool ...

Good luck.

Our sponsors:

[FreeBSD]Problem to update PHP port

A new version of PHP (5.3.9) was available in FreeBSD today. Since it contained a lot of security fixes and enhancements, I decided to give it a try. After testing the new PHP in couple test servers, I think it is ready to upgrade the PHP on the production server. Oh well, I didn’t expect that I needed to spend my whole lunch break to trouble-shoot this problem. So here is what I did:

# cd /usr/ports/lang/php5
# make install
===>  Vulnerability check disabled, database not found
===>  License check disabled, port has not defined LICENSE
===>  Found saved configuration for php5-5.3.9
===>  Extracting for php5-5.3.9
=> SHA256 Checksum mismatch for php-5.3.9.tar.bz2.
=> SHA256 Checksum OK for suhosin-patch-5.3.4-0.9.10.patch.gz.
===>  Refetch for 1 more times files: php-5.3.9.tar.bz2
===>  Vulnerability check disabled, database not found
===>  License check disabled, port has not defined LICENSE
===>  Found saved configuration for php5-5.3.9
=> php-5.3.9.tar.bz2 doesn't seem to exist in /usr/ports/distfiles/.
=> Attempting to fetch from http://dk.php.net/distributions/.
fetch: http://dk.php.net/distributions/php-5.3.9.tar.bz2: Requested Range Not Satisfiable
=> Attempting to fetch from http://de.php.net/distributions/.
fetch: http://de.php.net/distributions/php-5.3.9.tar.bz2: Requested Range Not Satisfiable
=> Attempting to fetch from http://es.php.net/distributions/.
fetch: http://es.php.net/distributions/php-5.3.9.tar.bz2: Requested Range Not Satisfiable
=> Attempting to fetch from http://fi.php.net/distributions/.
fetch: http://fi.php.net/distributions/php-5.3.9.tar.bz2: Requested Range Not Satisfiable
=> Attempting to fetch from http://fr.php.net/distributions/.
===>  Vulnerability check disabled, database not found
===>  License check disabled, port has not defined LICENSE
===>  Found saved configuration for php5-5.3.9
=> SHA256 Checksum mismatch for php-5.3.9.tar.bz2.
=> SHA256 Checksum OK for  suhosin-patch-5.3.9-0.9.10.patch.gz
===>  Giving up on fetching files: php-5.3.9.tar.bz2
Make sure the Makefile and distinfo file (/usr/ports/lang/php5/distinfo)
are up to date.  If you are absolutely sure you want to override this
check, type "make NO_CHECKSUM=yes [other args]".
*** Error code 1

Stop in /usr/ports/lang/php5.
*** Error code 1

Stop in /usr/ports/lang/php5.
*** Error code 1

Stop in /usr/ports/lang/php5.

Initially, I thought it was a checksum error. So I decided to skip the checksum, i.e.,

#make install NO_CHECKSUM=yes

Unfortunately, it gave the same error. I think the problem might come from corrupted port files or port database. Instead of finding the source of the problem, I decided to rebuild the whole thing.

First, let’s remove the port database:

#sudo rm -Rf /var/db/portsnap/*

Next, we need to re-download all port files:

#sudo portsnap fetch extract

Some new ports may be released during the extraction, let’s make sure that the port tree is up to date:

#sudo portsnap fetch update

Now, we need to manually download the php source. Make sure that the file is stored in /usr/ports/distfiles/

#cd /usr/ports/distfiles/
#sudo wget http://fi.php.net/distributions/php-5.3.9.tar.bz2

Now, try to test whether the system can build php again. Notice that this will not install the PHP in your system.

cd /usr/ports/lang/php5
sudo make

If it gives no error, which means the PHP is ready to go. Now let’s clean up our work and make sure everything is ready.

sudo make clean

Notice that there is no way to upgrade the PHP from Make without uninstall it. Since it is a production server, I want to keep the website running. So I decide to let Portmaster to do all dirty works for me.

sudo portmaster -Da

Depending on your CPU, it may take 5 minutes to an hour to finish the update. Normally, the standard php package will work fine after the update. However, if it is not a standard package, such as PECL, you will need to do one more step. For example, here is the error messages right after I upgraded PHP:

#php -v
[eAccelerator] This build of "eAccelerator" was compiled for PHP version 5.3.8.
Rebuild it for your PHP version (5.3.9) or download precompiled binaries.

PHP Warning:  PHP Startup: Unable to load dynamic library '/usr/local/lib/php/20090626/memcache.so' - /usr/local/lib/php/20090626/memcache.so: Undefined symbol "php_session_create_id" in Unknown on line 0

PHP Warning:  PHP Startup: Unable to load dynamic library '/usr/local/lib/php/20090626/tokyo_tyrant.so' - /usr/local/lib/php/20090626/tokyo_tyrant.so: Undefined symbol "ps_globals" in Unknown on line 0

PHP 5.3.9 with Suhosin-Patch (cli) (built: Jan 12 2012 13:09:43)
Copyright (c) 1997-2012 The PHP Group
Zend Engine v2.3.0, Copyright (c) 1998-2012 Zend Technologies

[eAccelerator] This build of “eAccelerator” was compiled for PHP version 5.3.8.
Rebuild it for your PHP version (5.3.9) or download precompiled binaries.

To solve this problem, simple rebuild the package, i.e.,

cd /usr/ports/www/eaccelerator
sudo make deinstall install clean

PHP Warning: PHP Startup: Unable to load dynamic library ‘/usr/local/lib/php/20090626/memcache.so’ – /usr/local/lib/php/20090626/memcache.so: Undefined symbol “php_session_create_id” in Unknown on line 0

#cd /usr/ports/databases/pecl-memcache
#sudo make deinstall
#sudo make install clean

PHP Warning: PHP Startup: Unable to load dynamic library ‘/usr/local/lib/php/20090626/tokyo_tyrant.so’ – /usr/local/lib/php/20090626/tokyo_tyrant.so: Undefined symbol “ps_globals” in Unknown on line 0

#cd /usr/ports/pecl-tokyo_tyrant
#sudo make deinstall
#sudo make install clean

After the re-installation is completed, make sure that PHP gives no complain:

#php -v

PHP 5.3.9 with Suhosin-Patch (cli) (built: Jan 12 2012 13:09:43)
Copyright (c) 1997-2012 The PHP Group
Zend Engine v2.3.0, Copyright (c) 1998-2012 Zend Technologies

That’s it! Have fun.

Our sponsors:

[FreeBSD-update]Installing updates…install: ///usr/src/lib/libc/gen/libc_dlopen.c: No such file or directory

When I tried to upgrade my FreeBSD system today, I received a last minute Christmas gift from the FreeBSD team. 🙂

#sudo freebsd-update fetch
Looking up update.FreeBSD.org mirrors... 4 mirrors found.
Fetching metadata signature for 8.2-RELEASE from update4.FreeBSD.org... done.
Fetching metadata index... done.
Inspecting system... done.
Preparing to download files... done.

The following files will be added as part of updating to 8.2-RELEASE-p5:
/usr/src/lib/libc/gen/libc_dlopen.c

I got the following error:

#sudo freebsd-update install
Installing updates...install: ///usr/src/lib/libc/gen/libc_dlopen.c: No such file or directory
 done.

Initially, I thought the problem was a typo in the freebsd-update profile, so I gave this a try:

sudo cat /var/db/freebsd-update/* | grep libc_dlopen.c

Unfortunately, I couldn’t find anything. So I investigated the problem, and I found that it was caused by the missing source. In a nut shell, if you did not install the FreeBSD with the source (i.e., /usr/src is empty), this problem will show up.

To fix this problem, simply create a dummy directory:

sudo mkdir -p /usr/src/lib/libc/gen

and re-run everything once again, i.e.,

#sudo freebsd-update fetch
#sudo freebsd-update install
#sudo reboot

After the computer finishes rebooting, verify that the upgrade is done:

# sudo freebsd-update fetch
Looking up update.FreeBSD.org mirrors... 4 mirrors found.
Fetching metadata signature for 8.2-RELEASE from update2.FreeBSD.org... done.
Fetching metadata index... done.
Inspecting system... done.
Preparing to download files... done.

No updates needed to update system to 8.2-RELEASE-p5.

That’s it!

Enjoy this last minute Christmas gift from the FreeBSD team. Merry Christmas! 🙂

–Derrick

Our sponsors:

How to Delete System Mail / Empty System Mail box in FreeBSD / Linux?

When I checked my FreeBSD system mail box today, I found that there were 8000 system mails sitting my mail box:

mail
Mail version 8.1 6/6/93.  Type ? for help.
"/var/mail/root": 8182 messages 8182 new
>N  1 [email protected]  Fri Sep 30 03:02  44/1330  "x.com output"
 N  2 [email protected]  Fri Sep 30 03:02  72/2464  "x.com output"
 N  3 [email protected]  Sat Oct  1 03:01  35/1075  "x.com output"
...
Another 8000 lines go here

There are several ways you can do. Either you can go through them one by one and delete them one at a time, i.e.,

d
[Hit the ENTER Key]

Or specify which mails you like to delete by ID, e.g.,

d x-y
[Hit the ENTER Key]

where x and y are the start and end of the mail ID, respectively.

For example, if you want to empty your FreeBSD mail box, you can do the following:

d 1-8182
[Hit the ENTER Key]

where 8182 is the number of mails I have.

You can find the number of your emails when you open your mail box:

"/var/mail/root": 8182 messages 8182 new

Hit the enter key again to confirm that the mail box is empty:

At EOF

And leave the mail box.

q

Now, try to access your mail box again, and the system should tell you that you have no system mail.

# mail
No mail for root

That’s it.

How to stop generating the system mails

Whenever the system run a background job, it will store the output of the program and email to the system mail box for auditing purposes. However, you can disable this feature if you don’t care the output.

Normally, we run a script this way:

start.sh

To avoid any output, we do the following instead:

start.sh > /dev/null 2>&1

For example, if you run many cron jobs, you need to go over your cron job list and add this to every single script, i.e.,

sudo nano /etc/crontab
or
crontab -e

and add /dev/null 2>&1 to every command.

Hope it helps.

–Derrick

Our sponsors:

ZFS+USB: Building a Super Large Server Using USB Memory, CF Card and SD Card.

I got a lot of unused USB thumb drives, CF flash card and SD cards sitting in my drawer. The sizes range from 8MB to 8GB. Unlike few years ago, it is getting a lot easier to access to the Internet, so I no longer need to carry my data via memory device any more. Instead, I simply connect to the Internet and the data is with me. That’s why my USB thumb drivers / CF flash cards / SD cards have been sitting in my drawer for few years.

I got an idea one day. It would be a waste to let them sitting in my drawer (or waiting to be sent to landfill). Why not I use them to build a file server. At least I can test out whether the idea is doable or not. So here are the candidates:

  • USB Thumb drives

    1. 8GB x 2
    2. 1GB x 1
    3. 256MB x 2
  • CF Flash Card

    1. 2GB x 1
    2. 1GB x 1
    3. 512MB x 2
  • SD Card

    1. 4GB x 2

As you can see from my list, the size of each candidates varies from 256MB to 8GB. So it will be interesting to put them together and build a super large file server.
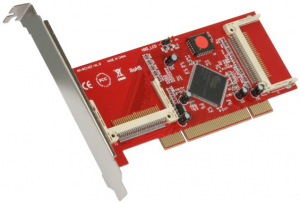
Most computer has multiple USB ports available. If you don’t have enough USB port, get a powered USB hub (i.e., the USB hub has it own power unit), it will be more efficient then getting the power from the computer. For the CF card, I use a SYBA SY-PCI48001 PCI to Compact Flash Adapter to connect my CF Flash cards to my computer. For the SD cards, I simply connect each of them to a Sandisk USB SD card reader.

Okay, let’s talk about the software. I am going to use ZFS to implement it, because it is quick and simple. First, connect all devices to your computer, and make sure that your operating systems can recognize all of them. In this tutorial, I am using FreeBSD as a tutorial. However, the idea should be the same in other ZFS ready system, such as Solaris.

Make sure that all USB devices are recognized by your operating system. In FreeBSD, the devices are registered as /dev/da* or /dev/ad*:

dmesg | egrep 'ad|da'

Now, you need to think about how to group your devices together. Do you simply want to build a pure USB ZFS pool, or a hybrid hard drive/USB pool. To keep thing simple, I will go with pure USB ZFS pool.

Suppose I am going to create a pure USB pool, which simply include every device in one single place:

zpool create myzpool /dev/ad0 /dev/ad1 /dev/ad2 /dev/da0 /dev/da1 /dev/da2

where the ad* and da* are the locations of my devices.

This will create a big pool. When you write some data to this pool, e.g.,

sudo dd if=/dev/random of=/myzpool/test_file count=10g bs=1M

The system will simply split the file into multiple chunks, and write all chunks to each USB devices at the same time.

Now let’s verify the pool information:

zpool iostat -v
               capacity     operations    bandwidth
pool         used  avail   read  write   read  write
----------  -----  -----  -----  -----  -----  -----
myzpool
  ad12       969M   112K      0      0  1.15K  66.4K
  ad13      1.90G   112K      0      0  1.74K  66.4K
  ad14       480M    11K      0      0  3.08K  66.9K
  da0          1G  2.78G      0      0  5.55K  66.1K
  da1          1G  2.78G      0      0  5.55K  66.1K
  da2        240M    80K      0      0  2.41K  66.8K
  da3        240M   112K      0      0  1.87K  66.8K
  da4       7.50G    80K      0      0  4.35K  66.5K
  da5       7.50G    96K      0      0  2.98K  66.3K
  da6        972M   112K      0      0    278  39.9K
----------  -----  -----  -----  -----  -----  -----

As you can see, the system is split the data and write it to each devices. ZFS is very smart to adjust the number of split to optimize the performance.

Okay, what about the performance? Honestly you can’t expect too much from a pure-USB zpool, because the write speed is limited to 40MB/s, which is way too slow compared to the disk. The only advantage is that there is no moving parts, which significant decrease the failure rate, and the overall cost is cheap. Now, let’s make talk about the hybrid pool, a combination of USB and hard drive pool.

A hybrid ZFS pool is a combination of hard drives and USB drives. In my experiment, I put the USB devices as log and cache devices, while the hard drives are used as main storage. If you don’t know what is ZFS log or ZFS cache, you can think about a ZFS log devices is a buffer for writing the data, while a ZFS cache is for reading the data.

Ideally, you should use two identical devices (same size) for ZFS log (writing the data). For ZFS cache, it doesn’t matter.

First, let’s create our ZFS pool with the storage devices (i.e., hard drives) only.

zpool create myzpool raidz /dev/ad0 /dev/ad1 /dev/ad2

Next, we need to add the ZFS log. We are going to create a mirror, so that they have to be identical.

zpool add myzpool log mirror /dev/da0 /dev/da1

Finally, we add the ZFS cache.

zpool add myzpool cache /dev/da2 /dev/da3 /dev/da4

And let’s take a look to the whole picture:

zpool iostat -v
               capacity     operations    bandwidth
pool         used  avail   read  write   read  write
----------  -----  -----  -----  -----  -----  -----
myzpool     5.83T  6.79T      9      2  1.03M   311K
  raidz1    5.83T  6.79T      9      1  1.03M   179K
    ad0         -      -      2      0   171K  29.9K
    ad1         -      -      2      0   171K  29.9K
    ad2         -      -      2      0   171K  29.9K
    ad3         -      -      2      0   171K  29.9K
    ad4         -      -      2      0   171K  29.9K
    ad5         -      -      2      0   171K  29.9K
    ad6         -      -      2      0   171K  29.9K
  da0        128K  3.78G      0      0      0  65.9K
  da1           -      -      0      0      0  65.9K
cache           -      -      -      -      -      -
  da2        961M     8M      0      0  1.14K  66.6K
  da3       1.89G     8M      0      0  1.73K  66.6K
  da4        472M     8M      0      0  3.06K  67.0K
  da5        232M     8M      0      0  2.40K  66.9K
  da6        232M     8M      0      0  1.86K  66.9K
  da7       7.50G     8M      0      0  4.33K  66.6K
  da8       7.50G     8M      0      0  2.96K  66.5K
  da9        964M     8M      0      0    276  39.6K
----------  -----  -----  -----  -----  -----  -----

With this combination, I get a pretty good performance (both read/write). When I copy the data from Windows to this ZFS pool using Samba, I can get a pretty high transfer speed (Over 100MB/s). Sometimes it get even close to 110MB/s. This result is very amazing given that my hard drives are the standard SATA drives (non-SSD) only.

The reliability of the USB devices / CF card / SD card sometimes questionable. That’s one of the reason why I don’t use them as the permanent storage media (using as Cache / log is okay). In this design, I use two SD cards (4GB x 2 = 8GB) as the ZFS log devices. Since they are set up as mirror, if one dies, the other one will kick in, which will minimize the data lost. For the cache devices, if one device is failed, I can remove it from the ZFS pool at any time. There will be no data lost so it will be okay.

I have run this super large server for few months already. There is about 200GB data I/O everyday, so far I am very happy with the overall performance. The most important thing is, those unused memory devices are now very happy as they don’t need to be sent to landfill.

Our sponsors:

[PHP]How to get the number of CPU cores in Fedora, Ubuntu, and FreeBSD

I am working on a PHP application which needs to be deploy to multiple places. One of the variables is the number of CPU core. Since each server has different number of CPU cores, I need to specify the number of CPU core in my application for each server. I think there should be a smarter way to do it.

PHP is a scripting language, it has limit support on accessing the hardware level information. In short, there is no library or function to do it. Fortunately, we can do it via shell command. In the other words, the following methods are not limited to PHP, it will work in any languages, as long as your language supports running the UNIX command and catch the return.

Getting the number of CPU Cores – Linux

(Tested on Fedora, Ubuntu Linux, should work on other Linuxs because they all use the same Linux kernel.)

cat /proc/cpuinfo | grep processor | wc -l

This will return something like this:

8

Getting the number of CPU Cores – FreeBSD

sysctl -a | grep 'hw.ncpu' | cut -d ':' -f2

which will return something like this (notice the extra space before the number):

8

Now, let’s put everything together. Run the command inside your application (Here I am using PHP for example):

//Linux
$cmd = "cat /proc/cpuinfo | grep processor | wc -l";

//FreeBSD
$cmd = "sysctl -a | grep 'hw.ncpu' | cut -d ':' -f2";

$cpuCoreNo = intval(trim(shell_exec($cmd)));

Of course, you can make the application to detect the system automatically:

$cmd = "uname";
$OS = strtolower(trim(shell_exec($cmd)));

switch($OS){
   case('linux'):
      $cmd = "cat /proc/cpuinfo | grep processor | wc -l";
      break;

   case('freebsd'):
      $cmd = "sysctl -a | grep 'hw.ncpu' | cut -d ':' -f2";
      break;

   default:
      unset($cmd);
}

if ($cmd != ''){
   $cpuCoreNo = intval(trim(shell_exec($cmd)));
}

That’s it! Happy PHPing.

–Derrick

Our sponsors:

How to Set up a Pure-FTPd Server with Virtual User on FreeBSD

This tutorial is for FreeBSD. If you are looking for setting up Pure-FTPd on Linux, click here.

My client likes to send me a huge data file (More than 10GB after compressed). Since I don’t care about the security during the transfer, I decide to go with the old school technology: FTP.

Basically, I need to set up a FTP server with virtual user. In the other words, the log in used by the FTP server has nothing to do with my system login, and I can easily disable that at any time.

1.) Install Pure-FTPd

sudo pkg_add -r pure-ftpd

2.) Create a user for Pure-FTPd, here I simply call it ftpuser.

sudo adduser ftpuser

3.) Let say, we want to create a user called guest to access the ftp server. guest is a virtual user, and its virtual home is in /home/ftpuser/guest

sudo mkdir /home/ftpuser/guest
sudo chown -R ftpuser:ftpuser  /home/ftpuser/
sudo chmod a+rw -R /home/ftpuser/

4.) Edit /etc/inetd.conf and add the following:

ftp     stream  tcp     nowait  root    /usr/local/sbin/pure-ftpd -O stats:/var/log/pureftpd.log       pure-ftpd -l puredb:/usr/local/etc/pureftpd.pdb

5.) Restart inetd

ps -ax | grep inetd
sudo killall -HUP inetd
sudo /usr/sbin/inetd -wW -C 6

6.) Edit /etc/syslog.conf

sudo nano /etc/syslog.conf

7.) Restart syslog

ps -ax | grep syslog
killall -HUP syslogd
/usr/sbin/syslogd -ss

8.) Create a user and add it into the Pure-FTPd database:

sudo pure-pw useradd guest -u ftpuser -d /home/ftpuser/guest/

You can also set the quota and maximum space:
1000 files, 100MB quota

pure-pw useradd guest -u ftpuser -d /home/ftpuser/guest/ -n 1000 -N 100 

9.) Set the password in case you forget the enter the password:

pure-pw passwd guest

10.) Update the database:

pure-pw mkdb

11.) If the system could not update the database, try this instead (One command, not two):

sudo pure-pw mkdb /usr/local/etc/pureftpd.pdb -f /usr/local/etc/pureftpd.passwd

That’s it!

–Derrick

Our sponsors:

FreeBSD: Unable to find device node for /dev/ad0s1b in /dev!

While I reinstalled the FreeBSD on my FreeBSD box, I got the following error message:

Unable to find device node for /dev/ad0s1b in /dev!

I searched online and I found different solutions. The most popular one is about using the command, dd, to clean up the first and the last 35 blocks. However, this solution doesn’t always work.

The 35 block trick is mainly for GPT partition, which was created under Linux. However, my harddrive was used in FreeBSD last time. So the GPT problem doesn’t apply. Even I tried the solution to wipe out the first and the last 100 (which is more than 35) blocks, it didn’t work either. Therefore, I tried to wipe out the entire harddrive. It works.

1. Set up an environment such that you can use the command, dd, to wipe out your harddrive. You can either connect your harddrive to a working machine, or boot the system using Live CD.

2. Run the following command to determine the correct location of your harddrive:

su
fdisk -l

Let say, it is on /dev/sda

3. Find out how many partitions have been created in this harddrive:

ls /dev/sda*

Let say there are two: /dev/sda, /dev/sda1

4. Wipe out each partition one by one:

dd if=/dev/zero /dev/sda bs=512
dd if=/dev/zero /dev/sda1 bs=512

5. After everything is done, you can verify it by running fdisk again:

fdisk -l

and it should say something like partition table not found, which is what we expect.

That’s it! Try to install FreeBSD again and everything should be fine.

If you still experience any difficulties, try the following trick:

1. After defining the geometry, don’t press the “w” key.
2. After creating the partitions, don’t press the “w” key.
3. When selecting the media, instead of choosing CD, try to use Network.

That should avoid most possible potential issues.

–Derrick

Our sponsors: