[Lightroom] How to save Lightroom Catalog on Network Drive in Windows

I am a heavy user of Adobe Lightroom. Often, I need to access my Lightoom catalog files using multiple computers. Currently, Lightroom only allows users to save the catalog files on a local hard drive, which is very inconvenient. For example, after I do the work using my office computer, I like to continue my work using my home computer. Unfortunately, it is very hard to synchronize my work with the current settings. I just don’t understand why Adobe have such a requirement because the catalog file is nothing more than a SQL Lite file (i.e., a database).

I tried to google for the solution, and I found a lot of different creative (but not practical) solutions. For example, someone suggested that the catalog could be saved on an external hard drive. Other suggested that the catalog can be saved to Dropbox, and let Dropbox to handle the synchronization. While these solutions seem to work, they are not practical at all! For the first solution (saving the data to an external drive), I think it is too risky and inconvenient to carry the data because the drive may fail at any time. For the second solution (saving the data to Dropbox), it only works for those who have fiber optics connections. For example, my catalog is nearly 40GB. Think about how long goes it take to upload/download a 40GB file with Dropbox…

Anyway, before you come here, you’ve probably already tried some other solutions, such as mapping your network drive locally, or creating a symbolic link. Obviously, none of those can trick Lightroom. Finally, I found a way to save my Lightroom catalog on a network drive. It is very simple and it can be done in few minutes.

I tested my solution on Windows 7 with Lightroom 4.4 and 5, and both Lightrooms have no problem to recognize my catalog that is stored on a network drive.

First, go to command prompt. You can do it by clicking the Start icon and type cmd and hit the ENTER key.

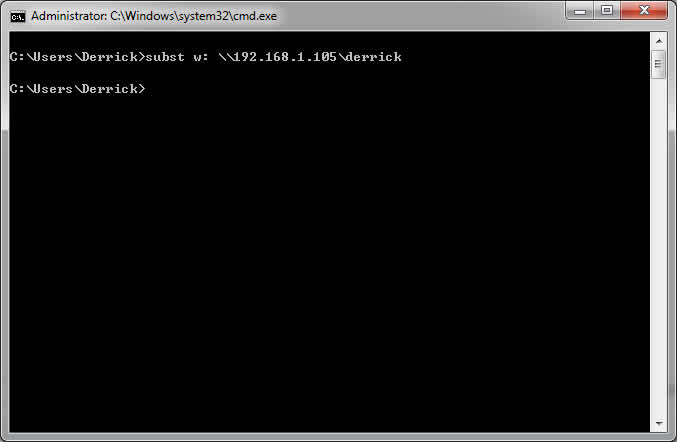
Now you will see a command line window. Type the following:

subst X: \\servername\sharename\

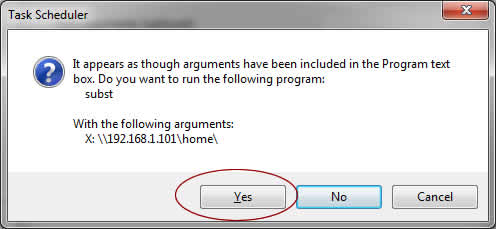
For example, suppose I want to map \\192.168.1.101\home to X:, I can type the following:

subst X: \\192.168.1.101\home\

Please click the thumbnail to enlarge the screenshots.

Now if you head to Windows Explorer, you will see something like this. Don’t worry about the “Disconnected Network Drive”, it is misleading. Try to open the drive. If it works, then you are half way done.

Now try to create a new Lightroom catalog and save to here. Adobe Lightroom doesn’t complain!

Next, we want to make this solution permanent. That’s because what we just did is for the current session only. Once we log off or reboot the computer, the drive will be gone. We are going to make Windows to automatically map the drive for us.

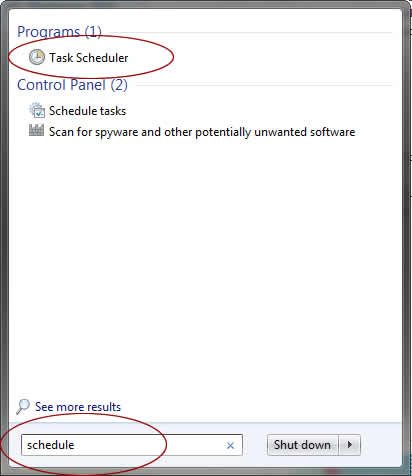
First, go to Start and type schedule. This will bring up the Task Schedule.

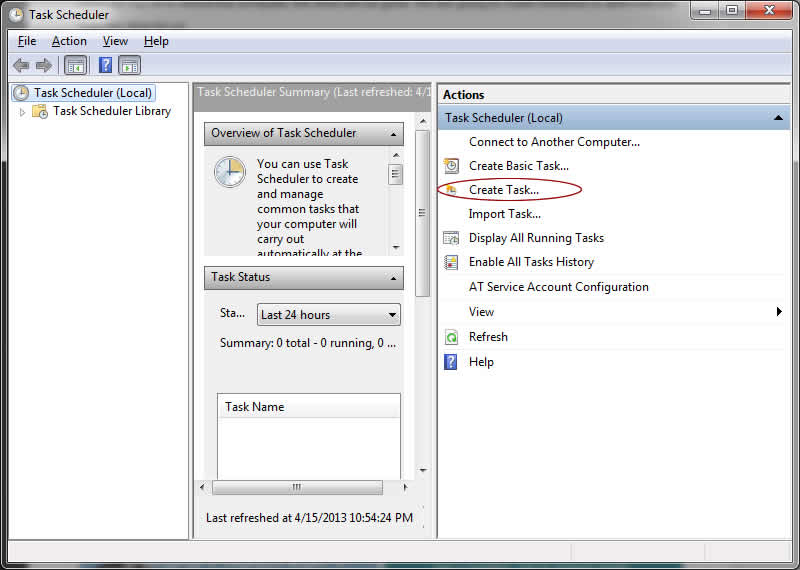
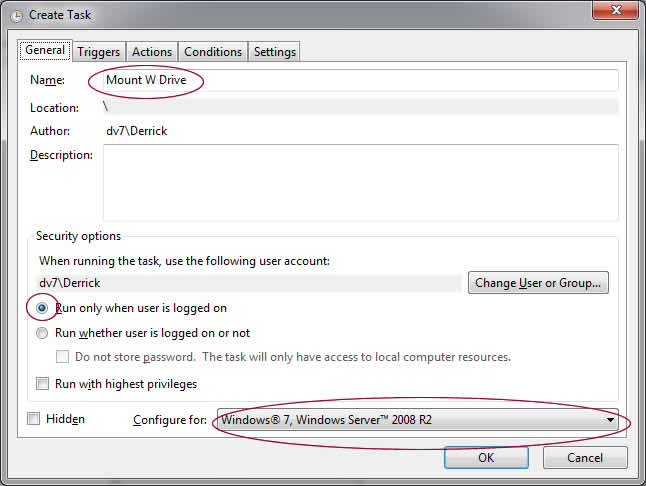
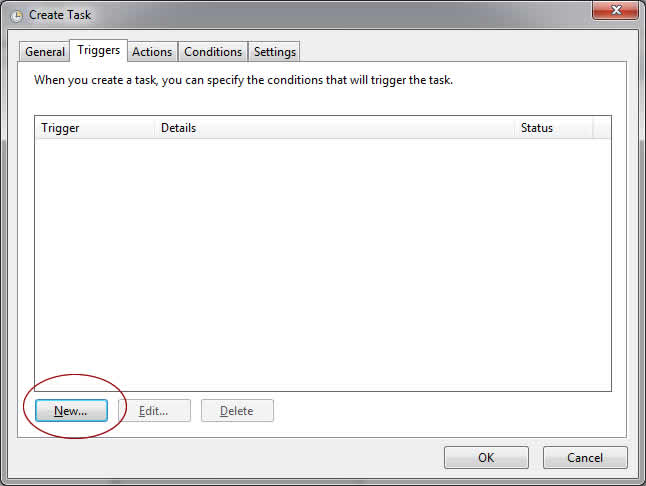
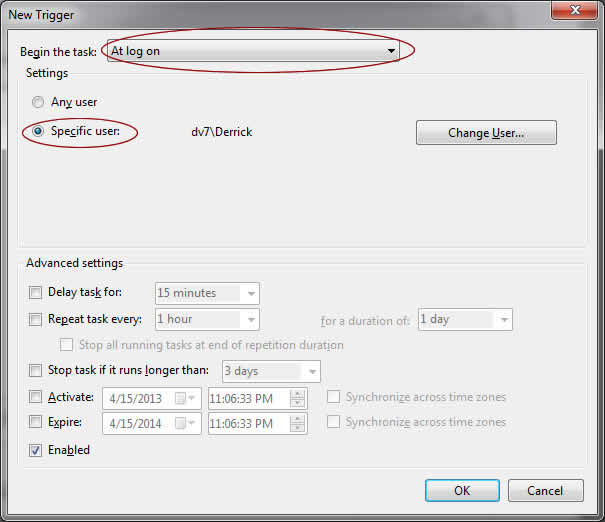
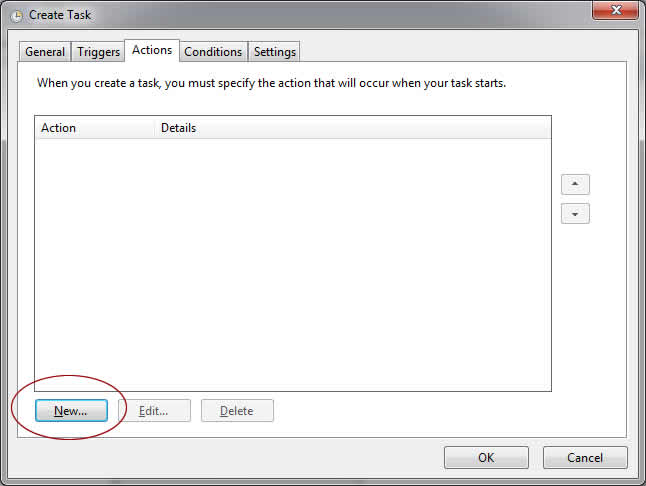
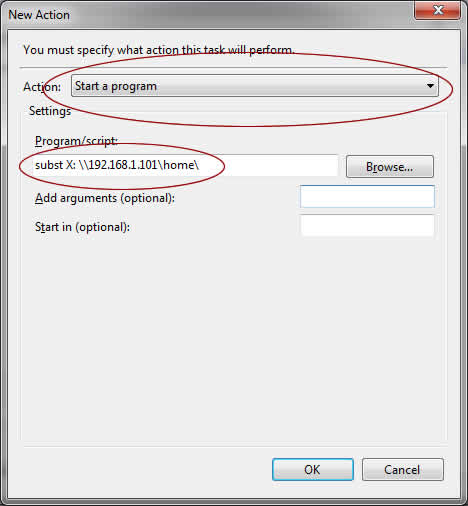
Click Create Task and following the screenshots:

After saving your task. Try to reboot your computer. Make sure that your network drive comes back after boot. If everything works fine, then you are can move your Lightroom catalog to the network drive.

Before moving your production work to the network drive, I suggest you to create a test catalog first. If it is stable after trying for multiple times, then you can safely move your production work to the network drive.

Have fun with Lightroom (and network drive)!

–Derrick

Our sponsors:

PHP Network Error

One of my PHP web applications stopped working today. After I investigated the issues, I noticed that this is a very famous, yet unsolved error. I have no idea why it happens, but I do have a work around solution for it. Basically, this article applies to you if you match all of the following:

  • You are using PHP
  • Your web applications talk to other servers via domain name (e.g., example.com rather than 123.1.1.3)
  • You use XAMPP (instead of native Apache, PHP).

Notice that I am not 100% sure whether this has anything to do with XAMPP. But most of problem I experienced happen on XAMPP platform.

And here are some example problems:

  • Getting a file connect using file_get_contents(‘http://example.com/somepage.html’), or CURL etc.
  • Sending emails (SMTP server: ‘mail.example.com’)
  • Connect to a database server via domain name (‘example.com:3306’)

Why this problem happens?

This problem has nothing to do with your PHP code. In fact, the problem happens when PHP tries to look up the IP address of your domain name. Let’s take a look to the following example. Suppose I have the following code:

$data = file_get_contents('http://example.com/test.html')

//process the $data here...

When PHP executes this code, it will try to get the IP address of example.com first, and talk to the server to retrieve the content. This problem happens because PHP is unable to get the IP address of example.com.

Initially, I thought it was my server issues, therefore I tried to ping example.com on the server, i.e.,

#ping example.com

and the result looks fine to me. So the problem has nothing to do with the OS / server. Then I run the following code in PHP

$IP = gethostbyname('example.com');
echo $IP;

Normally, I expect to see the IP address of example.com. If it return ‘example.com’, that means PHP is unable to determine the IP address. That explains why the web application stops working.

Solution #1: Restart XAMPP

Try to restart the XAMPP to see whether it resolves the problem or not:

sudo /opt/lampp/lampp stopapache
sudo /opt/lampp/lampp startapache

This method aims to resolve the situation that the XAMPP was already started but the network was not available. Restarting the Apache server helps to resolve this problem.

Solution #2: /etc/hosts

Since PHP was unable to lookup the IP address, I decided to give some hints to PHP by editing /etc/hosts:

123.1.1.1   example.com
123.1.1.2   anotherexample.com

This is a quick and easy solution. However, if example.com is moved a different IP address, you will need to update the file. It is pain in long term.

Solution #3: Stop using XAMPP

As I mentioned earlier, I notice that this problem happen in XAMPP environment only. I haven’t experienced this kind of problem with native Apache and native PHP. So I guess it may have something to do with XAMPP.

In fact, it is quite easy to switch from XAMPP to native Apache+PHP+MySQL etc. Native applications give you better performance and reliability and most importantly: the packages get upgraded automatically.

Hope it helps.

–Derrick

Our sponsors:

[FreeBSD]The net/samba35 port has been deleted: Obsoleted by net/samba36

FreeBSD is designed for users who got lots of spare time. Every once a while, it will give you some troubles (or “snacks” in programmer language), which help you to burn some of your spare time. If you cannot handle these troubles, then FreeBSD is not for you.

Although FreeBSD is a rock solid operating system, it is not smart enough to tell whether the owners (i.e., you and me) got plenty of spare time or not. Anyway, comparing to Windows Server, I think FreeBSD is considered an honor student already.

Okay, let’s go back to the error message. When I tried to update FreeBSD, I got the following error message:

Building new INDEX files... done.
===>>> Starting check of installed ports for available updates

===>>> The net/samba35 port has been deleted: Obsoleted by net/samba36
===>>> Aborting update

Terminated

Again, this is an old-school error. The port-maintainer decided that the samba35 is too old, and he likes to replace it by samaba36. We all love the new stuffs, but we want the transition goes smooth too. Apparently, it seems that the port-maintainer totally forgot about it.

If you check the directory, you will notice that /usr/ports/net/samba35 is deleted. If you try to soft-link samba36 to samba35, portmaster will likely to complain. The only way to solve this problem is by removing samba35 first, and installing samaba36 afterward.

So here is how to solve this problem:

sudo pkg_info | grep samba35

You will see something like the following:

samba35-3.5.19      A free SMB and CIFS client and server for UNIX

Let’s delete it.

sudo pkg_delete -f samba35-3.5.19

FreeBSD may remind you to manually remove Samba’s configuration, DO NOT do it.

WARNING: If you will *NOT* use this package anymore, please remove the
  following directories manually:
  /usr/local/etc/samba
  /var/log/samba
  /var/db/samba

Verify that the package has been deleted. The package should be gone.

sudo pkg_info | grep samba35

Now try to install the package again:

cd /usr/ports/net/samba36
sudo make install clean

After the installation is completed, don’t forget to start the Samba server:

sudo /usr/local/etc/rc.d/samba start

That’s it!

–Derrick

Our sponsors:

How to Upgrade FreeBSD from 8 to 9

Upgrading FreeBSD is very easy. Thanks for the simple architecture design and the disconnection between the kernel and the applications (ports), the whole process takes around 15 to 45 minutes. The coolest thing is that the system down time is very short. In my case, the down time was only about 3 minutes.

This table will help you to estimate the whole process and system down time:

Action Down Time? Approximate Duration
Download the update files None 5 to 15 minutes
Installing the update None 5 to 15 minutes
Helping FreeBSD to set up the system configurations None 1 to 3 minutes
Reboot Yes 1 to 3 minutes
Installing the update None 1 to 2 minutes
Reboot (Optional) Yes 1 to 3 minutes

Notice that this tutorial only works for i386 or amd64. For other CPU architectures such as Sparc, you will either reinstall the whole thing or rebuild the whole world (i.e., make buildworld). One way or the other, that’s a very time-consuming process.

First, I am assuming that your FreeBSD is up-to-date in your current version. You can do it by running the following command:

First, make sure that your ports are up to date.

#Download the latest ports
sudo portsnap fetch update

#Upgrade the old ports:
sudo portmaster -Da

Next, we want to upgrade the FreeBSD. Currently, the latest version is 9.1:

sudo freebsd-update upgrade -r 9.1-RELEASE

FreeBSD will try to download files for you. Just say yes.

Looking up update.FreeBSD.org mirrors... 4 mirrors found.
Fetching metadata signature for 8.2-RELEASE from update5.FreeBSD.org... done.
Fetching metadata index... done.
Fetching 1 metadata files... done.
Inspecting system... done.

The following components of FreeBSD seem to be installed:
kernel/generic world/base world/manpages

The following components of FreeBSD do not seem to be installed:
src/base src/bin src/cddl src/contrib src/crypto src/etc src/games
src/gnu src/include src/krb5 src/lib src/libexec src/release src/rescue
src/sbin src/secure src/share src/sys src/tools src/ubin src/usbin
world/catpages world/dict world/doc world/games world/info world/lib32
world/proflibs

Does this look reasonable (y/n)? y

Next, it will download the patches. Depending on your internet connection speed, it may take 1 to 10 minutes:

...
Applying patches... done.
Fetching 1962 files... done.
Attempting to automatically merge changes in files... done.

Now, FreeBSD will try to check whether your configuration is compatible with the new version or not. It may need your help to merge the configuration files manually. Notice that it uses VI, a standard (and very old, not really user-friendly) editor in Unix. If you’ve never used vi before, here are some simple commands:

#By default, a document is opened in read-only mode. To switch to a wrote mode:
i

#To set the mode to read only
Press the ESC key

#Delete a character
x

#Delete the whole line
dd


#Save a file
:w

#To quite vi
:q

#To save and quite
:wq

After some file editing, FreeBSD will give you a summary of what files will be changed. Just hit either ESC or q to end the list.

...
/usr/share/man/man3/lwres_addr_parse.3.gz
/usr/share/man/man3/lwres_buffer.3.gz
/usr/share/man/man3/lwres_buffer_add.3.gz
/usr/share/man/man3/lwres_buffer_back.3.gz
/usr/share/man/man3/lwres_buffer_clear.3.gz
/usr/share/man/man3/lwres_buffer_first.3.gz
/usr/share/man/man3/lwres_buffer_forward.3.gz
/usr/share/man/man3/lwres_buffer_getmem.3.gz

At this point, FreeBSD finish the upgrade plan. (It hasn’t made any change to your system.) Now we need to give a green light to FreeBSD to start upgrade the system.

sudo freebsd-update install
...Please reboot and run "/usr/sbin/freebsd-update install" again to finish installing updates.

After the reboot, run the command again to update the userland components:

sudo freebsd-update install

Installing updates...
Completing this upgrade requires removing old shared object files.
Please rebuild all installed 3rd party software (e.g., programs
installed from the ports tree) and then run "/usr/sbin/freebsd-update install"
again to finish installing updates.

Reboot the computer again to finish the upgrade.

sudo reboot

Now, we need to upgrade all of the ports. Notice that this step is optional. You don’t need to do it unless you found any problem after the upgrade.

#Upgrade all the installed ports
sudo portmaster -fa

Reboot the computer again to finish the upgrade.

sudo reboot

Make sure that FreeBSD is running on the latest version:

# uname -a
FreeBSD 9.1-RELEASE FreeBSD 9.1-RELEASE #0 r243825: Tue Dec  4 09:23:10 UTC 2012     [email protected]:/usr/obj/usr/src/sys/GENERIC  amd64

Have fun with FreeBSD.

–Derrick

Our sponsors:

[FreeBSD]MySQL server could not start

Today, I noticed that the MySQL server on my FreeBSD server is down for unknown reason, and today is Thanksgiving.

Initially, I tried to restart the MySQL server using the following command, but it didn’t help to restart the MySQL:

sudo /usr/local/etc/rc.d/mysql-server restart

and it gives me the following error message:

mysql not running? (check /var/db/mysql/icesquare.com.pid).

That’s interesting. So I check the pid file and I found that it is not available. After scratching my head for a while, I noticed one thing:

df
Filesystem     Size    Used   Avail Capacity  Mounted on
/dev/ad4s1d    7.7G    7.7G     -1M   100%    /var

Obviously, the /var directory is full. No wonder why the MySQL could not create any file, which explains why it stopped working.

Since the server is already up and running, it will be too late to increase the size of /var without reinstalling the entire system. The simplest way is to soft link the /var directory to somewhere else. Since a lot of system applications depends on /var, I don’t want to move the entire /var into a different places. So I decide to softlink /var/log into /usr/var/log.

The steps are easy:

sudo su
mkdir -p /usr/var/
mv /var/log /usr/var/
ln -s /usr/var/log /var/

To verify your work, it should look something like that:

ls /var
lrwxr-xr-x   1 root    wheel       13B Nov 22 11:48 log -> /usr/var/log/
df
Filesystem     Size    Used   Avail Capacity  Mounted on
/dev/ad4s1d    7.7G    1.1G    6.0G    15%    /var

Now, if you try to start the MySQL server again, it may or may not work. If you experience any difficulties, try to reboot the server. After the server is reboot, MySQL should be up and running again.

Lesson learned: Always create single partition. 🙂

–Derrick

Our sponsors:

FreeBSD.org Was Compromised. What Should You Do Next?

In case you are not aware this bad news. FreeBSD.org was compromised on September 17, 2012. Good news is that the compromise was caused by a human error (a stupid developer leaked a SSH private key somewhere), which has nothing to do with the code quality of the FreeBSD. 🙂 Bad news is that this may affect you if you use port. 🙁

The compromise is believed to have occurred due to the leak of an SSH key from a developer who legitimately had access to the machines in question, and was not due to any vulnerability or code exploit within FreeBSD.

We unfortunately cannot guarantee the integrity of any packages available for installation between 19th September 2012 and 11th November 2012, or of any ports compiled from trees obtained via any means other than through svn.freebsd.org or one of its mirrors. Although we have no evidence to suggest any tampering took place and believe such interference is unlikely, we have to recommend you consider reinstalling any machine from scratch, using trusted sources.

In short, the port tree was affected from September 19, 2012 to November 11, 2012. If you downloaded the ports in between this period, you are likely a victim of this incident. 🙁 Here is how to clean up the mess:

Stop using cvsup/csup to update your port. Use portsnap instead.

If you already used portsnap, do the following:

sudo portsnap fetch extract
sudo portsnap upgrade

If you have no idea what is portsnap, here is a quick tutorial:

First, install the portmaster and portupgrade. Port-Upgrade downloads the new ports to your server and Port-Master updates your applications based on the downloaded ports.

sudo pkg_add -r portupgrade portmaster

Download all ports. Notice that this is one-time work.

sudo portsnap fetch extract

If you decide to update your port tree, run the following:

sudo portsnap fetch update

Or if you like to run it in a cron job, run the following instead:

sudo nano /etc/crontab

#Run every three hours
0       */3     *       *       *       root    portsnap -I cron update && pkg_version -vIL= >/dev/null 2>&1

Now you have an updated port tree. Next you will need to update your applications based on your local port tree:

sudo portmaster -Dai

That’s it.

And remember, NEVER put your SSH private key in a public area.

–Derrick

Our sponsors:

[Adobe Lightroom / Photomatix]Lightroom rendition failed

Yesterday, I was processing some of the pictures in Adobe Lightroom. I liked to export few of them to Photomatix for HDR processing. Then, the system complained with this error message:

Lightroom rendition failed

After searching this error message on Google, I found that this message was generated by the Photomatix plug-in. According to Photomatix’s FAQ, it seems that the original picture is missing.

So, I ran a quick test (Find Missing Photos) in Adobe Lightroom, and of course it didn’t find anything. After some investigations, I found that the problem was caused by low free space in harddrive.

It is very easy to solve this problem. Simply change the Windows temporary drive to somewhere else and you are done.

So what cause this problem? When you export the pictures to other applications, Lightroom will first convert them in some common format first (usually TIFF), such that the other applications will be able to read the files. During this process, Lightroom will store these pictures in the temporary directory provided by Windows, and this settings cannot be changed within Lightroom.

By default, the temporary directory is in the system drive (e.g., C:). If you are using SSD harddrive, you may have very limited amount of free space left. Therefore, it is a good idea to assign the temporary directory to another drive with more space.

Here are the step by step tutorial:

  1. Start
  2. Control Panel
  3. System
  4. Advanced system settings
  5. Environment Variables

Now we are ready to change the location of temporary directory. Let’s edit the TEMP and TMP, and change them to something else. In my case, I have more space in d:, so I set them to D:\Temp.

Click OK and save. Now, restart your Lightroom and the error message will be gone.

–Derrick

Our sponsors:

[PHP]How to delete Memcache variables in PHP?

I’ve never thought about deleting a Memcache key is a difficult task. It took me few hours to figure out a working solution. No kidding. FYI, I am using PHP 5.4

Suppose you store a very expensive data into the Memcache, and you decide to delete it later. According to the PHP documentation, it should be very simple:

$memcache_obj->delete('key_to_delete');

or

memcache_delete($memcache_obj, 'key_to_delete');

However, this method only works with scalar variables, such as string, integer, double, float, Boolean etc. It does not work with non-scalar variables such as array, object etc.

I have tried many different ways, such as setting the value to something else, e.g.,

$memcache->set('key_to_delete', 'deleted');

or making the key to expire immediately:

$memcache->set('key_to_delete', 'deleted', 0, 1);
$memcache->set('key_to_delete', 'deleted', 0, -1);

Unfortunately, none of these methods worked in my case (my variable is a non-scalar array). So, I ended up doing it in a low-level way: Bypassing the PECL-Memcache (PHP Library) and talk to the Memcache server directly. Guess what, it works very well. The variable gets deleted!

function MEMCACHE_DEL_HASH($key){
	
	if ($key == '') return FALSE;
	
	$socket = @fsockopen('localhost', 11211);
	$command = "delete {$key}";
	
	fwrite($socket, $command."\r\n");
	fclose($socket);
	
	return true;
}

And it is super easy to call this function:

MEMCACHE_DEL_HASH('key_to_delete');

Feel free to modify this function such that you can pass in the connector, port or do anything you like.

That’s it! Have fun with Memcache.

–Derrick

Our sponsors:

[FreeBSD]The devel/pkg-config port moved to devel/pkgconf; Reason: pkg-config has been replace by pkgconf; pkgconf-0.8.5 conflicts with installed package(s): pkg-config-0.25_1

FreeBSD is designed for users who got lots of spare time. Every once a while, it will give you some troubles (or “snacks” in programmer language), which help you to burn some of your spare time. If you cannot handle those troubles, then FreeBSD is not for you.

Although FreeBSD is a rock solid operating system, it is not smart enough to tell whether the owners (i.e., me and you) got plenty of spare time or not.

Anyway, comparing to Windows Server, I think FreeBSD is considered an honor student.

Okay, let’s go back to the error message. When I tried to update FreeBSD, I saw the following error:

===>>> All >> pkg-config-0.25_1 (1/1)

        ===>>> The devel/pkg-config port moved to devel/pkgconf
        ===>>> Reason: pkg-config has been replace by pkgconf

===>  pkgconf-0.8.5 conflicts with installed package(s):
      pkg-config-0.25_1

      They install files into the same place.
      You may want to stop build with Ctrl + C.

Again, this is an old-school error. The port-maintainer decided that the app A is too old, and he likes to replace it by app B. We all love the new stuffs, but we want the transition goes smooth. Apparently, it seems that the port-maintainer totally forgot about it.

So here is how to solve this problem:

sudo pkg_info | grep pkg

You will see something like the following:

pkg-config-0.25_1   A utility to retrieve information about installed libraries

Let’s delete it.

sudo pkg_delete -f pkg-config-0.25_1

Verify that the package has been deleted:

sudo pkg_info | grep pkg

Now try to install the package again:

cd /usr/ports/devel/pkgconf
sudo make install clean

That’s it!

–Derrick

Our sponsors:

[FreeBSD]How to run PECL Tokyo Tyrant in PHP 5.4

After upgrading to PHP 5.4.3 (which is the first version of PHP 5.4 available in the FreeBSD port), I found that the pecl-tokyo_tyrant could not be compiled. Here is the error messages:

cd /usr/ports/databases/pecl-tokyo_tyrant
sudo make
===>  pecl-tokyo_tyrant-0.6.0 cannot install: doesn't work with PHP version : 5 (Doesn't support PHP 5).
*** Error code 1

Stop in /usr/ports/databases/pecl-tokyo_tyrant.
/usr/ports/databases/pecl-tokyo_tyrant/work/tokyo_tyrant-0.6.0/tokyo_tyrant.c:1827: error: expected '=', ',', ';', 'asm' or '__attribute__' before 'php_tokyo_tyrant_class_methods'
/usr/ports/databases/pecl-tokyo_tyrant/work/tokyo_tyrant-0.6.0/tokyo_tyrant.c:1867: error: expected '=', ',', ';', 'asm' or '__attribute__' before 'php_tokyo_tyrant_table_class_methods'
/usr/ports/databases/pecl-tokyo_tyrant/work/tokyo_tyrant-0.6.0/tokyo_tyrant.c:1911: error: expected '=', ',', ';', 'asm' or '__attribute__' before 'php_tokyo_tyrant_query_class_methods'
/usr/ports/databases/pecl-tokyo_tyrant/work/tokyo_tyrant-0.6.0/tokyo_tyrant.c:1936: error: expected '=', ',', ';', 'asm' or '__attribute__' before 'php_tokyo_tyrant_iterator_class_methods'
/usr/ports/databases/pecl-tokyo_tyrant/work/tokyo_tyrant-0.6.0/tokyo_tyrant.c: In function 'php_tokyo_tyrant_query_object_new':
/usr/ports/databases/pecl-tokyo_tyrant/work/tokyo_tyrant-0.6.0/tokyo_tyrant.c:2001: error: 'zend_class_entry' has no member named 'default_properties'
/usr/ports/databases/pecl-tokyo_tyrant/work/tokyo_tyrant-0.6.0/tokyo_tyrant.c: In function 'php_tokyo_tyrant_iterator_object_new':
/usr/ports/databases/pecl-tokyo_tyrant/work/tokyo_tyrant-0.6.0/tokyo_tyrant.c:2052: error: 'zend_class_entry' has no member named 'default_properties'
/usr/ports/databases/pecl-tokyo_tyrant/work/tokyo_tyrant-0.6.0/tokyo_tyrant.c: In function 'php_tokyo_tyrant_object_new_ex':
/usr/ports/databases/pecl-tokyo_tyrant/work/tokyo_tyrant-0.6.0/tokyo_tyrant.c:2090: error: 'zend_class_entry' has no member named 'default_properties'
/usr/ports/databases/pecl-tokyo_tyrant/work/tokyo_tyrant-0.6.0/tokyo_tyrant.c: In function 'zm_startup_tokyo_tyrant':
/usr/ports/databases/pecl-tokyo_tyrant/work/tokyo_tyrant-0.6.0/tokyo_tyrant.c:2166: error: 'php_tokyo_tyrant_class_methods' undeclared (first use in this function)
/usr/ports/databases/pecl-tokyo_tyrant/work/tokyo_tyrant-0.6.0/tokyo_tyrant.c:2166: error: (Each undeclared identifier is reported only once
/usr/ports/databases/pecl-tokyo_tyrant/work/tokyo_tyrant-0.6.0/tokyo_tyrant.c:2166: error: for each function it appears in.)
/usr/ports/databases/pecl-tokyo_tyrant/work/tokyo_tyrant-0.6.0/tokyo_tyrant.c:2171: error: 'php_tokyo_tyrant_table_class_methods' undeclared (first use in this function)
/usr/ports/databases/pecl-tokyo_tyrant/work/tokyo_tyrant-0.6.0/tokyo_tyrant.c:2176: error: 'php_tokyo_tyrant_query_class_methods' undeclared (first use in this function)
/usr/ports/databases/pecl-tokyo_tyrant/work/tokyo_tyrant-0.6.0/tokyo_tyrant.c:2182: error: 'php_tokyo_tyrant_iterator_class_methods' undeclared (first use in this function)
*** Error code 1

Stop in /usr/ports/databases/pecl-tokyo_tyrant/work/tokyo_tyrant-0.6.0.
*** Error code 1

Stop in /usr/ports/databases/pecl-tokyo_tyrant.

Basically, it means that the pecl-tokyo_tyrant is not happy with the new version of PHP 5.4. I’ve tried several methods, including using pkg_add, compiling from source, copying a working tokyo_tyrant.so etc, unfortunately none of these methods works.

Finally, I found that the maintainer of this package has made a new version available(0.6.2) at github. Here is how I did it:

First, go to here to grab the source code. Make sure that you download the tag.gz version because it has the file attribute available.

Second, let’s remove the pecl-tokyo_tyrant from your system. You can either do it in the port or pkg_delete:

From port:

cd /usr/ports/databases/pecl-tokyo_tyrant
sudo make deinstall

Or using pkg_delete:

sudo pkg_delete pecl-tokyo_tyrant-0.6.0

Now, extract the files and compile it from source:

tar -zxvf mkoppanen-php-tokyo_tyrant-0.6.0-2-gb0d7e0c.tar.gz
cd mkoppanen-php-tokyo_tyrant-b0d7e0c
sudo phpize
sudo ./configure
sudo make
sudo make install

and don’t forget to include the .so file in your configuration:

sudo nano /usr/local/etc/php/extensions.ini

Add the following (if not available) to the end of the file:

extension=tokyo_tyrant.so

Finally, let’s restart the Apache:

sudo apachectl stop
sudo apachectl start

That’s it! Have fun with Tokyo Tyrant with PHP 5.4.

–Derrick

Our sponsors: