[PHP]imagecreatefrompng Error (After upgrading FreeBSD)

Today, I found that one of my PHP scripts stop working. After some investigations, I found that it was the function, imagecreatefrompng, which caused the problem.

Interestingly, other similar functions such as imagecreatefromgif and imagecreatefromjpeg were completely working fine. The program stopped working when calling imagecreatefrompng only.

Initially, I thought the problem was coming from the PHP side. Therefore, I tried to get the error messages as many as possible, such as PHP error (error_reporting), Apache error (error_log), and even system error (dmesg). Unfortunately, I couldn’t find anything.

The script was working completely fine until I upgraded the system. So I think the problem may come from a missing library. To give you some background, here is how imagecreatefrompng works. First, your program calls imagecreatefrompng, which involves the GD library. GD library calls a PNG function in your system (possibly libpng) to process the PNG file. Since the program comes with from the system library, PHP / Apache will not report anything about it.

Since it will be too complicated to identify which library caused the problem, I decide to reinstall all ports. It sounds a very long process but it wasn’t at all. It only took 20 minutes to finish the whole thing. So here is what I did:

#FreeBSD
#sudo portmaster -fa

After the installation is completed, I rebooted the machine and everything worked again!

Enjoy!

–Derrick

Our sponsors:

[FreeBSD+ZFS]One or more devices has experienced an error resulting in data corruption. Applications may be affected.

When you check the ZFS status, you may find the following error message: One or more devices has experienced an error resulting in data corruption. Applications may be affected.. There can be million reasons to cause this error message showing up. Of course, 99% of them are caused by hardware failure, such as bad hard drives, broken cables, defective motherboard, or even bad memory. In this article, I am assuming that you already eliminated these possibilities, and have scratched your head for hours, and still have no clue which part went wrong. In fact, that’s what I did today.

Long story short. Here is how I experienced this error:

FreeBSD: 8.2-> 9.0
ZFS: 4 -> 5
ZPool: 15 -> 28

My system was working fine (FreeBSD 8.2; ZFS ver. 4, Zpool ver. 15), everything seems perfect. After I upgraded my system to FreeBSD 9, I upgraded the ZFS and Zpool to ver.5 and ver. 28, respectively. Everything seemed working fine until I check the status:

sudo zpool status -v
#sudo zpool status -v
  pool: storage
 state: ONLINE
status: One or more devices has experienced an error resulting in data
        corruption.  Applications may be affected.
action: Restore the file in question if possible.  Otherwise restore the
        entire pool from backup.
   see: http://www.sun.com/msg/ZFS-8000-8A
config:

        NAME        STATE     READ WRITE CKSUM
        storage     ONLINE       0     0     0
          raidz1-0  ONLINE       0     0     0
            ada0    ONLINE       0     0     0
            ada2    ONLINE       0     0     0
            ada3    ONLINE       0     0     0
            ada4    ONLINE       0     0     0
            ada5    ONLINE       0     0     0
            ada6    ONLINE       0     0     0
            ada7    ONLINE       0     0     0

errors: Permanent errors have been detected in the following files:

        storage/data:<0x0>

There are few things you need to pay attention:

The pool seems working fine, otherwise you will see FAULTED instead of ONLINE:

state: ONLINE

The system has no problem to read/write the data. Doesn’t seem to be hardware problem:

NAME        STATE     READ WRITE CKSUM
        storage     ONLINE       0     0     0
          raidz1-0  ONLINE       0     0     0
            ada0    ONLINE       0     0     0
            ada2    ONLINE       0     0     0
            ada3    ONLINE       0     0     0
            ada4    ONLINE       0     0     0
            ada5    ONLINE       0     0     0
            ada6    ONLINE       0     0     0
            ada7    ONLINE       0     0     0

This error message may give you some clue what’s wrong. Notice that storage and data are the pool names.

errors: Permanent errors have been detected in the following files:

        storage/data:<0x0>

The <0x0> represents the meta data of the pool. I think the problem may come from the upgrade process. Here are the steps how to solve this problem.

Force Clearing the Error

You can try to clear the error by running:

sudo zpool clear -F mypool

If it can clear the error, you are done. However, it is likely that it won’t work, and you need to move to the next step.

Scrubbing the Pool

You can try to scrub the entire pool by running:

sudo zpool scrub mypool

This will make the system to inspect every single block and correct the error. Although this process is long (It took 5 hours to inspect my 10TB pool), there is a very high chance that the problem will be corrected. Don’t forget to clear error after scrubbing the pool.

Making each devices online again

If the error still exists after scrubbing the entire pool (and clearing the error), you can try to force making each device go online:

sudo zpool online mypool /dev/ada0 /dev/ada2 /dev/ad4 ...

Try to reboot the computer

This is the last thing you can try. This will force the computer to mount the pool again. Hopefully it will clear the error and error status.

Rebuild the pool

If none of the method works, the only solution left is to rebuild the pool.

#Backup your data first
#sudo zpool destroy mypool
#sudo zpool create mypool ...

Good luck.

Our sponsors:

How to Clean Up / Reset User Account To Default on Linux, Ubuntu, Fedora Automatically

Imagine that you set up a computer at a public location, such as cafe, library, or computer lab in your school, so that any one can use your computer. Most of the time, users mainly use the web browsers for surfing the web, checking the email, or updating the status on social websites etc. At the mean time, they may download some files on your computer, generating a lot of browsing history in your web browsers, accidentally saving their user names/passwords in the browsers etc. How do you clean up these mess? How do you reset the user account to default automatically?

First, I am assuming that your computer is running Linux, such as Ubuntu, Fedora, Debian etc. It really doesn’t matter which Linux you use, because most Linux uses the same kernel. The idea describes in this article is applicable to any Linux.

Idea

Linux and Windows are very very different. Linux has a much better control on the user permissions. For example, if you simply create a standard user on Linux, e.g.,

sudo adduser guestuser

where this new user, guestuser, is a standard user only.

If you log in as guestuser, all of the files you create will be stored in your home folder only, i.e., /home/guestuser. Unlike Windows, there is no registry or something similar. In the other words, all of your activities are limited within your home folder. If you like to create a file outside your scope, you will need to have the root access. Of course, you won’t grand the root access to the guest user.

Now you understand that the guest user can only mess around the home directory only (/home/guestuser). In order to clean up or reset the user account to default, all you need is to reset this folder to default.

Setup a Home Directory On Ram Disk

We are going to implement this idea using ram disk. If you don’t know anything about ram disk, you can think about it as a usb thumb drive, except that it is a super fast device, and cannot hold any data after each reboot. In the other words, if we set up a the home directory of the guestuser on a ram disk, all of the mess will be gone after each reboot. So here are the steps:

First, we want to create a guestuser first:

sudo adduser guestuser

This will add a new user into the system and create its home directory. Next, we want to create a ram disk. Before we do it, let’s find out how much memory you have in your system:

free -m

On my machine, I have 2GB (2000 MB) memory in total.

             total     used     free   shared  buffers  cached
Mem:          1999     1789      209        0      119    1176
-/+ buffers/cache:      492     1506
Swap:         3150        0     3150

Since I only have 2GB of memory, I want to keep some of them for my system. I think using 512MB for the ramdisk is enough.

To create a ramdisk during the boot, simply modify /etc/rc.local

sudo nano /etc/rc.local

And include the following commands:

#Create a 512MB ramdisk, and map it to the home directory of the guestuser.
mount -t ramfs -o size=512M ramfs /home/guestuser


#After the ramdisk is mapped, the directory will be owned by the root.
#We need to modify the permission such that guestuser can access it.
chown -R guest:guest /home/guestuser

Here are some special notes for different Linux:

Fedora 15 or earlier: None

Fedora 16: By default, /etc/rc.local is missing. Please refer my another post: Fedora 16 /etc/rc.local is missing) for details.

Ubuntu: Please include your code before exit 0 command, otherwise it won’t work, i.e.,

#!/bin/sh -e
#
# rc.local
#
# This script is executed at the end of each multiuser runlevel.
# Make sure that the script will "exit 0" on success or any other
# value on error.
#
# In order to enable or disable this script just change the execution
# bits.
#
# By default this script does nothing.

mount -t ramfs -o size=512M ramfs /home/guestuser
chown -R guestuser:guestuser /home/guestuser

exit 0

After the set up is completed, simply reboot the computer to make the ramdisk effective.

Testing

Now, try to log in as the guestuser. You can try to download some files to your home directory; visit some websites; or even change the wallpaper. All of these settings will be stored in your home directory. Next, try to log out the account, restart the computer and log in to your account again. You will notice that everything will be reset to default, i.e., all of your previously downloaded files are gone, wallpaper will be reset to default, the web history is cleared etc.

Enjoy running a clean, maintenance-free workstation.

Our sponsors:

[FreeBSD]Problem to update PHP port

A new version of PHP (5.3.9) was available in FreeBSD today. Since it contained a lot of security fixes and enhancements, I decided to give it a try. After testing the new PHP in couple test servers, I think it is ready to upgrade the PHP on the production server. Oh well, I didn’t expect that I needed to spend my whole lunch break to trouble-shoot this problem. So here is what I did:

# cd /usr/ports/lang/php5
# make install
===>  Vulnerability check disabled, database not found
===>  License check disabled, port has not defined LICENSE
===>  Found saved configuration for php5-5.3.9
===>  Extracting for php5-5.3.9
=> SHA256 Checksum mismatch for php-5.3.9.tar.bz2.
=> SHA256 Checksum OK for suhosin-patch-5.3.4-0.9.10.patch.gz.
===>  Refetch for 1 more times files: php-5.3.9.tar.bz2
===>  Vulnerability check disabled, database not found
===>  License check disabled, port has not defined LICENSE
===>  Found saved configuration for php5-5.3.9
=> php-5.3.9.tar.bz2 doesn't seem to exist in /usr/ports/distfiles/.
=> Attempting to fetch from http://dk.php.net/distributions/.
fetch: http://dk.php.net/distributions/php-5.3.9.tar.bz2: Requested Range Not Satisfiable
=> Attempting to fetch from http://de.php.net/distributions/.
fetch: http://de.php.net/distributions/php-5.3.9.tar.bz2: Requested Range Not Satisfiable
=> Attempting to fetch from http://es.php.net/distributions/.
fetch: http://es.php.net/distributions/php-5.3.9.tar.bz2: Requested Range Not Satisfiable
=> Attempting to fetch from http://fi.php.net/distributions/.
fetch: http://fi.php.net/distributions/php-5.3.9.tar.bz2: Requested Range Not Satisfiable
=> Attempting to fetch from http://fr.php.net/distributions/.
===>  Vulnerability check disabled, database not found
===>  License check disabled, port has not defined LICENSE
===>  Found saved configuration for php5-5.3.9
=> SHA256 Checksum mismatch for php-5.3.9.tar.bz2.
=> SHA256 Checksum OK for  suhosin-patch-5.3.9-0.9.10.patch.gz
===>  Giving up on fetching files: php-5.3.9.tar.bz2
Make sure the Makefile and distinfo file (/usr/ports/lang/php5/distinfo)
are up to date.  If you are absolutely sure you want to override this
check, type "make NO_CHECKSUM=yes [other args]".
*** Error code 1

Stop in /usr/ports/lang/php5.
*** Error code 1

Stop in /usr/ports/lang/php5.
*** Error code 1

Stop in /usr/ports/lang/php5.

Initially, I thought it was a checksum error. So I decided to skip the checksum, i.e.,

#make install NO_CHECKSUM=yes

Unfortunately, it gave the same error. I think the problem might come from corrupted port files or port database. Instead of finding the source of the problem, I decided to rebuild the whole thing.

First, let’s remove the port database:

#sudo rm -Rf /var/db/portsnap/*

Next, we need to re-download all port files:

#sudo portsnap fetch extract

Some new ports may be released during the extraction, let’s make sure that the port tree is up to date:

#sudo portsnap fetch update

Now, we need to manually download the php source. Make sure that the file is stored in /usr/ports/distfiles/

#cd /usr/ports/distfiles/
#sudo wget http://fi.php.net/distributions/php-5.3.9.tar.bz2

Now, try to test whether the system can build php again. Notice that this will not install the PHP in your system.

cd /usr/ports/lang/php5
sudo make

If it gives no error, which means the PHP is ready to go. Now let’s clean up our work and make sure everything is ready.

sudo make clean

Notice that there is no way to upgrade the PHP from Make without uninstall it. Since it is a production server, I want to keep the website running. So I decide to let Portmaster to do all dirty works for me.

sudo portmaster -Da

Depending on your CPU, it may take 5 minutes to an hour to finish the update. Normally, the standard php package will work fine after the update. However, if it is not a standard package, such as PECL, you will need to do one more step. For example, here is the error messages right after I upgraded PHP:

#php -v
[eAccelerator] This build of "eAccelerator" was compiled for PHP version 5.3.8.
Rebuild it for your PHP version (5.3.9) or download precompiled binaries.

PHP Warning:  PHP Startup: Unable to load dynamic library '/usr/local/lib/php/20090626/memcache.so' - /usr/local/lib/php/20090626/memcache.so: Undefined symbol "php_session_create_id" in Unknown on line 0

PHP Warning:  PHP Startup: Unable to load dynamic library '/usr/local/lib/php/20090626/tokyo_tyrant.so' - /usr/local/lib/php/20090626/tokyo_tyrant.so: Undefined symbol "ps_globals" in Unknown on line 0

PHP 5.3.9 with Suhosin-Patch (cli) (built: Jan 12 2012 13:09:43)
Copyright (c) 1997-2012 The PHP Group
Zend Engine v2.3.0, Copyright (c) 1998-2012 Zend Technologies

[eAccelerator] This build of “eAccelerator” was compiled for PHP version 5.3.8.
Rebuild it for your PHP version (5.3.9) or download precompiled binaries.

To solve this problem, simple rebuild the package, i.e.,

cd /usr/ports/www/eaccelerator
sudo make deinstall install clean

PHP Warning: PHP Startup: Unable to load dynamic library ‘/usr/local/lib/php/20090626/memcache.so’ – /usr/local/lib/php/20090626/memcache.so: Undefined symbol “php_session_create_id” in Unknown on line 0

#cd /usr/ports/databases/pecl-memcache
#sudo make deinstall
#sudo make install clean

PHP Warning: PHP Startup: Unable to load dynamic library ‘/usr/local/lib/php/20090626/tokyo_tyrant.so’ – /usr/local/lib/php/20090626/tokyo_tyrant.so: Undefined symbol “ps_globals” in Unknown on line 0

#cd /usr/ports/pecl-tokyo_tyrant
#sudo make deinstall
#sudo make install clean

After the re-installation is completed, make sure that PHP gives no complain:

#php -v

PHP 5.3.9 with Suhosin-Patch (cli) (built: Jan 12 2012 13:09:43)
Copyright (c) 1997-2012 The PHP Group
Zend Engine v2.3.0, Copyright (c) 1998-2012 Zend Technologies

That’s it! Have fun.

Our sponsors:

How to keep the server running when the CPU fan is dead (and without buring the CPU)?

Few days ago, I found that the CPU fan of this server (i.e., icesquare.com) was having some troubles. It was spinning slowly and making some weird noise. After opening the computer case and had a brief investigation, I found that the fan needed to be replaced. Unlike the computer case fan, CPU fan works with CPU socket. Given that there are so many different sockets available, it is not likely that the local stores have each in stock. In the other words, I need to order the CPU fan online. At the mean time, I need to power down the server or it will kill the CPU (over heated).

There are several way to minimize the down time:

  1. Get a back up server, or
  2. Remove a working CPU fan from other server, or
  3. Build your own CPU fan

The first two solutions require powering down other servers, which is not a good idea to me. That’s why I picked the third one. In the last week, my DYI fan works pretty well as temporary CPU fan. So far the CPU temperature was very stable and without any problem.

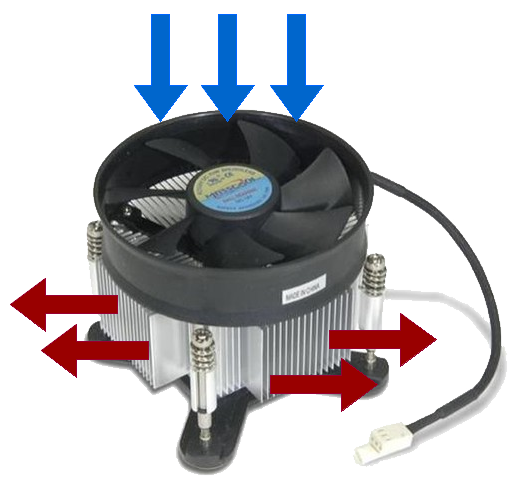
Different CPU fan has different design, including the air flow direction. A typical CPU fan actually draws the cold air into the CPU, and push the hot air out of the CPU.

Notice that some CPU fans work in an opposite way. Instead of pushing the cold air, they pull out the hot air (kind of like a vacuum). The best way to determine the air flow is by checking the fan rotation direction. After that, simply verify it with your right hand:


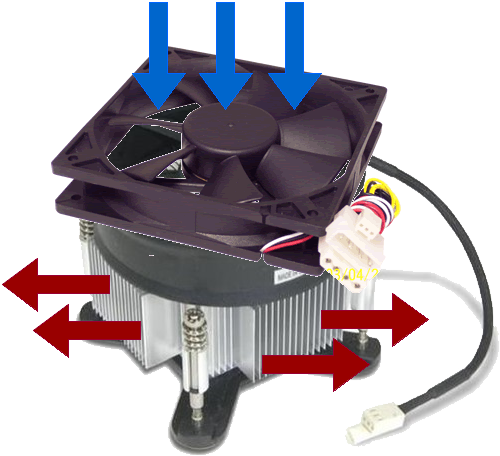
Based on this factor, it is possible to add a working computer fan on top of the broken CPU fan, as long as the air flow direction remains unchanged. In my situation, I used a regular computer case fan with similar dimension. i.e.,

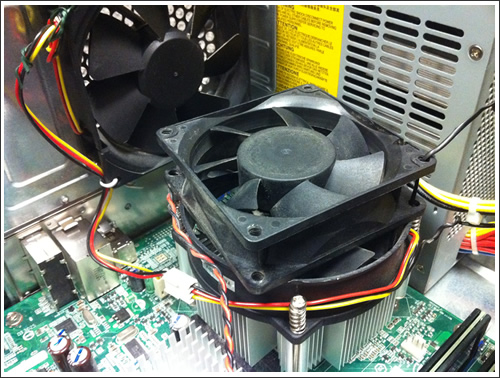
Of course, you will need to power off the defective CPU fan first. Here is the final setup. You can use any regular plastic wrapped metal cable wire to secure the fan.

Although the air flow direction remains unchanged, the power of the air flow will be reduced because part of the energy is used to rotate the defective CPU fan instead of pushing the air to the CPU. In short, the cooling performance will be reduced and the CPU temperature will get increased. Therefore, it is a good idea to add more computer case fans to make up the difference. In my situation, originally I had a rear fan in additional to my CPU fan. Therefore I added one additional fan (One on rear, and one on the side). Keep in mind that you need to keep the computer case closed. Opening the case will decrease the cooling performance.

This setup had run for about a week at room temperature. During this period, I didn’t notice any temperature rise. Both system and CPU temperatures were below the warning threshold.

By using this solution, it is possible to keep the server running and keep your CPU happy. 🙂

FYI, in terms of the cooling performance, it is more efficient to push the cool air into the system than pulling the hot air out from the system in most cases.

Enjoy.

–Derrick

Our sponsors:

[FreeBSD-update]Installing updates…install: ///usr/src/lib/libc/gen/libc_dlopen.c: No such file or directory

When I tried to upgrade my FreeBSD system today, I received a last minute Christmas gift from the FreeBSD team. 🙂

#sudo freebsd-update fetch
Looking up update.FreeBSD.org mirrors... 4 mirrors found.
Fetching metadata signature for 8.2-RELEASE from update4.FreeBSD.org... done.
Fetching metadata index... done.
Inspecting system... done.
Preparing to download files... done.

The following files will be added as part of updating to 8.2-RELEASE-p5:
/usr/src/lib/libc/gen/libc_dlopen.c

I got the following error:

#sudo freebsd-update install
Installing updates...install: ///usr/src/lib/libc/gen/libc_dlopen.c: No such file or directory
 done.

Initially, I thought the problem was a typo in the freebsd-update profile, so I gave this a try:

sudo cat /var/db/freebsd-update/* | grep libc_dlopen.c

Unfortunately, I couldn’t find anything. So I investigated the problem, and I found that it was caused by the missing source. In a nut shell, if you did not install the FreeBSD with the source (i.e., /usr/src is empty), this problem will show up.

To fix this problem, simply create a dummy directory:

sudo mkdir -p /usr/src/lib/libc/gen

and re-run everything once again, i.e.,

#sudo freebsd-update fetch
#sudo freebsd-update install
#sudo reboot

After the computer finishes rebooting, verify that the upgrade is done:

# sudo freebsd-update fetch
Looking up update.FreeBSD.org mirrors... 4 mirrors found.
Fetching metadata signature for 8.2-RELEASE from update2.FreeBSD.org... done.
Fetching metadata index... done.
Inspecting system... done.
Preparing to download files... done.

No updates needed to update system to 8.2-RELEASE-p5.

That’s it!

Enjoy this last minute Christmas gift from the FreeBSD team. Merry Christmas! 🙂

–Derrick

Our sponsors:

How to Delete System Mail / Empty System Mail box in FreeBSD / Linux?

When I checked my FreeBSD system mail box today, I found that there were 8000 system mails sitting my mail box:

mail
Mail version 8.1 6/6/93.  Type ? for help.
"/var/mail/root": 8182 messages 8182 new
>N  1 [email protected]  Fri Sep 30 03:02  44/1330  "x.com output"
 N  2 [email protected]  Fri Sep 30 03:02  72/2464  "x.com output"
 N  3 [email protected]  Sat Oct  1 03:01  35/1075  "x.com output"
...
Another 8000 lines go here

There are several ways you can do. Either you can go through them one by one and delete them one at a time, i.e.,

d
[Hit the ENTER Key]

Or specify which mails you like to delete by ID, e.g.,

d x-y
[Hit the ENTER Key]

where x and y are the start and end of the mail ID, respectively.

For example, if you want to empty your FreeBSD mail box, you can do the following:

d 1-8182
[Hit the ENTER Key]

where 8182 is the number of mails I have.

You can find the number of your emails when you open your mail box:

"/var/mail/root": 8182 messages 8182 new

Hit the enter key again to confirm that the mail box is empty:

At EOF

And leave the mail box.

q

Now, try to access your mail box again, and the system should tell you that you have no system mail.

# mail
No mail for root

That’s it.

How to stop generating the system mails

Whenever the system run a background job, it will store the output of the program and email to the system mail box for auditing purposes. However, you can disable this feature if you don’t care the output.

Normally, we run a script this way:

start.sh

To avoid any output, we do the following instead:

start.sh > /dev/null 2>&1

For example, if you run many cron jobs, you need to go over your cron job list and add this to every single script, i.e.,

sudo nano /etc/crontab
or
crontab -e

and add /dev/null 2>&1 to every command.

Hope it helps.

–Derrick

Our sponsors:

Can’t connect to local MySQL server through socket ‘/var/lib/mysql/mysql.sock’ (2)

When I tried to connect to the MySQL server through PHP, I got the following error: Can’t connect to local MySQL server through socket ‘/var/lib/mysql/mysql.sock’ (2)

To give you some background, here is my situation. My Fedora Linux is a 64-bit machine, and I have installed a 32-bit version of XAMPP (i.e., 32-bit PHP, 32-bit MySQL) for the web server. Also, I have some PHP scripts that will be run in background. These scripts are run using 64-bit PHP. Both 32-bit and 64-bit PHP need to access the MySQL database. Long story short. I got the MySQL error message when I tried to execute using the 64-bit PHP, while the 32-bit PHP has no complain.

When PHP talks to MySQL, it needs to talk to the MySQL representative, i.e., mysql.sock. If it cannot talk to the mysql.sock, then PHP will be unable to access the MySQL database.

The reason why my 64-bit PHP could not talk to MySQL because of a wrong location of mysql.sock. To solve this problem, simply do the following:

First, let’s find out where is the PHP.ini of the 64-bit PHP:

sudo find / -name "php.ini"

In Fedora Linux, it is:

/etc/php.ini

Then, we need to find out where is the mysql.sock:

sudo find / -name "mysql.sock"

In my case, it is:

/opt/lampp/var/mysql/mysql.sock

Now, let’s tell PHP the location of the mysql.sock:

sudo nano /etc/php.ini

And change the following line from:

mysql.default_socket =

to:

mysql.default_socket = /opt/lampp/var/mysql/mysql.sock

Now, try to run your script again. The problem should be gone.

Have fun with MySQL.

–Derrick

Our sponsors:

ZFS+USB: Building a Super Large Server Using USB Memory, CF Card and SD Card.

I got a lot of unused USB thumb drives, CF flash card and SD cards sitting in my drawer. The sizes range from 8MB to 8GB. Unlike few years ago, it is getting a lot easier to access to the Internet, so I no longer need to carry my data via memory device any more. Instead, I simply connect to the Internet and the data is with me. That’s why my USB thumb drivers / CF flash cards / SD cards have been sitting in my drawer for few years.

I got an idea one day. It would be a waste to let them sitting in my drawer (or waiting to be sent to landfill). Why not I use them to build a file server. At least I can test out whether the idea is doable or not. So here are the candidates:

  • USB Thumb drives

    1. 8GB x 2
    2. 1GB x 1
    3. 256MB x 2
  • CF Flash Card

    1. 2GB x 1
    2. 1GB x 1
    3. 512MB x 2
  • SD Card

    1. 4GB x 2

As you can see from my list, the size of each candidates varies from 256MB to 8GB. So it will be interesting to put them together and build a super large file server.
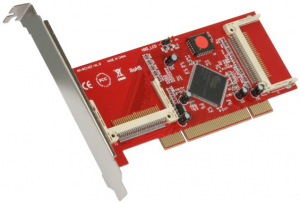
Most computer has multiple USB ports available. If you don’t have enough USB port, get a powered USB hub (i.e., the USB hub has it own power unit), it will be more efficient then getting the power from the computer. For the CF card, I use a SYBA SY-PCI48001 PCI to Compact Flash Adapter to connect my CF Flash cards to my computer. For the SD cards, I simply connect each of them to a Sandisk USB SD card reader.

Okay, let’s talk about the software. I am going to use ZFS to implement it, because it is quick and simple. First, connect all devices to your computer, and make sure that your operating systems can recognize all of them. In this tutorial, I am using FreeBSD as a tutorial. However, the idea should be the same in other ZFS ready system, such as Solaris.

Make sure that all USB devices are recognized by your operating system. In FreeBSD, the devices are registered as /dev/da* or /dev/ad*:

dmesg | egrep 'ad|da'

Now, you need to think about how to group your devices together. Do you simply want to build a pure USB ZFS pool, or a hybrid hard drive/USB pool. To keep thing simple, I will go with pure USB ZFS pool.

Suppose I am going to create a pure USB pool, which simply include every device in one single place:

zpool create myzpool /dev/ad0 /dev/ad1 /dev/ad2 /dev/da0 /dev/da1 /dev/da2

where the ad* and da* are the locations of my devices.

This will create a big pool. When you write some data to this pool, e.g.,

sudo dd if=/dev/random of=/myzpool/test_file count=10g bs=1M

The system will simply split the file into multiple chunks, and write all chunks to each USB devices at the same time.

Now let’s verify the pool information:

zpool iostat -v
               capacity     operations    bandwidth
pool         used  avail   read  write   read  write
----------  -----  -----  -----  -----  -----  -----
myzpool
  ad12       969M   112K      0      0  1.15K  66.4K
  ad13      1.90G   112K      0      0  1.74K  66.4K
  ad14       480M    11K      0      0  3.08K  66.9K
  da0          1G  2.78G      0      0  5.55K  66.1K
  da1          1G  2.78G      0      0  5.55K  66.1K
  da2        240M    80K      0      0  2.41K  66.8K
  da3        240M   112K      0      0  1.87K  66.8K
  da4       7.50G    80K      0      0  4.35K  66.5K
  da5       7.50G    96K      0      0  2.98K  66.3K
  da6        972M   112K      0      0    278  39.9K
----------  -----  -----  -----  -----  -----  -----

As you can see, the system is split the data and write it to each devices. ZFS is very smart to adjust the number of split to optimize the performance.

Okay, what about the performance? Honestly you can’t expect too much from a pure-USB zpool, because the write speed is limited to 40MB/s, which is way too slow compared to the disk. The only advantage is that there is no moving parts, which significant decrease the failure rate, and the overall cost is cheap. Now, let’s make talk about the hybrid pool, a combination of USB and hard drive pool.

A hybrid ZFS pool is a combination of hard drives and USB drives. In my experiment, I put the USB devices as log and cache devices, while the hard drives are used as main storage. If you don’t know what is ZFS log or ZFS cache, you can think about a ZFS log devices is a buffer for writing the data, while a ZFS cache is for reading the data.

Ideally, you should use two identical devices (same size) for ZFS log (writing the data). For ZFS cache, it doesn’t matter.

First, let’s create our ZFS pool with the storage devices (i.e., hard drives) only.

zpool create myzpool raidz /dev/ad0 /dev/ad1 /dev/ad2

Next, we need to add the ZFS log. We are going to create a mirror, so that they have to be identical.

zpool add myzpool log mirror /dev/da0 /dev/da1

Finally, we add the ZFS cache.

zpool add myzpool cache /dev/da2 /dev/da3 /dev/da4

And let’s take a look to the whole picture:

zpool iostat -v
               capacity     operations    bandwidth
pool         used  avail   read  write   read  write
----------  -----  -----  -----  -----  -----  -----
myzpool     5.83T  6.79T      9      2  1.03M   311K
  raidz1    5.83T  6.79T      9      1  1.03M   179K
    ad0         -      -      2      0   171K  29.9K
    ad1         -      -      2      0   171K  29.9K
    ad2         -      -      2      0   171K  29.9K
    ad3         -      -      2      0   171K  29.9K
    ad4         -      -      2      0   171K  29.9K
    ad5         -      -      2      0   171K  29.9K
    ad6         -      -      2      0   171K  29.9K
  da0        128K  3.78G      0      0      0  65.9K
  da1           -      -      0      0      0  65.9K
cache           -      -      -      -      -      -
  da2        961M     8M      0      0  1.14K  66.6K
  da3       1.89G     8M      0      0  1.73K  66.6K
  da4        472M     8M      0      0  3.06K  67.0K
  da5        232M     8M      0      0  2.40K  66.9K
  da6        232M     8M      0      0  1.86K  66.9K
  da7       7.50G     8M      0      0  4.33K  66.6K
  da8       7.50G     8M      0      0  2.96K  66.5K
  da9        964M     8M      0      0    276  39.6K
----------  -----  -----  -----  -----  -----  -----

With this combination, I get a pretty good performance (both read/write). When I copy the data from Windows to this ZFS pool using Samba, I can get a pretty high transfer speed (Over 100MB/s). Sometimes it get even close to 110MB/s. This result is very amazing given that my hard drives are the standard SATA drives (non-SSD) only.

The reliability of the USB devices / CF card / SD card sometimes questionable. That’s one of the reason why I don’t use them as the permanent storage media (using as Cache / log is okay). In this design, I use two SD cards (4GB x 2 = 8GB) as the ZFS log devices. Since they are set up as mirror, if one dies, the other one will kick in, which will minimize the data lost. For the cache devices, if one device is failed, I can remove it from the ZFS pool at any time. There will be no data lost so it will be okay.

I have run this super large server for few months already. There is about 200GB data I/O everyday, so far I am very happy with the overall performance. The most important thing is, those unused memory devices are now very happy as they don’t need to be sent to landfill.

Our sponsors:

[Solved]TFTP: Error code 2: Access violation

This post is an extension of my original post on TFTP: How to Setup TFTP. Although the post was written for Ubuntu, the same idea can be applied to all systems.

So, here is our problem. You set up a TFTP server. It starts fine. You upload a file, it gives no error. Now, you try to download a file, it throws you an error:

tftp> get myfile.jpg
Error code 2: Access violation

If you google the error message, Error code 2: Access violation on the web, you’ve probably noticed many solutions, some of them are very creative, such as running a touch command to create the file before downloading it etc. Before you try those solutions, ask yourself this question first: Do you want to touch 100 files before you download 100 files?

Anyway. I am not sure what cause the TFTP gives the error message: Error code 2: Access violation. However I never experienced this error in my system before with my configurations and settings. Therefore, I am going to share you my configurations for your reference.

My TFTP Configuration:

service tftp
{
   protocol = udp
   port = 69
   socket_type = dgram
   wait = yes
   user = nobody
   server = /usr/sbin/in.tftpd
   server_args = var/lib/tftpboot -s
   disable = no
}

There are couple things you need to pay attention. First, my TFTP root directory is /var/lib/tftpboot, and in my configuration file, I skip the first /. Second, I put a flag, -s in the server_args. That helps to keep TFTP from complain.


Next, the permission of the TFTP root directory plays an important role. Make sure that the permission and ownership are set correctly.

sudo chown -R nobody:nobody /var/lib/tftpboot
sudo chmo7 -R 777 /var/lib/tftpboot

Now, you can simply restart the system:

sudo service xinetd stop
sudo service xinetd start

and try to put a file and download it back:

tftp localhost
tftp> put myfile.jpg
Sent 56733279 bytes in 5.7 seconds

tftp> get myfile.jpg
Received 56733279 bytes in 5.7 seconds

That’s it.

Happy TFTP.

–Derrick

Our sponsors: