XAMPP: Error 1! Couldn’t start Apache! … Sorry, I’ve no idea what’s going wrong.

Today I helped my friend to install XAMPP on a Debian system. When I tried to start the Apache webserver, I got the following message:

#/opt/lampp/lampp startapache
XAMPP: Starting Apache with SSL (and PHP5)...
XAMPP: Error 1! Couldn't start Apache!
XAMPP: Starting diagnose...
XAMPP: Sorry, I've no idea what's going wrong.
XAMPP: Please contact our forum http://www.apachefriends.org/f/

This problem is likely related to your Apache configuration file. To drill down to the root of the problem, we can take a look to the Apache error log:

tail /opt/lampp/log/error_log

and it should give you some info on how to solve this computer problem.

–Derrick

Our sponsors:

Update for xz-4.999.9_1 failed

Recently, I tried to upgrade the installed port on my FreeBSD:

portmaster -Da

and I got the following message:

===>>> Launching child to update xz-4.999.9_1 to xz-5.0.0

===>>> Port directory: /usr/ports/archivers/xz

        ===>>> This port is marked IGNORE
        ===>>> is already in the base system

        ===>>> If you are sure you can build it, remove the
               IGNORE line in the Makefile and try again.

===>>> Update for xz-4.999.9_1 failed
===>>> Aborting update


===>>> You can restart from the point of failure with this command line:
       portmaster  ports-mgmt/portmaster

I google it and someone suggested to do the following:

Just run a

portmaster -e xz-4.999.9_1

And say yes to the prompt. 

Don’t do it!
I tried that and the nightmare began. It will first ask you whether you want to remove xz. Then it will go through every package that depends on xz, and ask you whether you want to delete them or not. If you accidentally click yes, your system will get into trouble.

Instead, try to deinstall it from port:

cd /usr/ports/archivers/xz
sudo make deinstall

This is a lot safer.

Our sponsors:

MySQL: Starting MySQL….. ERROR! The server quit without updating PID file

This step-by-step guide is mainly for FreeBSD, however the idea is the same for Linux. Every once a while, when I update my FreeBSD box, the system likes to shutdown my MySQL server. Therefore, I need to start it again after the update is done. Unfortunately, the upgrade process is not smooth every time. Sometimes it will throw me some error.

/usr/local/etc/rc.d/mysql.server start

Oh well, I got the following error messages:

Starting MySQL..... ERROR! The server quit without updating PID file.

Sometimes, the message will tell you the exact location of which PID file:

Starting MySQL..... ERROR! The server quit without updating PID file (/var/db/mysql/www.icesquare.com.pid).

There are several solutions to troubleshoot these problems. I will go over each one by one.

Solution 1: Reboot The Computer

Although it sounds simple, but it really works. During the system upgrade, the OS may disable some of your daemons. Instead of troubleshooting each one by one, the easiest way is to start everything over. For example, I experienced this problem today after upgrading the Apache and Ruby (Yes, MySQL is not part of the update), and I got this error message afterward. After rebooting the computer, the error message is gone.

Solution 2: Remove Your MySQL Config File

If you have modified your MySQL configuration file, MySQL may not like it few versions after (MySQL is not backward compatibility friendly). It can be the problem of using an unsupported variable, or something similar. The easiest way is to remove your configuration file, and try to start the MySQL server again:

Backup your MySQL configuration first.

mv /etc/my.cnf /etc/my.cnf.backup

And restart the MySQL server again:

/usr/local/share/mysql/mysql.server start

Hopefully you will see the following message:

Starting MySQL. SUCCESS!

Solution 3: Upgrade Your Database File

Sometimes, the newer MySQL doesn’t like the database created in earlier version. I discovered this when I upgrade to MySQL 5.5.7:

Starting MySQL..... ERROR! The server quit without updating PID file (/var/db/mysql/www.icesquare.com.pid).

Since MySQL tells me which PID file causes the problem, I open the file and take a look what’s going on:

sudo tail /var/db/mysql/www.icesquare.com.err

And I saw something interesting: tables: Table ‘mysql.proxies_priv’ doesn’t exist:

101112 10:49:16  InnoDB: Initializing buffer pool, size = 128.0M
101112 10:49:16  InnoDB: Completed initialization of buffer pool
101112 10:49:16  InnoDB: highest supported file format is Barracuda.
101112 10:49:17  InnoDB: 1.1.3 started; log sequence number 1589404
101112 10:49:17 [ERROR] Fatal error: Can't open and lock privilege tables: Table 'mysql.proxies_priv' doesn't exist
101112 10:49:17 mysqld_safe mysqld from pid file /var/db/mysql/www.icesquare.com.pid ended

The reason is very simple. MySQL could not open a table created in the earlier version (< 5.7.7) because it is not compatible with the current version. So, we can try to start the MySQL in safe mode through rc.d. First, you can edit the /etc/rc.conf and put the following into the file:

mysql_enable="YES"
mysql_args="--skip-grant-tables --skip-networking"

Restart MySQL through rc.d:

/usr/local/etc/rc.d/mysql-server start

If you did it right, you should see something like the following:

Starting MySQL.. SUCCESS!

Now, MySQL is already running the safe-mode. We want to perform a MySQL upgrade on all tables:

sudo mysql_upgrade

You should see something like this:

Looking for 'mysql' as: mysql
Looking for 'mysqlcheck' as: mysqlcheck
Running 'mysqlcheck' with connection arguments: '--port=3306' '--socket=/tmp/mysql.sock'
mysql.columns_priv                                 OK
mysql.db                                           OK
mysql.event                                        OK
mysql.func                                         OK
mysql.general_log                                  OK
mysql.help_category                                OK
mysql.help_keyword                                 OK
mysql.help_relation                                OK
mysql.help_topic                                   OK
mysql.host                                         OK
mysql.ndb_binlog_index                             OK
mysql.plugin                                       OK
mysql.proc                                         OK
mysql.procs_priv                                   OK
mysql.servers                                      OK
mysql.slow_log                                     OK
mysql.tables_priv                                  OK
mysql.time_zone                                    OK
mysql.time_zone_leap_second                        OK
mysql.time_zone_name                               OK
mysql.time_zone_transition                         OK
mysql.time_zone_transition_type                    OK
mysql.user                                         OK
Running 'mysql_fix_privilege_tables'...
OK

Now, we want to switch the MySQL back to normal mode by commenting the extra options in /etc/rc.conf:

mysql_enable="YES"
#mysql_args="--skip-grant-tables --skip-networking"

And restart MySQL through /etc/rc.d:

/usr/local/etc/rc.d/mysql-server restart

Now the MySQL is up and running again!

Happy MySQLing.

–Derrick

Our sponsors:

What can you do with A8M2N-LA / NodusM-GL8E?

Recently, I decided to turn my HP m7557c computer (motherboard: A8M2N-LA / NodusM-GL8E) to an Unix server. The nightmare began. After trying nearly 10 different operating systems and distributions, I found that only very few of them worked with A8M2N-LA / NodusM-GL8E. I think it is worth to share my experience with this beast – an experiment result that took more than 100 hours.

I have not failed. I've just found 10,000 ways that won't work.
-- Thomas A. Edison
The following operating system are listed in alphabetically:

Fedora 13
Status: No
Comment: Installation went well, but the system was very unstable due to kernel panic. This mother board may not compatible with the newer Linux kernel.

FreeBSD 7.3
Status: No
Comment: Does not support USB keyword, i.e., can’t start the installation.

FreeBSD 8.1
Status: Yes
Comment: Stable, however the harddrives are very unstable. Sometimes the system complains about the harddrive. See the full story here.

FreeBSD 8.2
Status: Yes
Comment: Very stable. No problem found so far.

OS X 10.4
Status: No
Comment: Installation failed.

OS X 10.5.8
Status: No
Comment: Installation completed, but very unstable. The system reboots itself.

OS X 10.6
Status: No
Comment: Installation failed

Ubuntu 9.10
Status: Yes, stable.

Ubuntu 10.04
Status: No
Comment: If install directly from the disk, the system will not boot. The only possible way is to upgrade from an earlier version. See Ubuntu 10.04 – Can’t boot / Can’t install for details.

Ubuntu 10.10
Status: No
Comment: Cannot even load the installation disk.

Hope my experience is helpful to you.

–Derrick

Our sponsors:

Cannot find autoconf. Please check your autoconf installation and the $PHP_AUTOCONF environment variable. Then, rerun this script.

This post is about FreeBSD, however the idea is about the same for other Unix systems.

While I tried to install memcached, the system complained with this message:

Cannot find autoconf. Please check your autoconf installation and the
$PHP_AUTOCONF environment variable. Then, rerun this script.

This problem is caused by missing couple variables at the shell level: PHP_AUTOCONF, PHP_AUTOHEADER. It is very easy to solve this problem:

1. First, make sure that Autoconf is installed in your system:

#pkg_info | grep autoconf
autoconf-2.68       Automatically configure source code on many Un*x platforms
autoconf-wrapper-20071109 Wrapper script for GNU autoconf

If autoconf is not available, install it from here:

cd /usr/ports/devel/autoconf268
make install clean

2. Now, we need to set couple variables. This step is very important because you can’t set the variable using sudo export x=y. First, switch to root

sudo su

3. Find out where is autoconf (The location in FreeBSD and Linux are different)

which autoconf

4. Set the autoconf, in my case, it is /usr/local/bin/autoconf

export PHP_AUTOCONF=/usr/local/bin/autoconf

5. Do the same thing for autoheader:

which autoheader
export PHP_AUTOHEADER=/usr/local/bin/autoheader

That’s it. Now try to install your software again and the error message should be gone.

–Derrick

Our sponsors:

Finally, Ubuntu uses a more updated Linux kernel than Fedora

Historically, Ubuntu focuses on the user experience such as beautiful graphical user interface, while Fedora focuses on performance. In the other words, the kernel in Fedora distribution is more up-to-dated.

I just upgraded by Ubuntu 10.04 to 10.10 (released on October 10, 2010), I found that the Linux Kernel in Ubuntu is more advanced than Fedora. I am surprised!

#cat /etc/lsb-release && uname -a

DISTRIB_ID=Ubuntu
DISTRIB_RELEASE=10.10
DISTRIB_CODENAME=maverick
DISTRIB_DESCRIPTION="Ubuntu 10.10"
Linux 2.6.35-22-generic #33-Ubuntu SMP Sun Sep 19 20:34:50 UTC 2010 i686 GNU/Linux

and for Fedora 13:

#cat /etc/redhat-release && uname -a
Fedora release 13 (Goddard)
Linux 2.6.34.7-56.fc13.x86_64 #1 SMP Wed Sep 15 03:36:55 UTC 2010 x86_64 x86_64 x86_64 GNU/Linux

Our sponsors:

Comments on running webservers at home – Part 1

I like to experiment all kind of computer technologies especially server applications. I am not one of those who is satisfied with just making a website and putting it in somewhere. I like the full control of the server because I like to try different combination of applications for performance tuning. For example, I doubt regular web hosting company allows you to host the entire system on a ram disk with a reasonable price tag. That’s why I choose to host a server at home. That’s a lot cheaper, plus I have the full control. However, running server application may generate lots of upstream traffic. That’s why most internet server providers (such as Charter) do not allow their customers to run any server related applications using their internet connection service. They do it by blocking most service related common ports, e.g., 80 (HTTP), 21 (FTP), 22 (SSH) etc. So there is really nothing you can do other than hosting your applications on different ports.

Two years ago, I started hosting all of my websites using my own computers. I found a number of benefits.

Benefits of hosting websites at home

1. It saves me tons of money.

I was paying $72/year per domain for web hosting. Since I have more than ten domains, the total running costs per year is pretty high. This amount is really nothing comparing to the cost of the electricity.

Monthly cost for web hosting:

$72 per domain/yr * 10 domains / 12 months
= $60 per domain / month

My monthly electricity cost at home, which includes everything such as running 10 non-gaming computers, washer, dryer, lighting etc:

$80 / month

I haven’t tried measuring the exact energy but you can imagine the electricity used by computers should be under $10 / month.

2. It is fun (and environmental friendly too).

I have few stone-age computers including a Pentium II laptop, a Mac G3 (speed wise similar to Pentium II), a Pentium M Celeron laptop etc. I integrated them to a web server farm (web clusters). Since running a web server does not require a lot of CPU power, they are doing okay for hosting low-traffic websites. Also, it is cool to show off my friends the global data center that I build for my websites.

3. Your data is secured!

Have you ever heard of any bank host their web sites on web hosting? No matter what type of encryption you use for your web applications, you still need to process the raw, original, and unencrypted data on the server side at one point. Processing confidential information on a shared server is like talking your secrets in a study room in a public library. You think you are in an isolated environment, but you can be surveillanced, it’s very simple and easy.

Here is an example:
Supposes I have a web application which accepts the confidential information from my users, and all traffics are encrypted. After the confidential information is decrypted on the server-side, my web application processes the raw information and do further things.

Let’s say the server environment is Apache + PHP + MySQL, the most popular combination of web application environment. Since they are all open-source, it is very easy to modify the source codes and log every single thing into a file, including the raw, original, unencrypted data processed by my web application.

You may think this may require lots of work and it will never happen on you. What if your competitor wants your confidential information? It doesn’t cost much to hire someone to do it.

Sounds scary?

More scary things come along. Shared web hosting (hosting multiple domains on one single server) always come with lots of trouble that many people are ignored. In theory, every website on a shared hosting lives in a virtual, independent environment, think about it as a virtual machine like VMWare or Hyper-V. Practically, it is not easy to set up such environment (e.g., FreeBSD Jail) and many web hosting companies choose to go with a less difficult path, because customers will not realize it anyway. Now here is the interesting part, supposes my domain and your domain are hosted on the same server. I can access the resource at the operating system level first (which will required some hacking), then access your file after that. Now I have access your source code and I can do whatever I want.

The most secure place in the world is the place that can be accessed by you, and no body else, i.e., your home, or any place you have full control

Our sponsors:

Think twice before upgrading your server to PHP 5.3.3

I upgraded to PHP 5.3.3 today, and I was shocked! I found a huge security hole default setting change that may leak the source code to public, which never happened in the earlier version.

Here is an example. Suppose my code looks like this:

<?php

echo "This is a good example";

?>

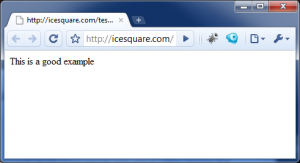
Everything will turn out fine. Here is the result:

Good Example

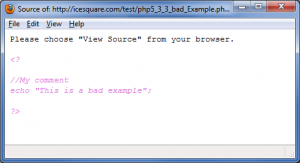
However, if the open tag is changed from <?php to <?:

<?

//My comment
echo "This is a bad example";

?>

Then PHP 5.3.3 will not recognize the code within the < ? and ?> tag. Instead, it will parse it as a regular text file, i.e., your users will see the code. Here is the result:
Bad Example

I know that it happens on PHP for Windows (XAMPP for Windows), but I didn’t know that they move this new feature to Unix world.

Update:
Thanks for the help from bt garner, it is pretty simple to fill this security hole.

First, open the php.ini. If you are not sure where is it, you can run the following command to locate it:

sudo find / -name "php.ini"

And activate the following parameters:

short_open_tag = On

That’s it!

–Derrick

Our sponsors:

fetch: ftp://ftp.FreeBSD.org/pub/FreeBSD/ports/distfiles/ngx-fancyindex-0.2.2.tar.bz2: File unavailable (e.g., file not found, no access)

Today I tried to run the upgrade my nginx on my FreeBSD box, and I received the following message:

===>  Vulnerability check disabled, database not found
===>  License accepted by the user
===>  Found saved configuration for nginx-0.7.66
=> ngx-fancyindex-0.2.2.tar.bz2 doesn't seem to exist in /usr/ports/distfiles/.
=> Attempting to fetch from http://connectical.com/attachments/download/26/.
fetch: http://connectical.com/attachments/download/26/ngx-fancyindex-0.2.2.tar.bz2: Not Found
=> Attempting to fetch from ftp://ftp.FreeBSD.org/pub/FreeBSD/ports/distfiles/.
fetch: ftp://ftp.FreeBSD.org/pub/FreeBSD/ports/distfiles/ngx-fancyindex-0.2.2.tar.bz2: File unavailable (e.g., file not found, no access)
=> Couldn't fetch it - please try to retrieve this
=> port manually into /usr/ports/distfiles/ and try again.

Obviously, the FreeBSD box could not download the file. To fix this problem, simply run the following commands:

cd /usr/ports/distfiles/
sudo wget http://files.connectical.com/gentoo/ngx-fancyindex-0.2.2.tar.bz2

This will allow FreeBSD to skip downloading the file from a wrong URL. Now, go back to the nginx port:

cd /usr/ports/www/nginx

and try to install nginx again:

sudo make install clean

Our sponsors:

-bash: /dev/null: Permission denied

Recently, I found that Ubuntu gives the following error when I log in to the system:

-bash: /dev/null: Permission denied

After I run the following command, the problem is gone:

sudo chmod 0666 /dev/null

Our sponsors: