I always wanted to find out the performance difference among different ZFS types, such as mirror, RAIDZ, RAIDZ2, RAIDZ3, Striped, two RAIDZ vdevs vs one RAIDZ2 vdev etc. So I decide to create an experiment to test these ZFS types. Before we talk about the test result, let’s go over some background information, such as the details of each design and the hardware information.
Background
Here is a machine I used for experiment. It is a consumer grade desktop computer manufactured back in 2014:
CPU: Intel(R) Core(TM) i7-4770 CPU @ 3.40GHz / quard cores / 8 threads
OS: CentOS Linux release 7.3.1611 (Core)
Kernel: Linux 3.10.0-514.6.1.el7.x86_64 #1 SMP Wed Jan 18 13:06:36 UTC 2017 x86_64 x86_64 x86_64 GNU/Linux
Memory: 20 GB (2GB x 4)
Hard drives: 5 TB x 8
(Every hard drive is 4k sectors, non-SSD, consumer grade, connected via a PCI-e x 16 raid card with SAS interface)
System Settings: Everything is system default. Nothing has been done to the kernel configuration.
Also, I tried to keep each test simple. Therefore I didn’t do anything special:
zpool create -f myzpool (different settings go here...)
zfs create myzpool/data
To optimize the I/O performance, the block size of the zpool is based on the physical sector of the hard drive. In my case, all of the hard drives have 4k (4096 bytes) sectors, which is translated to 2^12, therefore, the ashift value of the zpool is 12.
zdb | grep ashift
ashift: 12
To measure the write performance, I first generate a zero based file with the size of 41GB and output to the zpool directly. To measure the read performance, I read the file and output to /dev/null. Notice that the file size is very large (41GB) such that it does not fit in the arc cache memory (50% of the system memory, i.e., 10GB). Notice that the block size is the physical sector of the hard drive.
One of the readers asked me why I use a large file instead of many small files. There are few reasons:
- It is very easy to stress test / saturate the bandwidth (connection in between the hard drives, network etc) when working with large file.
- The results of testing large files is more consistent.
#To test the write performance:
dd if=/dev/zero of=/myzpool/data/file.out bs=4096 count=10000000

#To test the read performance:
dd if=/myzpool/data/file.out of=/dev/null bs=4096
FYI, if the block size is not specified, the result can be very different:
#Using default block size:
dd if=/myzpool/data/file.out of=/dev/null
40960000000 bytes (41 GB) copied, 163.046 s, 251 MB/s

#Using native block size:
dd if=/myzpool/data/file.out of=/dev/null bs=4096
40960000000 bytes (41 GB) copied, 58.111 s, 705 MB/s
After each test, I destroyed the zpool and created a different one. This ensures that the environment factors (such as hardware and OS) stay the same. Here is the test result. If you want to learn more about each design, such as the exact command I used for each test, the corresponding material will be available in the later section.
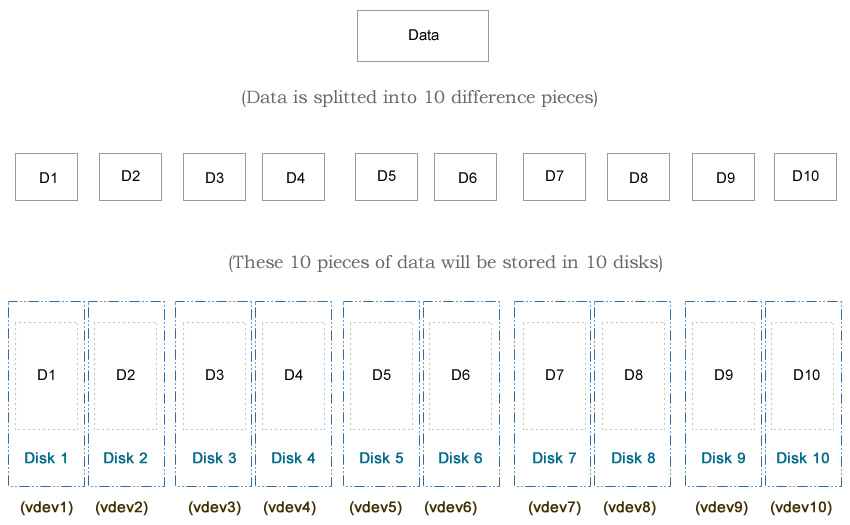
Notice that I used eight 5TiB hard drives (Total: 40TiB) in this test. Typically hard drive of 5TiB of can hold about 4.5 TB of data, that’s around 86%-90% of the advertised number, depending on which OS you are using. For example, if we use the striped design, which is the maximum possible storage capacity in ZFS, the usable space will be 8 x 5TiB x 90% = 36TB. Therefore, the following percentages will be based on 36TB rather than 40TiB.
You may notice that I use 10 disks in each diagram, while I use only 8 disks in the article here. That’s because the diagram was from my first edit. At that time I used a relative old machine, which may not reflect the modern ZFS design. The hardware and the test methods I used in the second edit is better, although both edits draw the same conclusion.
Test Result
(Sorted by speed)
(Click to see details)
Striped
In this design, we use all disks to store data (i.e., zero data protection), which max out our total usable spaces to 36 TB.
#Command
zpool create -f myzpool hd1 hd2 \
                        hd3 hd4 \
                        hd5 hd6 \
                        hd7 hd8

#df -h
Filesystem     Size    Used   Avail Capacity  Mounted on
myzpool         36T      0K     36T       0%  /myzpool

#zpool status -v
        NAME        STATE     READ WRITE CKSUM
        myzpool     ONLINE       0     0     0
          hd1       ONLINE       0     0     0
          hd2       ONLINE       0     0     0
          hd3       ONLINE       0     0     0
          hd4       ONLINE       0     0     0
          hd5       ONLINE       0     0     0
          hd6       ONLINE       0     0     0
          hd7       ONLINE       0     0     0
          hd8       ONLINE       0     0     0
And here is the test result:
#Write Test
dd if=/myzpool/data/file.out of=/dev/null bs=4096
40960000000 bytes (41 GB) copied, 58.111 s, 705 MB/s

#Read Test
dd if=/myzpool/data/file.out of=/dev/null bs=4096
40960000000 bytes (41 GB) copied, 59.6386 s, 687 MB/s
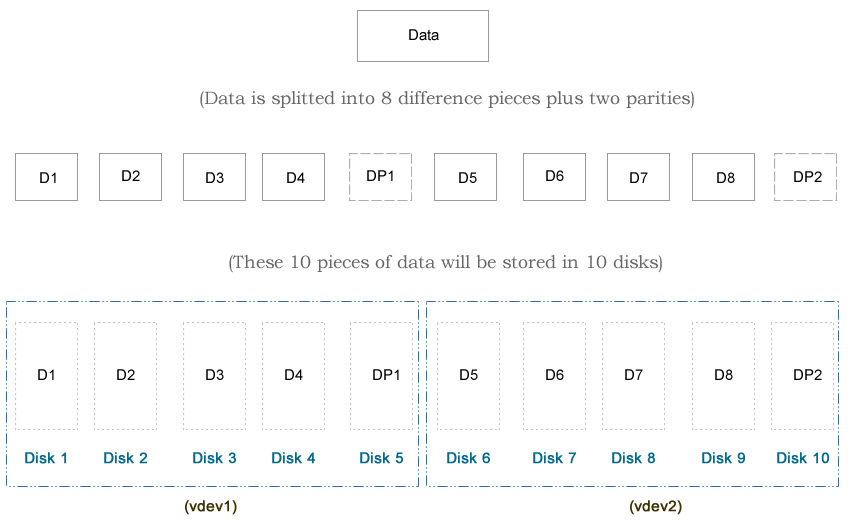
RAIDZ x 2
In this design, we split the data into two groups. In each group, we store the data in a RAIDZ1 structure. This is similar to RAIDZ2 in terms of data protection, except that this design supports up to one failure disk in each group (local scale), while RAIDZ2 allows ANY two failure disks overall (global scale). Since we use two disks for parity purpose, the usable space drops from 36TB to 26TB.
#Command
zpool create -f myzpool raidz hd1 hd2 hd3 hd4 \
                        raidz hd5 hd6 hd7 hd8

#df -h
Filesystem     Size    Used   Avail Capacity  Mounted on
myzpool         26T      0K     26T       0%  /myzpool

#zpool status -v
        NAME        STATE     READ WRITE CKSUM
        myzpool     ONLINE       0     0     0
          raidz1-0  ONLINE       0     0     0
            hd1     ONLINE       0     0     0
            hd2     ONLINE       0     0     0
            hd3     ONLINE       0     0     0
            hd4     ONLINE       0     0     0
          raidz1-1  ONLINE       0     0     0
            hd5     ONLINE       0     0     0
            hd6     ONLINE       0     0     0
            hd7     ONLINE       0     0     0
            hd8     ONLINE       0     0     0
And here is the test result:
#Write Test
dd if=/dev/zero of=/storage/data/file.out bs=4096 count=10000000
40960000000 bytes (41 GB) copied, 61.1401 s, 670 MB/s

#Read Test
dd if=/storage/data/file.out of=/dev/null bs=4096
40960000000 bytes (41 GB) copied, 60.2457 s, 680 MB/s
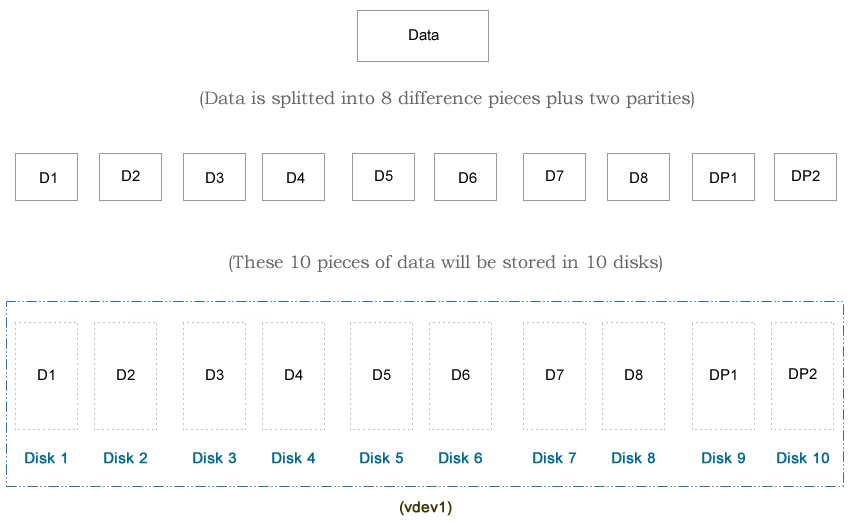
RAIDZ2
In this design, we use two disks for data protection. This allow up to two disks fail without losing any data. The usable space will drop from 36TB to 25TB.
#Command
zpool create -f myzpool raidz2 hd1 hd2 hd3 hd4 \
                               hd5 hd6 hd7 hd8

#df -h
Filesystem     Size    Used   Avail Capacity  Mounted on
myzpool         25T     31K     25T       0%  /myzpool

#zpool status -v
        NAME        STATE     READ WRITE CKSUM
        myzpool     ONLINE       0     0     0
          raidz2-0  ONLINE       0     0     0
            hd1     ONLINE       0     0     0
            hd2     ONLINE       0     0     0
            hd3     ONLINE       0     0     0
            hd4     ONLINE       0     0     0
            hd5     ONLINE       0     0     0
            hd6     ONLINE       0     0     0
            hd7     ONLINE       0     0     0
            hd8     ONLINE       0     0     0
And here is the test result:
#Write Test
dd if=/dev/zero of=/storage/data/file.out bs=4096 count=10000000
40960000000 bytes (41 GB) copied, 67.3897 s, 608 MB/s

#Read Test
dd if=/storage/data/file.out of=/dev/null bs=4096
40960000000 bytes (41 GB) copied, 60.8205 s, 673 MB/s
RAIDZ1
In this design, we use one disk for data protection. This allow up to one disk fails without losing any data. The usable space will drop from 36TB to 30TB.
#Command
zpool create -f myzpool raidz hd1 hd2 hd3 hd4 \
                              hd5 hd6 hd7 hd8

#df -h
Filesystem     Size    Used   Avail Capacity  Mounted on
myzpool         30T      0K     30T       0%  /myzpool

#zpool status -v
        NAME        STATE     READ WRITE CKSUM
        myzpool     ONLINE       0     0     0
          raidz1-0  ONLINE       0     0     0
            hd1     ONLINE       0     0     0
            hd2     ONLINE       0     0     0
            hd3     ONLINE       0     0     0
            hd4     ONLINE       0     0     0
            hd5     ONLINE       0     0     0
            hd6     ONLINE       0     0     0
            hd7     ONLINE       0     0     0
            hd8     ONLINE       0     0     0

And here is the test result:
#Write Test
dd if=/dev/zero of=/storage/data/file.out bs=4096 count=10000000
40960000000 bytes (41 GB) copied, 67.8107 s, 604 MB/s

#Read Test
dd if=/storage/data/file.out of=/dev/null bs=4096
40960000000 bytes (41 GB) copied, 64.8782 s, 631 MB/s
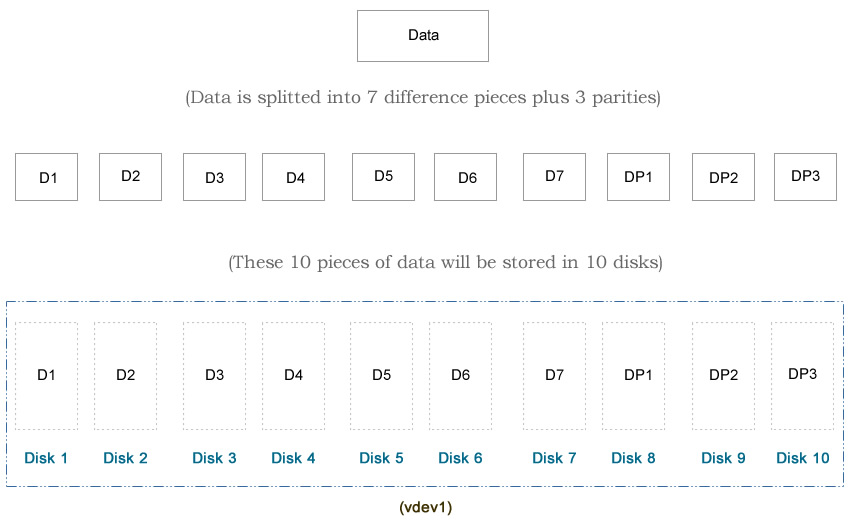
RAIDZ3
In this design, we use three disks for data protection. This allow up to three disks fail without losing any data. The usable space will drop from 36TB to 21TB.
#Command
zpool create -f myzpool raidz3 hd1 hd2 hd3 hd4 \
                               hd5 hd6 hd7 hd8

#df -h
Filesystem     Size    Used   Avail Capacity  Mounted on
myzpool         21T     31K     21T     0%    /myzpool

#zpool status -v
        NAME        STATE     READ WRITE CKSUM
        myzpool     ONLINE       0     0     0
          raidz3-0  ONLINE       0     0     0
            hd1     ONLINE       0     0     0
            hd2     ONLINE       0     0     0
            hd3     ONLINE       0     0     0
            hd4     ONLINE       0     0     0
            hd5     ONLINE       0     0     0
            hd6     ONLINE       0     0     0
            hd7     ONLINE       0     0     0
            hd8     ONLINE       0     0     0
And here is the test result:
#Write Test
dd if=/dev/zero of=/storage/data/file.out bs=4096 count=10000000
40960000000 bytes (41 GB) copied, 77.549 s, 528 MB/s

#Read Test
dd if=/storage/data/file.out of=/dev/null bs=4096
40960000000 bytes (41 GB) copied, 70.9604 s, 577 MB/s
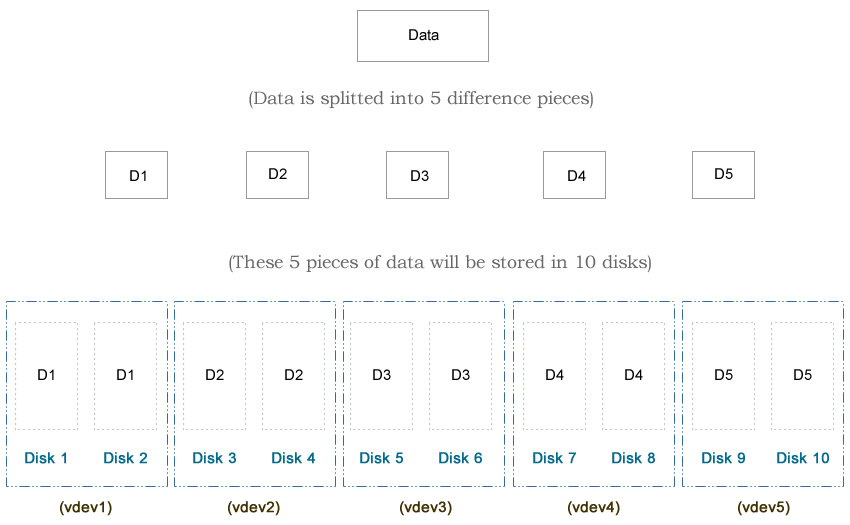
Mirror
In this design, we use half of our disks for data protection, which makes our total usable spaces drop from 36 TB to 18 TB.
#Command
zpool create -f myzpool mirror hd1 hd2 \
                        mirror hd3 hd4 \
                        mirror hd5 hd6 \
                        mirror hd7 hd8

#df -h
Filesystem     Size    Used   Avail Capacity  Mounted on
myzpool         18T     31K     18T       0%  /myzpool

#zpool status -v
        NAME        STATE     READ WRITE CKSUM
        myzpool     ONLINE       0     0     0
          mirror-0  ONLINE       0     0     0
            hd1     ONLINE       0     0     0
            hd2     ONLINE       0     0     0
          mirror-1  ONLINE       0     0     0
            hd3     ONLINE       0     0     0
            hd4     ONLINE       0     0     0
          mirror-2  ONLINE       0     0     0
            hd5     ONLINE       0     0     0
            hd6     ONLINE       0     0     0
          mirror-3  ONLINE       0     0     0
            hd7     ONLINE       0     0     0
            hd8     ONLINE       0     0     0
And here is the test result:
#Write Test
dd if=/dev/zero of=/storage/data/file.out bs=4096 count=10000000
40960000000 bytes (41 GB) copied, 86.6451 s, 473 MB/s

#Read Test
dd if=/storage/data/file.out of=/dev/null bs=4096
40960000000 bytes (41 GB) copied, 68.4477 s, 598 MB/s
RAIDZ2 x 2
In this design, we split the data into two groups. In each group, we store the data in a RAIDZ2 structure. Since we use two disks for parity purpose, the usable space drops from 36TB to 18TB.
#Command
zpool create -f myzpool raidz2 hd1 hd2 hd3 hd4 \
                        raidz2 hd5 hd6 hd7 hd8

#df -h
Filesystem     Size    Used   Avail Capacity  Mounted on
myzpool         18T      0K     18T       0%  /myzpool

#zpool status -v
        NAME        STATE     READ WRITE CKSUM
        myzpool     ONLINE       0     0     0
          raidz2-0  ONLINE       0     0     0
            hd1     ONLINE       0     0     0
            hd2     ONLINE       0     0     0
            hd3     ONLINE       0     0     0
            hd4     ONLINE       0     0     0
          raidz2-1  ONLINE       0     0     0
            hd5     ONLINE       0     0     0
            hd6     ONLINE       0     0     0
            hd7     ONLINE       0     0     0
            hd8     ONLINE       0     0     0
And here is the test result:
#Write Test
dd if=/dev/zero of=/storage/data/file.out bs=4096 count=10000000
40960000000 bytes (41 GB) copied, 98.9698 s, 414 MB/s

#Read Test
dd if=/storage/data/file.out of=/dev/null bs=4096
40960000000 bytes (41 GB) copied, 92.963 s, 441 MB/s
Summary
I am not surprised that the striped layout offers the fastest writing speed and maximum storage space. The only drawback is zero data protection. Unless you mirror the data at the server level (e.g., Hadoop), or the data is not important, otherwise I won’t recommend you to use this design.
Personally I recommend to go with Striped RAIDZ, i.e., we try to make multiple RAIDZ vdev, and each vdev has no more than 5 disks. In theory, ZFS recommends the number of disks in each vdev is no more than 8 to 9 disks. Based on my experience, ZFS will slow down when it has about 30% free space left if we have too many disks in one single vdev.
So which design you should use? Here is my recommendation:
#Do you care your data?
No: Go with striped.
Yes: See below:

#How many disks do you have?
1:     ZFS is not for you.
2:     Mirror
3-5:   RAIDZ1
6-10   RAIDZ1 x 2
10-15: RAIDZ1 x 3
16-20: RAIDZ1 x 4
And yes, you can pretty much forget about RAIDZ2, RAIDZ3 and mirror if you need speed and data protection together.
So, you may ask a question, what should I do if there are more than one hard drive fail? The answer is: You need to keep an eye on the health of your ZFS pool every day. I have been managing over 60 servers since 2009, and I’ve used only RAIDZ1 with my consumer level harddrives (most of them actually was taken from the external harddrives). So far I don’t have any data lost.
sudo zpool status -v

or

sudo zpool status -v | grep 'state: ONLINE'
Simply write a program to get the result from this command, and send yourself an email if there is anything go wrong. You can include the program in your cron job and have it run daily or hourly. This is my version:
#!/bin/bash

result=`sudo zpool status -x`

if [[ $result != 'all pools are healthy' ]]; then
        echo "Something is wrong."
        #Do something here such as send an email, such as sending an email via HTTP...
        /usr/bin/wget "http://example.com/send_email.php?subject=Alert&body=File%20System%20Has%20Problem" -O /dev/null > /dev/null
        exit 1;
fi
Enjoy ZFS.
–Derrick
Our sponsors: