[Solved]Fedora 16 /etc/rc.local is missing

Finally, I got a chance to try the new Fedora 16. The overall experience is pretty good, except that it comes with some troublesomes. I guess it is a bonus feature to test your troubleshooting skills. No problem, those are piece of cake to me. After trying for about 15 mins, I found two minor computer problem so far: Missing rc.local and ntpdate.

How to fix Missing rc.local

By default, rc.local is missing in Fedora 16. To create it, simply do the following:

sudo nano /etc/rc.d/rc.local

and include your start-up script in the file, e.g.,

#!/bin/sh
/opt/lampp/lampp startapache

Next, we need to change the ownership:

sudo chmod a+x /etc/rc.d/rc.local

and create a symbolic link:

sudo ln -s /etc/rc.d/rc.local /etc

Now, try to reboot your computer. The script should start at the boot.

Missing ntpdate

Typically I manually synchronize the computer time with a reference server, e.g.,

sudo ntpdate time.nist.gov

However, I guess Fedora team wants to move to NTP service, so they decide to take the ntpdate command away. All you need to do is to install it back, i.e.,

sudo yum install ntpdate -y

Enjoy the new Fedora 16.

–Derrick

Our sponsors:

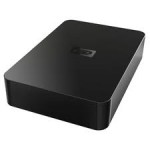
How to Open / Take Apart a Western Digital Elements Hard Drive Case

Recently I decide to add more space to my server. For some reasons, the internal hard drives are always more expensive than the external one, even the hard drives are exact the same thing. So I decide to buy an external hard drives first, and disassemble the case and take the hard drive out. I guess Western Digital doesn’t want you to do it, so there is no easy way to open the case. In fact, it is pretty easy to take out the hard drive without breaking the case. And I am going to show you how to open the Western Digital Elements hard drive case. The whole process should take no more than 5 minutes.

Open a Western Digital Elements Hard Drive Case:

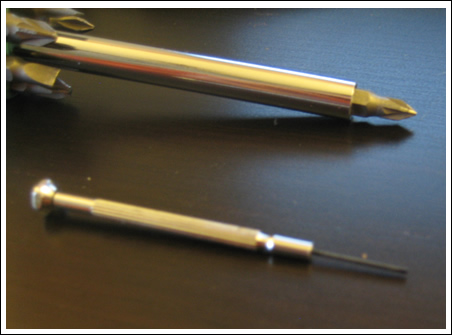
Step 1 – Get the Tools Ready

You don’t need any fancy tool to get the job done. Simply use a precision screw driver such as 1/32″ flat and a regular Philip screw driver (PZ1) are enough.

Open a Western Digital Elements Hard Drive Case

Open a Western Digital Elements Hard Drive Case:

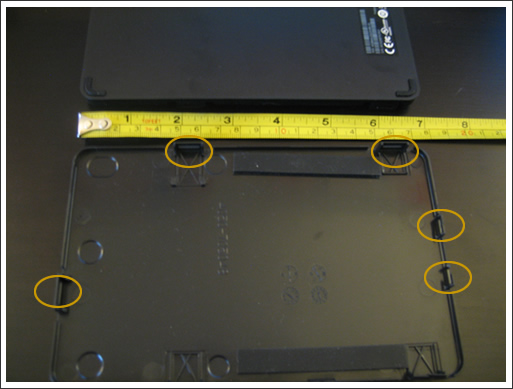
Step 2 – Knowing the Plan

Since Western Digital uses a self-snapping cover to snap on the case, it is good to know where are these clips.

Open a Western Digital Elements Hard Drive Case

Open a Western Digital Elements Hard Drive Case:

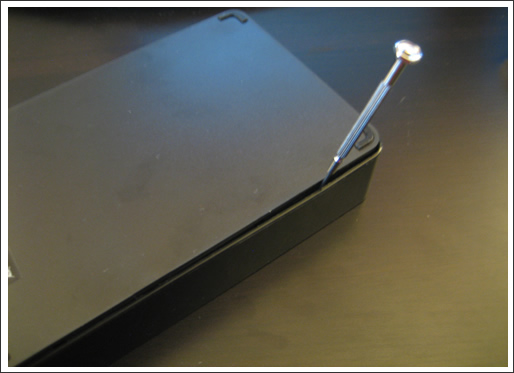
Step 3 – Open the Case

After knowing the locations of these clips, simply use a screw driver to open the case carefully on these locations.

Open a Western Digital Elements Hard Drive Case

Open a Western Digital Elements Hard Drive Case:

Step 4 – Almost Done

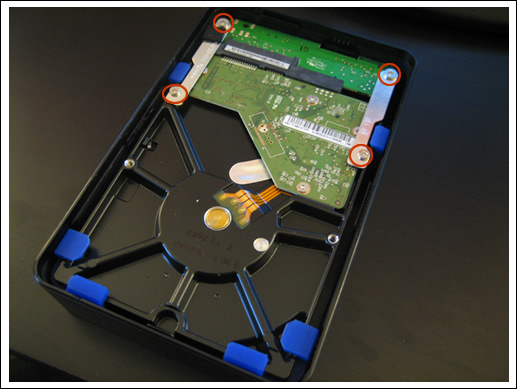
After removing the cover, you will see something like this. Unscrew the 4 circled screws with the Phillip screw driver and take out the hard drive very carefully.

Open a Western Digital Elements Hard Drive Case

Open a Western Digital Elements Hard Drive Case:

Step 5 – Remove the Connectors and Protections

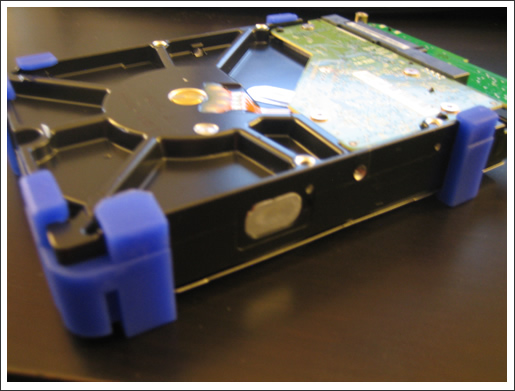
We are almost there. All you need to do is to remove the blue protections and the circuit board.

Open a Western Digital Elements Hard Drive Case

Open a Western Digital Elements Hard Drive Case:

Step 6 – Completed!

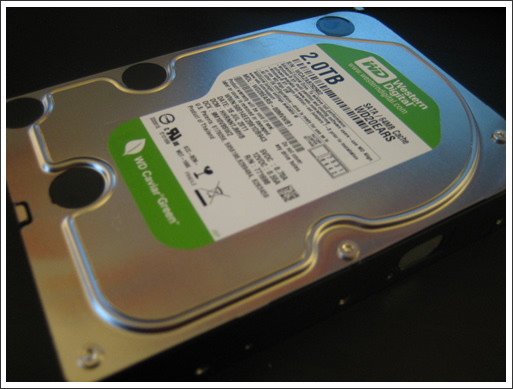
Now the hard drive is ready. Simply snap it into your desktop and it is ready to go!

Open a Western Digital Elements Hard Drive Case

Open a Western Digital Elements Hard Drive Case:

The Adapter

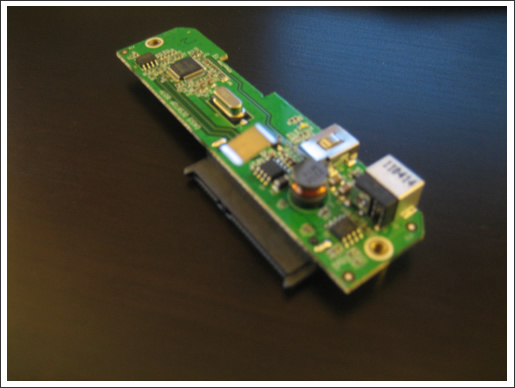
Now you have an extra USB-SATA adapter available. You can simply build you own Lego SATA enclosure with it. However, keep in mind that it only works with Western Digital hard drives. If you plug in a non-Western Digital hard driver such as Seagate, it won’t recognize it at all.

Open a Western Digital Elements Hard Drive Case

Updated on June 25, 2023

WD is doing something weird to their hard drives since 8TB. You can’t directly plug the WD hardrive to your power supply. There are three methods:

1.) Tape or strip out the connector on the power port to disable the 3.3V pin. Google: “How to disable the 3.3v pin on Western Digital USB White Label Drives”. Personally I think this is a bit unreliable (if you tape to cover the connector) or risky (if you strip out the connector)

2.) Use a “SATA to PATA power converter” and “PATA to SATA power converter”, i.e., Power supply -> SATA to PATA power converter -> PATA to SATA power converter -> Hard Drive. You can find them on Amazon.

3.) If you use server grade components, such as Dell PowerEdge servers, typically it comes with a hard drive bay, i.e., it comes with a hard drive enclosure and you need to slide your hard drives into the big box. The big box contains everything including the data and power supply. Based on my experience, it works great with the new WD hard drives.

4.) Get a power supply that work with WD hard drive. Some people say Consair works with the WD hard drive. I have exact the same model but I can’t get it work.

Have fun.

–Derrick

Our sponsors:

How to Setup TFTP on Ubuntu 11.10

Recently I decide to jump into the pool of using diskless Ubuntu. Basically the client computer downloads the necessary files from the Ubuntu server every time during the boot. To keep things simple and easy, Ubuntu does that by using TFTP. So the first step is to set up a TFTP server on the server. For those who haven’t heard of TFTP, it is similar to FTP, except that it has no security feature, and the function is extremely limited. Anyway, here is how to set up a TFTP server on Ubuntu 11.10:

Installing TFTP sounds easy. However, I’ve heard that many people experienced many issues during the installation, such as Error code 2: Access violation issue. That’s why I create this tutorial. If you follow exact the same steps, you will not experience any problem.

First, let’s install all the necessary packages:

sudo apt-get install xinetd tftpd tftp -y

Next, we need to create a configuration file:

sudo nano /etc/xinetd.d/tftp

Put the following content into the file.


service tftp
{
   protocol = udp
   port = 69
   socket_type = dgram
   wait = yes
   user = nobody
   server = /usr/sbin/in.tftpd
   server_args = var/lib/tftpboot -s
   disable = no
}

In the server_args, I have var/lib/tftpboot, which represents the location of the tftp root, i.e., /var/lib/tftpboot. Notice that I skip the root /.

Now let’s change the ownership of the directory:


sudo mkdir /var/lib/tftpboot
sudo chown -R nobody:nobody /var/lib/tftpboot
sudo chmod -R 777 /var/lib/tftpboot

and start the TFTP service:

sudo service xinetd stop
sudo service xinetd start

Verify the TFTP is running correctly or not:

netstat -na | grep LIST | grep 69

You should see something like this:

tcp        0      0 0.0.0.0:69              0.0.0.0:*     LISTEN

Test: Upload a file to TFTP Server

Now let’s test the TFTP server by logging into the server first:

tftp localhost

and upload a file:

tftp> put myfile.jpg
Sent 56733279 bytes in 5.7 seconds

Quit:

q

Make sure that file has been uploaded:

ls -l /var/lib/tftpboot

Test: Download a file from TFTP Server

Now, let’s go to a different directory and download the file we just upload.

cd some_other_directory

and log in to the tftp server again:

tftp localhost

and get the file:

tftp> get myfile.jpg
Received 56733279 bytes in 5.7 seconds

You are done.

Troubleshooting (e.g., Error code 2: Access violation)

If you see a message like: Error code 2: Access violation

Make sure that you:
– Follow the exact procedure in this tutorial
– Make sure that the tftp is started with -s flag.
– Check the permission of the directory, i.e., 777
– After you’ve made any changes to the TFTP configuration, make sure that you stop and start the inet service again.
– Don’t forget to quit tftp before retrying the command.

That’s it!

Enjoy TFTP.

–Derrick

Our sponsors: