How to Remote Desktop To Linux From Windows Using XRDP

If you are looking for ways to remote desktop to Linux from Windows, and you are sick of VNC, you are in the right place.

I have been looking for a solution to do something very simple. I want to remotely access the desktop of my Linux servers from Windows machine. Of course, it must be at a usable level.

I’ve tried different applications before, incluing XMing, XManager (X11 forwarding), VNC, 2X, NoMachine, ranging from open-source to commercial. Unfortunately, they offer nothing close to the Windows to Windows Remote Desktop experience.

Why XMing is bad?

XMing allows you to run a remote application (e.g., Firefox) on your desktop. It works great as long as you keep the session available. Once you close your session, there is no way to go back to the previous session. For example, suppose I am browsing a website using the Firefox on the remote server via XMing. If I decide to close the XMing (without closing the browser), there is no way for me to go back to the page I left off later. Of course, in reality, it doesn’t make too much sense to use a Firefox on a remote server. I was referring to some software that takes days to run, such as R, Matlab etc.

By the way, it is an application level, meaning that it does not work with the desktop level.

Why VNC is bad?

VNC is nearly perfect. It offers something similar to Windows Remote Desktop, i.e., I can access to the desktop level. If I work on something, I can get my previous session back even my session is closed. There are only two disadvantages: Slow, and not for multiple users.

VNC uses a stone-age protocol to delivery the remote desktop experience: Screen capture. When there is a change on the remote server, it takes a screen shot and send it to the client. You can imagine how slow it will be over the Internet. Although they released a better algorithm, which works directly at the graphic card level, i.e., only send the modified area to the client instead of everything. However the new protocol is still far from usable. The Microsoft Remote Desktop just blows VNC far far away.

Another thing I don’t like VNC is that it is at the machine/server level, not the user level. VNC uses its own user authorization. When you set up a VNC service, you define your own password. That’s it. In the other words, if I open a desktop on the server as derrick. Everybody will be able to see my desktop content via VNC as long as they enter the correct password. Unless I go to the server physically and switch to a different user, otherwise there is no way to protect the content of my desktop.

The good thing about VNC is that it is cross-platform. It works on OS X, Windows, Linux etc. Wait a minute. Java is cross-platform too. Do you want to use it?

Why XManager is bad?

XManager is better than VNC. It uses some special protocol such that the speed is not an issue. However, it is suffered in the session problem like XMing. If I remote desktop to the server using XManager, and I close my session later, there is no way for me to go back to my previous sessions. In the other words, I will lose all opened applications and contents.

And no, the session is still running silently on the server. They are just orphans. XManager doesn’t allow you to connect to the old session when you try to establish a new connection.

Solution: xrdp

I am so happy that I finally found something useful and usable. That’s xrdp. Here is a step-by-step tutorial on how to install it on Fedora/CentOS Linux. The instruction will be similar to Debian/Ubuntu Linux. The set up time should take no more than 5 minutes.

#Install xrdp
sudo yum install -y xrdp

If your Linux is too old, or your default repository does not have xrdp available, you may want to run the following:

#Don't forget to use the right (i686 or x86_64) architecture.

sudo rpm -Uvh  http://dl.fedoraproject.org/pub/epel/6/x86_64/epel-release-6-8.noarch.rpm
sudo rpm -Uvh  http://rpms.famillecollet.com/enterprise/remi-release-6.rpm
sudo yum update -y

sudo yum install -y xrdp

Next, we want to start the xrdp service

sudo /etc/rc.d/init.d/xrdp start

You may want to enable this service during the boot up:

sudo chkconfig  xrdp on

Don’t forget to open the port 3389 in your firewall:

sudo nano /etc/sysconfig/iptables

-A INPUT -m state --state NEW -m tcp -p tcp --dport 3389 -j ACCEPT

Don’t forget to restart the firewall:

sudo service iptables stop
sudo service iptables start

Now, run the remote desktop on Windows, and enter the IP address of the server to see what happen.

–Derrick

Our sponsors:

How to Improve rsync Performance

I need to transfer 10TB of data from one machine to another machine. Those 10TB of files are living in a large RAID which span across 7 different disks. The target machine has another large RAID which span across 12 different disks. It is not easy to copying those files locally. Therefore, I decide to copy the files over the LAN.

There are four options popping up in my head: scp, rsync, rsyncd (rsync as daemon) and netcat.

scp

scp is handy, easy to use but comes with two disadvantages: slow and not fault-tolerant. Since scp comes with the highest security, all data are encrypted before the transfer. It will slow down the overall performance because of the extra encryption stuffs (which makes the data larger), and extra computational resource (which uses more CPU). If the transfer is interrupted, there is no easy way to resume the process other than transferring everything again. Here are some example commands:

#Source machine
#Typical speed is about 20 to 30MB/s
scp -r /data target_machine:/data

#Or you can enable the compression on the fly
#Depending on the type of your data, if your data is already compressed, you may see no or negative speed improvement
scp -rC /data target_machine:/data

rsync

rsync is similar to scp. It comes with the encryption (via SSH) such that the data is safe. It also allows you to transfer the newer files only. This will reduce the amount of data being transferred. However, it comes with few disadvantages: long decision time, encryption (which increase the size of overhead) and extra computational resource(e.g., data comparison, encryption and decryption etc). For example, if I use rsync to transfer 10TB of files from one machine to another machine (where the directory on the target machine is blank), it can easily take 5 hours to determine which files will need to be transferred before the actual data transfer is initialized.

#Run on the target machine
rsync -avzr -e ssh --delete-after source_machine:/data/ /data/

#Use a less secure encryption algorithm to speed up the process
rsync -avzr --rsh="ssh -c blowfish" --delete-after source_machine:/data/ /data/

#Use an even less secure algorithm to get the top speed
rsync -avzr --rsh="ssh -c arcfour" --delete-after source_machine:/data/ /data/

#By default, rsync compares the files using checksum, file size and modification date.
#Reduce the decision process by skipping the hash check
rsync -avzr --rsh="ssh -c arcfour" --delete-after --whole-file source_machine:/data/ /data/

Anyway, no matter what you do, the top speed of rsync in a consumer-grade gigabit network is around 45MB/s. On average, the speed is around 25-35MB/s. Keep in mind that this number does not include the decision time, which can be few hours.

rsyncd (rsync as a daemon)

Thanks for the comment of our reader. I got a chance to investigate the rsync as a daemon. Basically, the idea of running rsync as a daemon is similar to rsync. On the server, we run rsync as a service/daemon. We specify which directory we want to “export” to the clients (e.g., /usr/ports). When the files get changed on the server, it records the changes so that the when the clients talk to the server, the decision time will be faster. Here is how to set up rsync server on FreeBSD

sudo nano /usr/local/etc/rsyncd.conf

And this is my configuration file:

pid file = /var/run/rsyncd.pid

#Notice that I use derrick here instead of other systems users, such as nobody
#That's because nobody does not have permission to access the path, i.e., /data/
#Either you make the source directory available to "nobody", or you change the daemon user.
uid = derrick
gid = derrick
use chroot = no
max connections = 4
syslog facility = local5
pid file = /var/run/rsyncd.pid

[mydata]
   path = /data/
   comment = data
Don't forget to include the following in /etc/rc.conf, so that the service will be started automatically.

rsyncd_enable="YES"
#Let's start the rsync service:

sudo /usr/local/etc/rc.d/rsyncd start

To pull the files from the server to the clients, run the following:

rsync -av myserver::mydata /data/

#Or you can enable compression
rsync -avz myserver::mydata /data/

To my surprise, it works much better than running rsync alone. Here are some data I collected during transferring 10TB files from ZFS to ZFS:

Bandwidth measured on the client machine: 70MB/s

zpool IO speed on the client side: 75MB/s

P.S. Initially, the speed was about 45-60MB/s, after I tweak my Zpool, I can get the top speed to 75-80MB/s. Please check out here for references.

I notice that the decision time is much faster than running rsync alone. Also the process is much more stable, with zero interruption, i.e.,

rsync error: received SIGINT, SIGTERM, or SIGHUP (code 20) at io.c(521) [receiver=3.1.0]
rsync error: received SIGINT, SIGTERM, or SIGHUP (code 20) at rsync.c(632) [generator=3.1.0]
rsync: [receiver] write error: Broken pipe (32)

NetCat

NetCat is similar to cat, except that it works at the network level. I decide to use netcat for the initial transfer. If it is interrupted, I will let rsync to kick in the process. Netcat does not encrypt the data, so the overhead is very small. If you transfer the file within a local network and you don’t care about the security, netcat is a perfect choice.

There is only one disadvantage of using netcat. It can only handle one file at a time. It doesn’t mean you need to run netcat for every single file. Instead, we can tar the file before feeding to netcat, and untar the file at the receiving end. As long as we do not compress the files, we can keep the CPU usage small.

#Open two terminals, one for the source and another one for the target machine.

#On the target machine:
#Go to the directory, e.g., 
cd /data

#Run the following:
nc -l 9999| tar xvfp -

#On the source machine:
#Go to the directory, e.g.,
cd /data

#Pick a port number that is not being used, e.g., 9999
tar -cf - . | nc target_machine 9999

Unlike rsync, the process will start right the way, and the maximum speed is around 45 to 60MB/s in a gigabit network.

Conclusion

Candidates Top Speed (w/o compression) Top Speed (w/ compression) Resume Stability Instant Start?
scp 40MB/s 25MB/s No Low Instant
rsync 25MB/s 50MB/s Yes Medium Long Preparation
rsyncd 30MB/s 70MB/s Yes High Short Preparation
netcat 60MB/s (tar w/o -z) 40MB/s (tar w/ -z) No Very High Instant

–Derrick

Our sponsors:

How to Install a 2.5TB, 3TB drives on Linux

Recently I got a new hard drive (3TB) for my Linux box at work. I didn’t realize that it is problematic / nightmare to do such a simple work.

First, if you try to use fdisk to add the drive, it won’t work. Or I should say… it works, but it only give you a 2TB usable space. This is a limitation of fdisk, because it can handle up to 2^32 -1 sectors (or 2TB). That’s why fdisk is not a solution here.

It seems that the only solution is using parted.

sudo parted /dev/sdd

It will return something like this:

GNU Parted 2.3
Using /dev/sdd
Welcome to GNU Parted! Type 'help' to view a list of commands.
(parted)

First, we want to create a label:

(parted) mklabel gpt
Warning: The existing disk label on /dev/sdd will be destroyed and all data on this disk will be lost. Do you want to continue?
Yes/No? Yes

Then, we want to specify the unit:

(parted) unit TB

And tell parted to use all available space:

(parted) mkpart primary 0 -0

Next, we need to review the summary:

(parted) print
Model: ATA WDC WD30EZRX-00M (scsi)
Disk /dev/sdd: 3.00TB
Sector size (logical/physical): 512B/4096B
Partition Table: gpt

Number  Start   End     Size    File system  Name     Flags
 1      0.00TB  3.00TB  3.00TB  ext2         primary

As you can see, the size is 3TB. Don’t worry about the file system for now (ext2). If it looks good to you, now we need to leave parted.

(parted) quit
Information: You may need to update /etc/fstab.

Next, we need to format the partition:

#CentOS 6
sudo mkfs.ext4 /dev/sdd1

#CentOS 7
sudo mkfs.xfs /dev/sdd1

After few seconds, it will give you some more information about your drive:

mke2fs 1.41.14 (22-Dec-2010)
Filesystem label=
OS type: Linux
Block size=4096 (log=2)
Fragment size=4096 (log=2)
Stride=1 blocks, Stripe width=1 blocks
183148544 inodes, 732566272 blocks
36628313 blocks (5.00%) reserved for the super user
First data block=0
Maximum filesystem blocks=4294967296
22357 block groups
32768 blocks per group, 32768 fragments per group
8192 inodes per group
Superblock backups stored on blocks:
        32768, 98304, 163840, 229376, 294912, 819200, 884736, 1605632, 2654208,
        4096000, 7962624, 11239424, 20480000, 23887872, 71663616, 78675968,
        102400000, 214990848, 512000000, 550731776, 644972544

Writing inode tables: done
Creating journal (32768 blocks): done
Writing superblocks and filesystem accounting information: done

This filesystem will be automatically checked every 35 mounts or
180 days, whichever comes first.  Use tune2fs -c or -i to override.

Now you can use your drive, such as mounting or putting it into /etc/fstab

sudo mount /dev/sdd1 /mnt/
df
/dev/sdd1             2.8T   42G  2.6T   2% /mnt

That’s it! Enjoy your new disk.

–Derrick

Our sponsors:

How to Clean Up / Reset User Account To Default on Linux, Ubuntu, Fedora Automatically

Imagine that you set up a computer at a public location, such as cafe, library, or computer lab in your school, so that any one can use your computer. Most of the time, users mainly use the web browsers for surfing the web, checking the email, or updating the status on social websites etc. At the mean time, they may download some files on your computer, generating a lot of browsing history in your web browsers, accidentally saving their user names/passwords in the browsers etc. How do you clean up these mess? How do you reset the user account to default automatically?

First, I am assuming that your computer is running Linux, such as Ubuntu, Fedora, Debian etc. It really doesn’t matter which Linux you use, because most Linux uses the same kernel. The idea describes in this article is applicable to any Linux.

Idea

Linux and Windows are very very different. Linux has a much better control on the user permissions. For example, if you simply create a standard user on Linux, e.g.,

sudo adduser guestuser

where this new user, guestuser, is a standard user only.

If you log in as guestuser, all of the files you create will be stored in your home folder only, i.e., /home/guestuser. Unlike Windows, there is no registry or something similar. In the other words, all of your activities are limited within your home folder. If you like to create a file outside your scope, you will need to have the root access. Of course, you won’t grand the root access to the guest user.

Now you understand that the guest user can only mess around the home directory only (/home/guestuser). In order to clean up or reset the user account to default, all you need is to reset this folder to default.

Setup a Home Directory On Ram Disk

We are going to implement this idea using ram disk. If you don’t know anything about ram disk, you can think about it as a usb thumb drive, except that it is a super fast device, and cannot hold any data after each reboot. In the other words, if we set up a the home directory of the guestuser on a ram disk, all of the mess will be gone after each reboot. So here are the steps:

First, we want to create a guestuser first:

sudo adduser guestuser

This will add a new user into the system and create its home directory. Next, we want to create a ram disk. Before we do it, let’s find out how much memory you have in your system:

free -m

On my machine, I have 2GB (2000 MB) memory in total.

             total     used     free   shared  buffers  cached
Mem:          1999     1789      209        0      119    1176
-/+ buffers/cache:      492     1506
Swap:         3150        0     3150

Since I only have 2GB of memory, I want to keep some of them for my system. I think using 512MB for the ramdisk is enough.

To create a ramdisk during the boot, simply modify /etc/rc.local

sudo nano /etc/rc.local

And include the following commands:

#Create a 512MB ramdisk, and map it to the home directory of the guestuser.
mount -t ramfs -o size=512M ramfs /home/guestuser


#After the ramdisk is mapped, the directory will be owned by the root.
#We need to modify the permission such that guestuser can access it.
chown -R guest:guest /home/guestuser

Here are some special notes for different Linux:

Fedora 15 or earlier: None

Fedora 16: By default, /etc/rc.local is missing. Please refer my another post: Fedora 16 /etc/rc.local is missing) for details.

Ubuntu: Please include your code before exit 0 command, otherwise it won’t work, i.e.,

#!/bin/sh -e
#
# rc.local
#
# This script is executed at the end of each multiuser runlevel.
# Make sure that the script will "exit 0" on success or any other
# value on error.
#
# In order to enable or disable this script just change the execution
# bits.
#
# By default this script does nothing.

mount -t ramfs -o size=512M ramfs /home/guestuser
chown -R guestuser:guestuser /home/guestuser

exit 0

After the set up is completed, simply reboot the computer to make the ramdisk effective.

Testing

Now, try to log in as the guestuser. You can try to download some files to your home directory; visit some websites; or even change the wallpaper. All of these settings will be stored in your home directory. Next, try to log out the account, restart the computer and log in to your account again. You will notice that everything will be reset to default, i.e., all of your previously downloaded files are gone, wallpaper will be reset to default, the web history is cleared etc.

Enjoy running a clean, maintenance-free workstation.

Our sponsors:

[PHP]How to get the number of CPU cores in Fedora, Ubuntu, and FreeBSD

I am working on a PHP application which needs to be deploy to multiple places. One of the variables is the number of CPU core. Since each server has different number of CPU cores, I need to specify the number of CPU core in my application for each server. I think there should be a smarter way to do it.

PHP is a scripting language, it has limit support on accessing the hardware level information. In short, there is no library or function to do it. Fortunately, we can do it via shell command. In the other words, the following methods are not limited to PHP, it will work in any languages, as long as your language supports running the UNIX command and catch the return.

Getting the number of CPU Cores – Linux

(Tested on Fedora, Ubuntu Linux, should work on other Linuxs because they all use the same Linux kernel.)

cat /proc/cpuinfo | grep processor | wc -l

This will return something like this:

8

Getting the number of CPU Cores – FreeBSD

sysctl -a | grep 'hw.ncpu' | cut -d ':' -f2

which will return something like this (notice the extra space before the number):

8

Now, let’s put everything together. Run the command inside your application (Here I am using PHP for example):

//Linux
$cmd = "cat /proc/cpuinfo | grep processor | wc -l";

//FreeBSD
$cmd = "sysctl -a | grep 'hw.ncpu' | cut -d ':' -f2";

$cpuCoreNo = intval(trim(shell_exec($cmd)));

Of course, you can make the application to detect the system automatically:

$cmd = "uname";
$OS = strtolower(trim(shell_exec($cmd)));

switch($OS){
   case('linux'):
      $cmd = "cat /proc/cpuinfo | grep processor | wc -l";
      break;

   case('freebsd'):
      $cmd = "sysctl -a | grep 'hw.ncpu' | cut -d ':' -f2";
      break;

   default:
      unset($cmd);
}

if ($cmd != ''){
   $cpuCoreNo = intval(trim(shell_exec($cmd)));
}

That’s it! Happy PHPing.

–Derrick

Our sponsors:

How to Set up a Pure-FTPd Server with Virtual User on Fedora

This tutorial is for Fedora Linux. If you are looking for setting up Pure-FTPd on FreeBSD, click here.

My client likes to send me a huge data file (More than 10GB after compressed). Since I don’t care about the security during the transfer, I decide to go with the old school technology: FTP.

Basically, I need to set up a FTP server with virtual user. In the other words, the log in used by the FTP server has nothing to do with my system login, and I can easily disable that at any time.

0.) Make sure port 21 is opened. You can update this setting in the Fedora Firewall settings.

1.) Install Pure-FTPd

sudo yum install pure-ftpd -y

2.) Create a user for Pure-FTPd, here I simply call it ftpuser.

sudo adduser ftpuser

3.) Let say, we want to create a user called guest to access the ftp server. guest is a virtual user, and its virtual home is in /home/ftpuser/guest

sudo mkdir /home/ftpuser/guest
sudo chown -R ftpuser:ftpuser  /home/ftpuser/
sudo chmod a+rw -R /home/ftpuser/

4.) Edit the Pure-FTPd configuration

sudo nano /etc/pure-ftpd/pure-ftpd.conf

5.) Uncomment the following:

PureDB                        /etc/pure-ftpd/pureftpd.pdb

6.) Start the Pure-FTPd

/etc/init.d/pure-ftpd start

If you want to start Pure-FTPd automatically, include this line in /etc/rc.local

7.) Create a user and add it into the Pure-FTPd database:

sudo pure-pw useradd guest -u ftpuser -d /home/ftpuser/guest/

You can also set the quota and maximum space:
1000 files, 100MB quota

pure-pw useradd guest -u ftpuser -d /home/ftpuser/guest/ -n 1000 -N 100 

8.) Set the password in case you forget the enter the password:

pure-pw passwd guest

9.) Update the database:

pure-pw mkdb

That’s it!

–Derrick

Our sponsors:

How to clean up the dmesg message

Recently, I found that my dmesg log are filled of junk. Or I should say it contains lots of errors and complains that I already fix. However, I don’t want to reboot the machine to get rid of these error messages. How can I do it? The solution is very simple.

For FreeBSD and other BSD members, run the following:

sudo sysctl kern.msgbuf_clear=1

For Fedora / Ubuntu Linux, run the following instead:

sudo dmesg -c

Easy?

–Derrick

Our sponsors:

Upgrade Fedora Linux Using Command Line

Recently, I decide to upgrade all of the Fedora Linux servers. As of today, the latest version is Fedora 15. As for my servers, they are in between Fedora 11 and 14. In the other words, I will need to upgrade some machine from 11 all the way to 15.

There are several ways to upgrade the Fedora system. You can either do it through the GUI (With physical access to the machine), GUI (Though VNC), or command line. I prefer the last option because I have limited number of monitors and input devices.

I haven’t tried upgrading Fedora through command line before. The experience is very different comparing to FreeBSD. So I am going to list out what I have done step by step:

1. Backup your data. Although I haven’t experienced any data loss during the upgrade. It is always a good idea to have a backup first.

2. Make sure that your system is up to date with your current version:

sudo yum update

3. Install preupgrade:

sudo yum install preupgrade -y

4. Run the preupgrade:

sudo preupgrade-cli "Fedora 15 (Lovelock)"

It will download the packages from the server. Depending on your system settings, my system downloaded around 1500 packages, which took about 10 to 20 minutes. After that, it will prompt to reboot the machine.

5. This step is optional. Connect your monitor, keyboard and mouse to the machine.

6. Reboot your server

sudo reboot

7. Now the system will boot into the upgrade interface and perform the upgrade. Notice that this step can easily take 2 to 3 hours (My machine: Q6700 Quad Core, Ram: 8GB). During the upgrade, you cannot remotely access the computer. If you try to connect a monitor / keyboard / mouse, it may give no response. Just be patient and wait. It is not a good idea to reboot your machine at this stage.

8. After waiting for nearly 2.5 hour (2 hours to unpack and install the package, half hour to clean up the package), the machine finally reboots.

9. You should be able to remotely access this machine from SSH. Run the following command to determine your Fedora version:

cat /etc/redhat-release && uname -a

10. Run the following commands to clean up the system:

sudo yum update
sudo package-cleanup --orphans
sudo updatedb
sudo yum repolist 
sudo yum distro-sync 

10. Enjoy your new system.

Our sponsors:

Building a Super Large and Reliable File Server with Mixed Size of Harddisks

In this article, I am going to show you how to build a super large, ultra reliable, expandable file server with mixed size of hard drives.

Here is my criteria:

  • Large Storage Capacity. At this moment, the largest hard drive is 2TB. I am looking for at least 10TB.
  • Great Performance. The users should not feel any delay when multiple users are reading/writing to the file server at the same time.
  • Reliable. No data loss or inconsistent. The file system should repair by itself.
  • Expandable. The file system must be expandable. During the upgrade, the data should be preserved (i.e., don’t need to wipe out the original data)
  • Client Independent / Cross Platform. The user should be able to access the file server from any OS.
  • Software based / Hardware Independent. In case of hardware failure, it will be easy to transfer the entire system to a different computer.

I am going to show you how to implement all of these using FreeBSD and ZFS. The idea of the implementation is the same on other operating systems that support ZFS, such as *Solaris, *BSD etc. However, using ZFS on Linux (via Linux FUSE) is not recommended given the performance / stability issues (See Wikipedia for details). I personally do not recommend running ZFS on Linux in production environment.

Before I talk about how I do it, I like to go over what other technologies I tried before, and why they are not qualified.

RAID + LVM on Linux

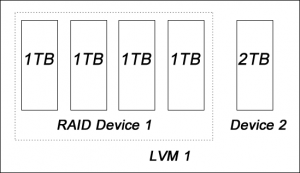
This is one of the most common techniques used by many people on building file server. First, you need to build a RAID device using mdadm on the selected harddrives with identical size. If you have different size of harddrive, you will need to put them on a separated RAID device because mdadm does not support mixing different size of harddrive in a single RAID device without losing usable space. Later, you combine multiple devices (RAID, single harddrives etc) into a single partition using LVM.

The good thing about this technique is the expandability, i.e., you can add any hard drive to the partition at any time without losing any data at any time. However, there are few disadvantages of this combination:

Poor reliability
The reliability is handled at the RAID level. If your setup is not 100% RAID, such as the following example, the reliability can be discounted.

In this example, if the device 2 (2TB) is failed, the data that is stored on device 2 will be lost, because the data redundancy is only available on device 1.

Performance is not optimized
Data redundancy helps to improve the performance especially on reading. Again, if the setup is not one single RAID device, the performance can be discounted too.

So, let’s see how ZFS can solve these issues.

ZFS

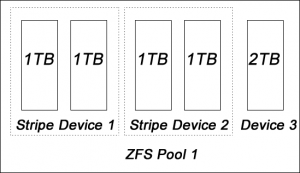
ZFS is the next generation file system developed by Sun. It comes with all advantages of mdadm + LVM, plus a lot of features such as compression, encryption, power failure handling, checksum etc. So why this setup is better than the LVM one? Let’s take a look to the following example:

In this example, all devices in the ZFS pool are protected against data failure.

Let’s Start Building A Super Large File Server Now!

First, let’s assume that I have the following hardware:

  1. A 64-bit system with at least 2GB memory. Although ZFS will do fine on 32-bit system with 512MB memory, I recommend going with higher configurations because ZFS uses a lot of resources. In my case, I use an AMD Dual Core 4600+ (manufactured in 2006) with 3GB memory.
  2. Mixed size of harddrives, the size of the larger harddrive has to be divisible by the smaller one. In my case, I have 2TB and 1TB harddrives. Keep in mind that 2x1TB = 2TB.
  3. The harddrives are connected to the system using IDE/SATA. No firewire or USB.
  4. Four 1TB harddrives (A, B, C, D)
  5. Three 2TB harddrives (E, F, G)
  6. One extra harddrive, any size, reserved for the system uses. (H)

Using this combination(10GB in total), you can build a big file server with 8GB or 6GB, depending on your preference of data security.

I am going to build a RAIDZ2 device using FreeBSD and ZFS. In general ZFS is only available on the harddrives with the same size (without losing harddrive space). Since I want to put my 1TB and 2TB harddrives in the same pool, I first create couple RAID0 drives first. Then I add them together to make a big ZFS device. Here is the big picture:

Building RAID0 Devices

As usual, login as root first.

sudo su

And load the stripe module:

kldload geom_stripe

Now we need to create a RAID0 device from /dev/ad1(A: 1TB) and /dev/ad2(B:1TB). If you are unsure about the device name, try running dmesg for details:

dmesg | grep ad
gstripe label -v st0 /dev/ad1 /dev/ad2

And label the new device: /dev/stripe/st0

bsdlabel -wB /dev/stripe/st0

Format the new device:

newfs -U /dev/stripe/st0a

Mount the device for testing:

mount /dev/stripe/st0a /mnt

Verify the size:

df -h

Add the following into /boot/loader.conf:

geom_stripe_load="YES"

Now, reboot your machine. If /dev/stripe/st0 is available, then your RAID0 device is ready.

If you need to build more RAID0 devices, repeat the above steps. Keep in mind that you need to change the device name from st0 to st1.

Putting all devices together into ZFS Pool

First, let’s enable ZFS first:

echo 'zfs_enable="YES"' >> /etc/rc.conf

and start ZFS:

/etc/rc.d/zfs start

Get your devices ready. In my cases, my devices name are:
/dev/ad5: 2TB
/dev/ad6: 2TB
/dev/ad7: 2TB
/dev/stripe/st0: 2TB (RAID0: 2x1TB)
/dev/stripe/st1: 2TB (RAID0: 2x1TB)

Create the ZFS pool, which will mount on /storage/data
Note that I use raidz2 here for extra protection against data failure. Basically, raidz (single parity) allows up to 1 failed harddrives while raidz2 (double parity) allows up to 2 failed harddrives.

  • RAIDZ: Usable space: 8GB, allow up to one 2TB harddrive group failed (i.e., one 2TB or two 1TB in the same group)
  • RAIDZ2: Usable space: 6GB, allow up to two 2TB harddrive groups failed (i.e., two 2TB or two 1TB in the different groups)
zpool create storage raidz2 /dev/ad5 /dev/ad6 /dev/ad7 /dev/stripe/st0 /dev/stripe/st1
zfs create storage/data

Verify the result:

zpool status
df -h

We need to make some performance tweaking first, otherwise the system will be very unstable. Add the following to the /boot/loader.conf

#Your Physical Memory minus 1 GB
vm.kmem_size="3g"
vm.kmem_size_max="3g"

vfs.zfs.arc_min="512m"

#Your Physical Memory minus 2GB
vfs.zfs.arc_max="2048m"


vfs.zfs.vdev.min_pending="1"
vfs.zfs.vdev.max_pending="1"

Now reboot the system:

reboot

To test the stability of the system, I recommend saving some files into the ZFS pool and run it for few days.

Why Running ZFS on Linux is not a Solution?

ZFS is not supported by Linux natively due to legal issue. In the other words, it is not supported by Linux kernel. Although ZFS has been ported to Linux via FUSE, which is running ZFS as an application, it will introduce the performance and efficiency penalties. (Source: ZFS Wiki). So I don’t recommend running ZFS on Linux.

Enhancement Idea

  1. You can use Samba to share the files with Windows users.
  2. To secure your data, I recommend set up another system on a separate machine and mirror the data using rsync.

Further Readings

  1. FreeBSD Handbook: RAID0 – Striping
  2. FreeBSD Handbook: The Z File System (ZFS)
  3. ZFS Tuning Guide

Our sponsors:

Package ssh is not available, but is referred to by another package. This may mean that the package is missing, has been obsoleted, or is only available from another source

Today, I helped my friend to install Debian. It was done via two GUI remote desktop connections (i.e., slow), and therefore I would like to access the server via SSH. So I tried to install the SSH package:

sudo apt-get install -y ssh

and I received the following message:

Reading package lists... Done
Building dependency tree... Done
Package ssh is not available, but is referred to by another package.
This may mean that the package is missing, has been obsoleted, or
is only available from another source

Actually this is a very easy problem. Debian tries to download SSH from the package source (defined in /etc/apt/source.list) but the package (SSH) is not available. To solve this problem, we can simply edit the source list:

sudo nano /etc/apt/source.list

and insert (if not exists) or update (if exists) the following links into your file:

deb http://ftp.us.debian.org/debian/ lenny main contrib non-free
deb http://security.debian.org/ lenny/updates main contrib non-free

Since we’ve update the package source list, we need to update the package database of the system:

sudo apt-get -y update

Now we can install the package again:

sudo apt-get install -y ssh

and upgrade the entire system (optional):

sudo apt-get -y dist-upgrade

Have fun with Debian.

–Derrick

Our sponsors: