
How to remove .DS_Store and .AppleDouble

If you’ve shared your Windows / Unix drives with Mac OS X before, you may notice that Mac OS X will leave some footprints on your shared folders, such as .DS_Store and .AppleDouble. These files and directories are pretty annoying because they showed up in almost every single directory you accessed from the OS X.

There are two ways to solve this computer problem:

  1. Ask Apple to stop generating the .DS_Store
  2. Delete .DS_Store by yourself
  3. Set the shared folder to read-only

Apple had a tutorial on how to stop generating the .DS_Store (See here for details), however this solution requires you to run the command on every single account on every mac.

…If you want to prevent .DS_Store file creation for other users on the same computer, log in to each user account and perform the steps above…

In the other words, you will need to run the command for (# of user on each mac) x (# of mac) times!

For example, if you have 5 users on each mac, and you have 4 macs. You will need to run the command for 5 x 4 = 20 times! Also, I’ve tried this method before and the problem seemed coming back after the upgrading the system (e.g., from OS X 10.7 to 10.7.1). Therefore I decide to go with the second solution: Delete .DS_Store by myself.

How to delete .DS_Store and .AppleDouble automatically

Depending on what operating system the shared drives locate, there are two different ways to solve this problem, and they are very similar.

Situation 1: The shared folder is on Windows

If the shared folder located on a Windows machine, you may want to delete .DS_Store and .AppleDouble from the OS X. First, go to Terminal first:

Create a script

nano clean.sh

Now you are in a text editor. Copy and paste the following into the editor:

find . -name ".DS_Store"        -exec rm -Rf {} \;
find . -name ".apdisk"          -exec rm -Rf {} \;
find . -name ".AppleDouble"     -exec rm -Rf {} \;
find . -name ".AppleDB"         -exec rm -Rf {} \;
find . -name "afpd.core"        -exec rm -Rf {} \;
find . -name ".TemporaryItems"  -exec rm -Rf {} \;
find . -name "__MACOSX"         -exec rm -Rf {} \;
find . -name "._*"              -exec rm -Rf {} \;

Save the file. Don’t forget that we need to make it executable.

chmod a+x clean.sh

Now you can run the script:

./clean.sh

Unfortunately, OS X will recreate these files again after the files are removed. Therefore, I create a cron job to remove them automatically:

sudo nano /etc/crontab

and put the following:

@hourly       root /path.to/script.sh

This will tell the system to run the script hourly.

Of course, you can change it to daily, weekly, monthly etc.

Situation 2: The shared folder is on OS X or Unix

The idea is very similar. You can do the same thing except that the script will be on the server side.

Or you can simply make the shared folder to read-only. Then Mac OS X can not create any annoying files. Here is an example on how to set up a read-only shared drive on Samba:

[Public]
        browseable = yes
        writeable = no
        path = /public
        force directory mode = 777
        force create mode = 777
        comment = This is a public directory
        create mode = 777
        directory mode = 777
        available = yes

Now you can say goodbye to .DS_Store and .AppleDouble.

–Derrick

Our sponsors:

How to protect and secure WordPress

Securing a WordPress blog is pretty simple. If you google the words “How to protect wordpress”, you will find a lot of sites talk about the basic techniques, such as

  1. Make sure that your WordPress software and other plugins are always up to date
  2. Enable Akismet to protect your site from spam comment
  3. Don’t share your WordPress account with others people

While these advices are absolutely correct, but to me (and most other experienced users), these are common sense only. As an advanced user, I am interested in learning more innovative or advanced techniques, rather than some junk collected from WordPress for Dummies.

In the following paragraphs, I am going to show you some advanced techniques that 90% of the WordPress sites have not implemented. They are nothing fancy, just require you to do tweak using terminal. Notice that doing something through terminal (a.k.a. command line) is considered an difficult task to 90% of the people in the world.

Anyway, the techniques I introduce below are targeted to solve the most basic and fundamental security problem that WordPress do not address, because these problems go beyond its capability.

Securing WordPress: Step 1 – Secure your server, at least secure how you login to WordPress Dashboard

WordPress provides an extremely easy way to access the WordPress Dashboard:

http://yourwordpress.com/wordpress/wp-login.php

It is very handy because you can log in to your website anywhere, as long as you have access to a browser with internet connection. However, it also opens a door to everybody as long as they have your login and password. How? When you login to WordPress, you are sending your login and password to the WordPress server in clear, unencrypted format. Everything are visible to everybody. If someone is interested to steal your information, it is possible.

There are two ways to solve this problem –

1.) Building a secure HTTP server, i.e.,

https://yourwordpress.com

Notice that it is https, not just http.

Depending on what web server you use to run WordPress. In my case, I use Apache and it is very simple to run a secure Apache server. All I need is to generate a website certificate, apply it to my domain and my secure web server is ready.

There is only one problem – All browsers will complain about your certificate because it is generated by myself, not the other authorities such as Verisign. However, I can ask my browser to ignore that.

If it sounds difficult to you, you can ignore that. The second suggestion below will help solving this problem.

Securing WordPress: Step 2 – Limit the access to WordPress Dashboard

Okay, now you’ve already secure the communication channel between your computer and the WordPress server, and no one can see the login and password in your transaction. Is it enough? Nope. I can still brute-force attack your website by trying all different combination. So, we need to limit the access by IP addresses. Depending on how you access your WordPress blog, if you always access it from certain location, such as home, office or other locations, and if these IP addresses do not change often, this may work for you.

Simply go to the wordpress directory, e.g.,

/usr/local/www/wordpress

Make sure that .htaccess exists.

Add the following to the end of the file:

order deny,allow
deny from all
allow from XXX.XXX.XXX.XXX
allow from localhost

Replace XXX.XXX.XXX.XXX by your IP addresses. Here are some examples:

allow from 192.168.1.101  #Allow from this address
allow from 192.168.1        #Allow from 192.168.1.*
allow from 192.168          #Allow from 192.168.*.*

That’s it! If you want to go further, you can check the IP address inside wp-login.php as well, i.e.,

$IP = $_SERVER['REMOTE_ADDR'];

if ($IP != '192.168.1.100') exit();

However, I don’t recommend this way because your codes will get overwritten after upgrading the WordPress.

That’s it. Enjoy building a secure WordPress site.

–Derrick

Our sponsors:

[Solved]Harddrive disappears or got deteched in FreeBSD

Have you experienced these computer problems like mine before? You got some error messages that your system cannot read your harddrives, or your harddrives suddenly got detached by your system. You have no clue why it happens because it is a fairly new harddrive. Before you decide to discard, return or RMA your harddrive, let me share you my experience first because it may save your harddrive (and your bank).

Recently, I found several harddrive related computer problems in my FreeBSD systems. These includes:

Symptom: Harddrive seems failing

When I boot the computer, it threw me the following messages:

ad0: FAILURE - READ_DMA status=51 ready ,DSC,ERROR error=40 uncorrectable LBA=sector

If you miss these messages during the boot process, you can review these messages using the following command:

sudo dmesg | grep ad | less

Symptom: Harddrive is disappeared or got detached

When I tried to test the harddrive using dd, e.g.,

dd if=/dev/random of=/dev/ad0

(This command will wipe the entire disk with random data until the disk is full. The reason why I do it because I want to test every single sector of the disk.)

It gave the following message:

dd: /dev/ad0: open: I/O error

and I checked the /dev/ad0, e.g.,

ls -al /dev/ad0

The file was disappeared.

Apparently, the device was detached by the system automatically.

So, how do you solve this computer problem? Here are few methods I recommend you to try:

Solution: Check the SMART Status

You can check the SMART status of the harddrive using the following command:

smartctl -a /dev/ad

Make sure that the test result is PASSED.

If you don’t have smartctl installed, it is available in the following port:

/usr/ports/sysutils/smartmontools

Solution: How do you connect your harddrive?

Sometimes, connecting the harddrive through PCI card can cause issue (at least in my case). After connecting the harddrive to a different port, such as switching from port 1 of the card to port 3 of the motherboard, the computer problem is solved and gone. If the computer problem still exists, the next thing I will try is to connect the harddrive using USB or firewire. You can do it by getting an harddrive enclosure.

Solution: Replacing harddrive cables

Old harddrive cables can be the source of the computer problems too. Since the temperature inside the computer chassis is high, and the harddrive cables are usually bended, these can soften the cable and may break the metal wire inside the cable. Try replacing it by new cables and see the computer problem is gone or not. Also, check the power adapter as well. Sometimes this computer problem is caused by loose power connectors.

Solution: Have you installed any new harddrive recently?

Sometimes, the system will behave abnormally because of newly installed hardware. It can be any reason such as conflicting hardware etc. Recently, I installed a PCI flash card adapter, which caused the system very unstable. After I removed the card, the computer problem is solved and gone.

Solution: Is your Motherboard doing okay?

Although it is not likely, but this computer problem can caused by the burned motherboard. Sometimes, if a mother board is getting old, it can be unstable and not reliable (Heavy usage such as gaming can generate high temperature, which will decrease the life span of a motherboard). To determine the root of the computer problem, I will replace a motherboard and test the system again.

How do you know if your system is stable or not?

Here are few things I usually do to test the stability of a system:

1. Run the machine for at least a week.

2. Wipe all non-system harddrives using dd:

sudo dd if=/dev/random of=/dev/ad0 &
sudo dd if=/dev/random of=/dev/ad2 &
sudo dd if=/dev/random of=/dev/ad4 &

etc.

where ‘&’ at the end of the command means running it in background.

3. If possible, always keep your system in a cool place such as basement. It helps to keep the harddrive healthy.

–Derrick

Our sponsors:

Building a Super Large and Reliable File Server with Mixed Size of Harddisks

In this article, I am going to show you how to build a super large, ultra reliable, expandable file server with mixed size of hard drives.

Here is my criteria:

  • Large Storage Capacity. At this moment, the largest hard drive is 2TB. I am looking for at least 10TB.
  • Great Performance. The users should not feel any delay when multiple users are reading/writing to the file server at the same time.
  • Reliable. No data loss or inconsistent. The file system should repair by itself.
  • Expandable. The file system must be expandable. During the upgrade, the data should be preserved (i.e., don’t need to wipe out the original data)
  • Client Independent / Cross Platform. The user should be able to access the file server from any OS.
  • Software based / Hardware Independent. In case of hardware failure, it will be easy to transfer the entire system to a different computer.

I am going to show you how to implement all of these using FreeBSD and ZFS. The idea of the implementation is the same on other operating systems that support ZFS, such as *Solaris, *BSD etc. However, using ZFS on Linux (via Linux FUSE) is not recommended given the performance / stability issues (See Wikipedia for details). I personally do not recommend running ZFS on Linux in production environment.

Before I talk about how I do it, I like to go over what other technologies I tried before, and why they are not qualified.

RAID + LVM on Linux

This is one of the most common techniques used by many people on building file server. First, you need to build a RAID device using mdadm on the selected harddrives with identical size. If you have different size of harddrive, you will need to put them on a separated RAID device because mdadm does not support mixing different size of harddrive in a single RAID device without losing usable space. Later, you combine multiple devices (RAID, single harddrives etc) into a single partition using LVM.

The good thing about this technique is the expandability, i.e., you can add any hard drive to the partition at any time without losing any data at any time. However, there are few disadvantages of this combination:

Poor reliability
The reliability is handled at the RAID level. If your setup is not 100% RAID, such as the following example, the reliability can be discounted.
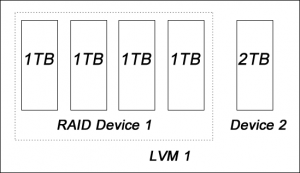
In this example, if the device 2 (2TB) is failed, the data that is stored on device 2 will be lost, because the data redundancy is only available on device 1.

Performance is not optimized
Data redundancy helps to improve the performance especially on reading. Again, if the setup is not one single RAID device, the performance can be discounted too.

So, let’s see how ZFS can solve these issues.

ZFS

ZFS is the next generation file system developed by Sun. It comes with all advantages of mdadm + LVM, plus a lot of features such as compression, encryption, power failure handling, checksum etc. So why this setup is better than the LVM one? Let’s take a look to the following example:
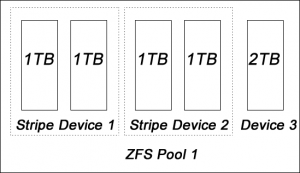
In this example, all devices in the ZFS pool are protected against data failure.

Let’s Start Building A Super Large File Server Now!

First, let’s assume that I have the following hardware:

  1. A 64-bit system with at least 2GB memory. Although ZFS will do fine on 32-bit system with 512MB memory, I recommend going with higher configurations because ZFS uses a lot of resources. In my case, I use an AMD Dual Core 4600+ (manufactured in 2006) with 3GB memory.
  2. Mixed size of harddrives, the size of the larger harddrive has to be divisible by the smaller one. In my case, I have 2TB and 1TB harddrives. Keep in mind that 2x1TB = 2TB.
  3. The harddrives are connected to the system using IDE/SATA. No firewire or USB.
  4. Four 1TB harddrives (A, B, C, D)
  5. Three 2TB harddrives (E, F, G)
  6. One extra harddrive, any size, reserved for the system uses. (H)

Using this combination(10GB in total), you can build a big file server with 8GB or 6GB, depending on your preference of data security.

I am going to build a RAIDZ2 device using FreeBSD and ZFS. In general ZFS is only available on the harddrives with the same size (without losing harddrive space). Since I want to put my 1TB and 2TB harddrives in the same pool, I first create couple RAID0 drives first. Then I add them together to make a big ZFS device. Here is the big picture:
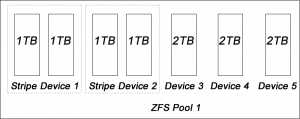
Building RAID0 Devices

As usual, login as root first.

sudo su

And load the stripe module:

kldload geom_stripe

Now we need to create a RAID0 device from /dev/ad1(A: 1TB) and /dev/ad2(B:1TB). If you are unsure about the device name, try running dmesg for details:

dmesg | grep ad
gstripe label -v st0 /dev/ad1 /dev/ad2

And label the new device: /dev/stripe/st0

bsdlabel -wB /dev/stripe/st0

Format the new device:

newfs -U /dev/stripe/st0a

Mount the device for testing:

mount /dev/stripe/st0a /mnt

Verify the size:

df -h

Add the following into /boot/loader.conf:

geom_stripe_load="YES"

Now, reboot your machine. If /dev/stripe/st0 is available, then your RAID0 device is ready.

If you need to build more RAID0 devices, repeat the above steps. Keep in mind that you need to change the device name from st0 to st1.

Putting all devices together into ZFS Pool

First, let’s enable ZFS first:

echo 'zfs_enable="YES"' >> /etc/rc.conf

and start ZFS:

/etc/rc.d/zfs start

Get your devices ready. In my cases, my devices name are:
/dev/ad5: 2TB
/dev/ad6: 2TB
/dev/ad7: 2TB
/dev/stripe/st0: 2TB (RAID0: 2x1TB)
/dev/stripe/st1: 2TB (RAID0: 2x1TB)

Create the ZFS pool, which will mount on /storage/data
Note that I use raidz2 here for extra protection against data failure. Basically, raidz (single parity) allows up to 1 failed harddrives while raidz2 (double parity) allows up to 2 failed harddrives.

  • RAIDZ: Usable space: 8GB, allow up to one 2TB harddrive group failed (i.e., one 2TB or two 1TB in the same group)
  • RAIDZ2: Usable space: 6GB, allow up to two 2TB harddrive groups failed (i.e., two 2TB or two 1TB in the different groups)
zpool create storage raidz2 /dev/ad5 /dev/ad6 /dev/ad7 /dev/stripe/st0 /dev/stripe/st1
zfs create storage/data

Verify the result:

zpool status
df -h

We need to make some performance tweaking first, otherwise the system will be very unstable. Add the following to the /boot/loader.conf

#Your Physical Memory minus 1 GB
vm.kmem_size="3g"
vm.kmem_size_max="3g"

vfs.zfs.arc_min="512m"

#Your Physical Memory minus 2GB
vfs.zfs.arc_max="2048m"


vfs.zfs.vdev.min_pending="1"
vfs.zfs.vdev.max_pending="1"

Now reboot the system:

reboot

To test the stability of the system, I recommend saving some files into the ZFS pool and run it for few days.

Why Running ZFS on Linux is not a Solution?

ZFS is not supported by Linux natively due to legal issue. In the other words, it is not supported by Linux kernel. Although ZFS has been ported to Linux via FUSE, which is running ZFS as an application, it will introduce the performance and efficiency penalties. (Source: ZFS Wiki). So I don’t recommend running ZFS on Linux.

Enhancement Idea

  1. You can use Samba to share the files with Windows users.
  2. To secure your data, I recommend set up another system on a separate machine and mirror the data using rsync.

Further Readings

  1. FreeBSD Handbook: RAID0 – Striping
  2. FreeBSD Handbook: The Z File System (ZFS)
  3. ZFS Tuning Guide

Our sponsors:

How to remove “A Remarkable Book from Wiley-Finance “An excellent book!” — Paul Wilmott Want to break into the lucrative world of trading and quantitative finance? You need this book!”

Recently, I found that WordPress adds the following things (or random crappy ads) into my posts, such as:

A Remarkable Book from Wiley-Finance “An excellent book!”   — Paul Wilmott Want to break into the lucrative world of trading and quantitative finance? You need this book!
The Unreal Universe A Book on Physics and Philosophy Pages: 292 (282 in eBook) Trimsize: 6″ x 9″ Illustrations: 34 (9 in color in eBook) Tables: 8 Bibliography: Yes Index: Yes ISBN:9789810575946

which makes my posts look something like the following:

In fact, this computer problem has nothing to do with the WordPress. The computer problem is generated by the following WordPress plugins:

I think this kind of activity is very annoying and not responsible. To solve this computer problem, I simply removed these two plugins.

That’s it. The computer problem is solved and now my blog looks a lot cleaner!

If you like to investigate further, take a look to the following files:

/<your wordpress path>/wp-content/plugins/easy-adsenser/head-text.php
/<your wordpress path>/wp-content/plugins/adsense-now/head-text.php

And search for the following:

A Remarkable Book from Wiley-Finance “An excellent book!”   — Paul Wilmott Want to break into the lucrative world of trading and quantitative finance? You need this book!
The Unreal Universe A Book on Physics and Philosophy Pages: 292 (282 in eBook) Trimsize: 6″ x 9″ Illustrations: 34 (9 in color in eBook) Tables: 8 Bibliography: Yes Index: Yes ISBN:9789810575946

Anyway, I don’t recommend install any plugins developed by the authors of Easy Adsense and Adsense Now.

–Derrick

Our sponsors:

[Solved]Windows 7 Taskbar Loses Transparency

After letting Windows 7 to automatically upgrade my system, I found that the taskbar was no longer transparent. So I ran the trouble shooting features to find out why the transparency feature was gone.

Desktop -> Right Click -> Personalize -> Window Color

The transparency feature is not available. So I clicked on the trouble shooting link, and Windows complains about the incompatibility of the graphic card.

This computer problem is pretty obvious. Windows 7 installed a new graphic card driver for me which broke everything. To solve this computer problem, I simply download a driver developed by the manufacturer:

FYI, mine is nVidia GT-230M

After reinstalling the driver, everything went back to normal, and the taskbar is transparent again!

Story learned: Never install any graphic driver developed by Microsoft.

Our sponsors:

How to sudo over scp

Today, I like to copy a file from a server to a different server using command line in Unix. Since I like to put the file at a location that require root permission, if I do it using scp, I have to split it into two commands, i.e.,

1.) scp the file to a remote location
2.) copy the file to destination location via sudo and ssh

However, I like to do it in one single command. After trial and error for few times, finally I come up with a solution to solve this computer server problem.

Suppose I want to copy a file from local server:/my_source_file to remoteserver.com:/root/file, I can simply do everything in one single command:

ssh remoteserver.com sudo sh -c '"cat > /root/file"' < /my_source_file

This computer problem is easy and piece of cake.

--Derrick

Our sponsors:

HP2009m: Power Button Lockout

When I tried to turn off my HP2009m monitor by pushing the power button, I see the following message:

Power Button Lockout

Since HP has a tradition to make beautiful and quality monitor with the worst power button (Which means you have to keep it power on, or you need to get a new one even the monitor is doing okay), I was worrying about whether my monitor is “dead” or not.

After unplugging the power cable for a night and put it back the next day, I found that the problem was still there. So, finally I decided to reset the monitor to factory settings. Yay! It works!

So here is what I’ve done:

  • Push the Menu button
  • Select Factory Reset using the +/- key
  • Push the OK button
  • Select Yes by using the +/- key
  • Push the OK button

This computer problem should be gone. If the computer problem still exists, I will take apart the monitor (by remove the frame) and re-adjust the power button. That’s how I save my another HP monitor from being sent to landfill.

–Derrick

Our sponsors:

How to speed up Ubuntu on a Low-End computer?

If you think your Ubuntu box is slow. You may want to give Xubuntu a try.

I have a Ubuntu box on a relative old (5+ years) laptop (HP dv1000, Pentium Celerom M + 512MB ram). I mainly use it for lightweight activity such as office and web browsing. Recently, I put this laptop in my kitchen, which required connecting to an external monitor. I found that when I am in graphics mode, the overall system was getting slow.

After some investigations, I have the following conclusions:

  1. The native resolution of the laptop graphic card is 1024×900. Since I connected it to an external monitor (1680×1050), it required more CPU and memory from the system. (It is an integrated graphic card, and it does not have any memory on its own.)
  2. The Ubuntu uses Gnome desktop, which uses more resources and it is not optimized for low-end machine.
 

So I have few options –

  1. Go back to Windows (Guess what, a clean Windows XP runs even much faster than Ubuntu)
  2. Install other high performance system such as FreeBSD
  3. Stick with Ubuntu, but uses a different window manager.
 

I do not prefer the first option because I like to keep a distance from Microsoft product. For the second option, I normally prefer using FreeBSD as a server rather than desktop because of the hardware driver issues. Therefore, I decide to go with the third option. That will minimize the change and impact.

Ubuntu comes with two other siblings, Xbuntu and Kbuntu. Basically, these three systems share the same core, but with different themes, i.e., window manager:

  1. Ubuntu: Gnome
  2. Xubuntu: Xfce
  3. Kubuntu: KDE
 

I have tried these three window managers before. Here are their rankings in terms of fanciness, beauty, and resource consumption:

KDE > Gnome > Xfce

So I decide to give Xubuntu a try. After installing Xubuntu, I found that the overall system is a lot faster and smoother. I know that I’ve made a good decision.

FYI, if you need even more speed, consider to install Window Maker. It is even faster than Xfce!

–Derrick

Our sponsors:

Package ssh is not available, but is referred to by another package. This may mean that the package is missing, has been obsoleted, or is only available from another source

Today, I helped my friend to install Debian. It was done via two GUI remote desktop connections (i.e., slow), and therefore I would like to access the server via SSH. So I tried to install the SSH package:

sudo apt-get install -y ssh

and I received the following message:

Reading package lists... Done
Building dependency tree... Done
Package ssh is not available, but is referred to by another package.
This may mean that the package is missing, has been obsoleted, or
is only available from another source

Actually this is a very easy problem. Debian tries to download SSH from the package source (defined in /etc/apt/source.list) but the package (SSH) is not available. To solve this problem, we can simply edit the source list:

sudo nano /etc/apt/source.list

and insert (if not exists) or update (if exists) the following links into your file:

deb http://ftp.us.debian.org/debian/ lenny main contrib non-free
deb http://security.debian.org/ lenny/updates main contrib non-free

Since we’ve update the package source list, we need to update the package database of the system:

sudo apt-get -y update

Now we can install the package again:

sudo apt-get install -y ssh

and upgrade the entire system (optional):

sudo apt-get -y dist-upgrade

Have fun with Debian.

–Derrick

Our sponsors: