nginx vs Tornado Web vs Apache Performance Benchmark

Let’s put the nginx, Tornado and Apache and see who is the winner.

What to test:

A simple Hello World webpage.

How:

ab -n 10000 -c 300 http://myserver.ip

Test Environment:

OS: Ubuntu 9.10 (32-bit) / Linux 2.6.31
CPU: Pentium Celeron M 1.5 GHz
Ram: 512 MB
Apache: 2.2.12
PHP: 5.2.10
Python: 2.6
Tornado: 0.2
nginx: 0.6.13

Result:

Apache

Server Software:        Apache/2.2.12
Server Port:            80

Document Path:          /
Document Length:        13 bytes

Concurrency Level:      300
Time taken for tests:   5.295 seconds
Complete requests:      10000
Failed requests:        0
Write errors:           0
Total transferred:      2863146 bytes
HTML transferred:       130143 bytes
Requests per second:    1888.58 [#/sec] (mean)
Time per request:       158.850 [ms] (mean)
Time per request:       0.529 [ms] (mean, across all concurrent requests)
Transfer rate:          528.05 [Kbytes/sec] received

Connection Times (ms)
              min  mean[+/-sd] median   max
Connect:        0    8 151.0      0    3028
Processing:     0  122 602.0     48    5289
Waiting:        0  122 600.8     48    5284
Total:         10  130 622.1     49    5292

Percentage of the requests served within a certain time (ms)
  50%     49
  66%     50
  75%     50
  80%     51
  90%     53
  95%     63
  98%     68
  99%   5271
 100%   5292 (longest request)

nginx

Server Software:        nginx/0.6.13
Server Port:            8000

Document Path:          /
Document Length:        13 bytes

Concurrency Level:      300
Time taken for tests:   3.172 seconds
Complete requests:      10000
Failed requests:        0
Write errors:           0
Total transferred:      2230000 bytes
HTML transferred:       130000 bytes
Requests per second:    3152.12 [#/sec] (mean)
Time per request:       95.174 [ms] (mean)
Time per request:       0.317 [ms] (mean, across all concurrent requests)
Transfer rate:          686.45 [Kbytes/sec] received

Connection Times (ms)
              min  mean[+/-sd] median   max
Connect:        0    2  68.3      0    3057
Processing:     0   70 359.1     27    3164
Waiting:        0   70 359.1     26    3164
Total:         10   72 365.6     27    3169

Percentage of the requests served within a certain time (ms)
  50%     27
  66%     27
  75%     27
  80%     27
  90%     28
  95%     29
  98%     32
  99%   3157
 100%   3169 (longest request)

Tornado Web:

Server Software:        TornadoServer/0.1
Server Port:            8888

Document Path:          /
Document Length:        12 bytes

Concurrency Level:      300
Time taken for tests:   5.109 seconds
Complete requests:      10000
Failed requests:        0
Write errors:           0
Total transferred:      1680000 bytes
HTML transferred:       120000 bytes
Requests per second:    1957.33 [#/sec] (mean)
Time per request:       153.270 [ms] (mean)
Time per request:       0.511 [ms] (mean, across all concurrent requests)
Transfer rate:          321.12 [Kbytes/sec] received

Connection Times (ms)
              min  mean[+/-sd] median   max
Connect:        0   32 309.3      0    3035
Processing:    33  103  28.5    103     375
Waiting:       33  102  28.5    103     375
Total:         36  135 311.3    103    3154

Percentage of the requests served within a certain time (ms)
  50%    103
  66%    105
  75%    108
  80%    112
  90%    116
  95%    126
  98%    313
  99%   3121
 100%   3154 (longest request)

What do these numbers mean?

In a given time, if nginx and Tornado Web can handle 1.66 and 1.036 times more requests than Apache, respectively! In the other words, the server is more efficient and it can use the saved resource to do something else!

–Derrick

Our sponsors:

Tornado Web Server – Very Fast!

I just did a benchmark comparison on Tornado Web Server and Apache + PHP server. The result is pretty amazing.

What to test:

A simple Hello World application.

How:

ab -n 1000 -c 300 http://myserver.ip

Test Environment

OS: FreeBSD 7.1
CPU: Pentium III 933 MHz
Ram: 256 MB
PHP: 5.2.9
Python: 2.5.4
Tornado: 0.2

Result:

Apache + PHP:

Concurrency Level:      300
Time taken for tests:   3.515 seconds
Complete requests:      1000
Failed requests:        0
Write errors:           0
Total transferred:      255000 bytes
HTML transferred:       12000 bytes
Requests per second:    284.50 [#/sec] (mean)
Time per request:       1054.499 [ms] (mean)
Time per request:       3.515 [ms] (mean, across all concurrent requests)
Transfer rate:          70.85 [Kbytes/sec] received

Tornado Web Server:

Concurrency Level:      300
Time taken for tests:   1.907 seconds
Complete requests:      1000
Failed requests:        0
Write errors:           0
Total transferred:      168000 bytes
HTML transferred:       12000 bytes
Requests per second:    524.48 [#/sec] (mean)
Time per request:       571.993 [ms] (mean)
Time per request:       1.907 [ms] (mean, across all concurrent requests)
Transfer rate:          86.05 [Kbytes/sec] received

What do these numbers mean?

Tornado Web Server can handle 1.84 times more requests than Apache + PHP server in a given time!

–Derrick

Our sponsors:

Fedora Linux 12 is out today

Fedora Linux 12 is out today.

Here are the links to download Fedora 12:

  1. Download Fedora 12 64-Bit
  2. Download Fedora 12 32-Bit
  3. Download Fedora 12 PowerPC
  4. All versions

Suggestions:
I found that the downloading speed varies depends on which mirror you get. I suggest to test the download speed first, and re-try it (using a different mirror) if the speed is too slow.

For example, run the following command in terminal:

wget http://download.fedoraproject.org/pub/fedora/linux/releases/12/Fedora/x86_64/iso/Fedora-12-x86_64-DVD.iso

Which will show you the speed. Simply terminate the command and re-try it if the speed is too low.

Have fun with Fedora 12.

–Derrick

Our sponsors:

[Solved]Cisco RVS4000 4-port Gigabit Security Router – Slow

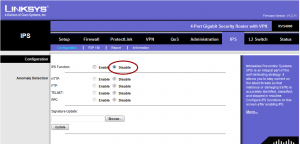
Recently we bought a Cisco RVS4000 4-port Gigabit Security Router and we noticed that the connection speed to the Internet was extremely slow. If we connected the server directly to the Internet (Without going through the Router), the download speed was around 80MBps, while the speed dropped down to 30 ~ 40MBps with the router with the default setting.

After disabling the IPS, the problem was gone!

Steps (IPS)- Required

  1. Go to the control panel (http://192.168.1.1)
  2. Go to the IPS tab
  3. Go to the Configuration Tab
  4. Disable the IPS function

Cisco RVS4000 4-port Gigabit Security Router - Slow Speed

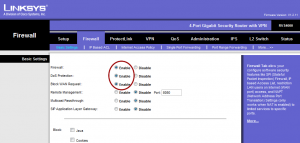
Steps (Firewall) – Optional

  1. Go to the Firewall Tab
  2. Enable Firewall, DoS Protection and Block WAN Request
  3. Disable the rest

Cisco RVS4000 4-port Gigabit Security Router - Slow Speed

Looks like the IPS feature took too much resource from the router CPU.

–Derrick

Our sponsors:

[Solved]Snow Leopard (OS X 10.6.2) can’t boot after upgrading to 10.6.2

After upgrading to Snow Leopard (OS X) 10.6.2 from 10.6.1, I found that my system could not boot, no matter what option I chose at the boot prompt (-x, -v, -s etc). After trying for nearly half an hour, I was about to give up. Finally, I tried replacing the kernel and it rocked! I think I should share my solution here because I couldn’t find something like that on Google.

What I did:
Replacing the kernel of OS X 10.6.2 by OS X 10.6. You can find the old kernel from your backup (if you have), or from the Snow Leopard installation disk.

Steps:

  1. Grab your OS X 10.6 installation disk.
  2. Boot the system using the external DVD-Rom or USB Flash Drive.
  3. After booting to the installation screen, select your language and continue.
  4. Open Terminal
  5. Type the following:
cp /mach_kernel /Volumes/XXX/

where XXX is the name of your system directory. If you are not sure how to find it, you can try to run:

df

Warning(Side Effect):
When the system upgrades to OS X 10.6.2, it upgrades both the kernel (the brain) and the apps (the body) to 10.6.2. Now, we are downgrading the brain back to 10.6. It may cause unexpected behavior because the brain and the body are speaking different languages. You can think about the problem this way: The brain is speaking an old language while the body understands the new language only. Will they get along together? May be. Only Apple knows the answer.

So do it at your own risk.

Our sponsors:

Installing Apache on Snow Leopard (OS X 10.6)

The Apache web server comes with the OS X is a bit out dated. So I decided to install a new one. After I tried installing it using mac port, it kept giving error.

Finally, I built the Apache from source, and it worked!

Grep Apache from here.

Download the file, where the link should look something like:

Unix Source: httpd-2.2.14.tar.gz

Run the following command in terminal:

tar -zxvf httpd-2.2.14.tar.gz

cd httpd-2.2.14

./configure

make

sudo make install

That’s it! Now, let’s test the webserver.

First, let’s disable the Apache that shipped with the OS X (Not the one you just install!). You can simply do it by going to:

System Preferences -> Sharing -> Web Sharing

Go back to Terminal. Make sure the default web server is not running:

sudo apachectl stop

Now, let’s verify the installations:

/usr/local/apache2/bin/apachectl -v

You should see something like this:

Server version: Apache/2.2.14 (Unix)
Server built:   Oct 24 2009 20:53:45

Now, let’s start the web server:

sudo /usr/local/apache2/bin/apachectl start

Open your browsers and access to http://localhost/.
You should see something like:

It works!

Have fun!

–Derrick

Our sponsors:

Can’t send mail from Fedora Linux … Solved!

I was having problem today to send out an email from my Fedora 11 Linux box. By default, the mail server software, Sendmail, comes with the standard installation and no configuration is required. I didn’t understand why the Sendmail didn’t work.

After a very detail investigation, I finally found out why. Here are the steps I went through to solve the problem.

1. Make sure the Sendmail is running.

netstats -na | grep LISTEN

You should see something is running on port 25.

2. Make sure the stupid SELinux Firewall is disabled.

3. Make sure the Linux Firewall allows port 25.

4. Try to connect to the port 25.

telnet localhost 25

If you have trouble to connect to the port, that means something is not work.

5. Make sure you are not blocking port 25 at the system level:
In /etc/hosts.allow

sendmail: localhost: allow

That should work!

Our sponsors:

“mount_smbfs: kldload(smbfs): Operation not permitted” SOLVED!!!!

When I tried to mount a windows share from FreeBSD:

sudo mount_smbfs -I WindowsBoxIPaddress //username@WindowsBoxIPaddress/WindowsShare /mnt

I always got this error:

mount_smbfs: kldload(smbfs): Operation not permitted

After searching this error message on Google, I found that all suggested solutions were related to running this command using sudo, which I already did. Today morning, I tried a different way and the problem is solved!

In /etc/rc.conf, I disable the following configurations:

#kern_securelevel="1"
#kern_securelevel_enable="YES"

After I rebooted the machine, and mounted the Windows share again, it worked! That’s simple, isn’t it?

Note: These two lines are for making the FreeBSD box more secure, and I highly recommend to put these in a public accessible server. I don’t think it is safe to make a public accessible server to access to any Windows box because there are not many protections you can do on a Windows box. In case the public server got hacked, the connections to other internal servers should be blocked, i.e., other internal servers can always access the public server, but not vice versa.

–Derrick

Our sponsors:

Performance Benchmark: FreeBSD vs Ubuntu vs OS X, which one is better?

If you cannot decide whether you should go with FreeBSD or Ubuntu (or Linux), check out this article: FreeBSD or Linux in 6 Simple Questions

Recently I am working on building a web farm which is formed by three ancient time computers (The sum of their ages is older than me). Therefore, I need to pick an operating system to make them running efficient enough. Basically here are my criterias:

  • It must be secure. (Sorry, Microsoft Windows, I tried installing Windows Server and the OS got infected by virus in 20 minutes after connecting to Web.)
  • It must be stable and require no reboot. (I have a very good experience with FreeBSD. My longest record of uptime is 6 months so far.)
  • It must be efficient and effective on performance.

So after trying different operating systems, I ran down to three choices: FreeBSD 8, Ubuntu 10 and OS X.

And I finally go with FreeBSD 8. Before I talked about why I kick the Ubuntu and OS X away, let me discuss what methodology I used.

First Test: Extreme Computation

I write a program to calculate the value of pi using Monte-Carlo simulations. For those who are not familiar with this simulation method, basically it try to repeat a calculation for n times and try to determine the value of pi based on the results of calculations. This calculation will use all available CPU resources.

Here is the result from a computer: Pentium II 400MHz + 160MB

  • FreeBSD 8.1 ~ 5 seconds
  • FreeBSD 4.11~ 10 seconds
  • Ubuntu 10.04 ~ 8 seconds
  • OS X 10.3.9 ~ 11 seconds

The result is very obvious, FreeBSD 8.1 is the best candidate in this test. However, the result of my program only gives a very small portion of the picture. So I decide to run another test:

Second Test: Apache Benchmark

No test is better than the real world test drive. Since my primary purpose is for web server, so I decide to test the performance on how Apache perform on different operating systems. My test is pretty simple, I basically ask the Apache Benchmark client to download a page from the test server. The page does three things:

  1. Display a picture
  2. Insert a record into MySQL database
  3. Retrieve the current count from MySQL database

This way I can test the overall performance on how the system handles the file I/O, database I/O and computations.

So the result is pretty interesting (1000 total requests and 100 concurrent requests)

  • FreeBSD 8.1 ~ 200 requests/sec, no failure
  • FreeBSD 4.11~ 150 requests/sec, approx. 20% failure.
  • Ubuntu 10.04 ~ 180 requests/sec, no failure
  • OS X 10.3.9 ~ 160 requests/sec, approx. 50% failure.

I am not surprised with the result because FreeBSD 8 really does a very good job in kernel optimization. Since kernel is the heart(or brain) of all computations, an OS with good kernel is expected to give good results always.

So, I finally pick FreeBSD 8 as the core OS of my web farm, and I am loving it.

Our sponsors:

Installing Apache, PHP, MySQL and MemCached on OS X

This is my note on how to to install Apache, PHP and MySQL on a an OS X box. Although some of these applications are come with the operating systems, it is always good to know how to upgrade them to the latest version.

1. Apple Developer Tools and Mac Port

Before installing Mac Port, you will need the Apple Developer Tools. You can download it from the Apple Developer’s Network.

After installing Apple Developer’s Tools, you can install Mac Port. You can get it from the here.

Update Mac Port

sudo port selfupdate

Add the Mac Port path in the profile: ”’~/.bash_profile”’:

export PATH=/opt/local/bin:$PATH

MySQL:Mac Port
Install MySQL from Mac Port:

sudo port install mysql5

MySQL:Package
Go to the [http://dev.mysql.com/downloads/mysql/5.0.html#macosx-dmg MySQL’s website] to download the package.

Setup the a master password for root user:

/usr/local/mysql/bin/mysqladmin -u root password 'new-password'

Add the MySQL path in the profile: ”’~/.bash_profile”’:

export PATH=/usr/local/mysql/bin:$PATH

Apache:Mac Port

Install Apache from Mac Port:

sudo port install apache2

Open the configuration file: ”’/opt/local/etc/rc.conf”’ and add the following at the end of the file:

APACHE2=-YES-

PHP:Mac Port

Install PHP from Mac Port:

sudo port install php5 +apache2 +mysql5 +pear 

When that is done, register PHP 5 with Apache 2:

cd /opt/local/apache2/modules
sudo /opt/local/apache2/bin/apxs -a -e -n "php5" libphp5.so

And create a php.ini file (which you can edit to configure PHP 5):

sudo cp /opt/local/etc/php.ini-dist /opt/local/etc/php.ini

httpd.conf

Edit the Apache configuration file ”’/opt/local/apache2/conf/httpd.conf”’ and add the following lines to the end of the file:

AddType application/x-httpd-php .php
AddType application/x-httpd-php-source .phps

Replace this line:

DirectoryIndex index.html

by the following:

DirectoryIndex index.php index.html

php.ini

If the MySQL is installed from package rather than from Mac Port, we need to modify the mysql.default_socket value.

Open ”’/opt/local/etc/php.ini”’:

mysql.default_socket = /tmp/mysql.sock

MemCached

Install MemCached from Mac Port:

 sudo port install memcached
 sudo port install php5-memcache

We need to enable MemCached in PHP5.

First, we need to add the following in ”’/opt/local/etc/php.ini:”’:

extension_dir=/opt/local/lib/php/extensions/no-debug-non-zts-20060613
extension = memcache.so

Run the following command to start MemCached:

sudo /opt/local/bin/memcached -d -u nobody

Our sponsors: