Installing XAMPP on Fedora 12 64-bit system

I was installing XAMPP on Fedora 11 64-bit today, and I saw this famous message:

sudo /opt/lampp/lampp startapache
XAMPP is currently only availably as 32 bit application. Please use a 32 bit compatibility library for your system.

The message is very clear that XAMPP doesn’t like 32-bit system. So, we will need to cheat XAMPP that the system is 32-bit. First, we will need to install some libraries:

sudo yum -y install glibc.i686 libgcc.i686 libstdc++.i686

and now, we need to skip the 32-bit annoying check. Use Nano or your favorite editor to open this file: /opt/lampp/lampp

sudo nano /opt/lampp/lampp

Replace the following from:

# XAMPP is currently 32 bit only
case `uname -m` in
       *_64)
       if /opt/lampp/bin/php -v > /dev/null 2>&1
       then
               :
       else
               $de && echo "XAMPP gibt es zur Zeit nur als 32-Bit Applikation. Bitte verwende eine 32-Bit Kompatibilitaetsbibliothek fuer Dein System."
               $de || echo "XAMPP is currently only availably as 32 bit application. Please use a 32 bit compatibility library for your system."
               exit
       fi
       ;;
esac

To:

# XAMPP is currently 32 bit only
#case `uname -m` in
#       *_64)
#       if /opt/lampp/bin/php -v > /dev/null 2>&1
#       then
#               :
#       else
#               $de && echo "XAMPP gibt es zur Zeit nur als 32-Bit Applikation. Bitte verwende eine 32-Bit Kompatibilitaetsbibliothek fuer Dein System."
#               $de || echo "XAMPP is currently only availably as 32 bit application. Please use a 32 bit compatibility library for your system."
#               exit
#       fi
#       ;;
#esac

Now run the following the start XAMPP:

sudo /opt/lampp/lampp startapache

Wow! Everything is working great!

–Derrick

Our sponsors:

Updated: What technologies (or toys) I am playing recently?

Recently I am playing the following technologies (toys):

  1. Tornado Web – Not sure how long will Apache + PHP last. Time to learn Python.
  2. Tokyo Cabinet & Tyrant – Another one of my long term plans to step away from SQL.
  3. PHP API for Tokyo Tyrant — I decide to write my own because I cannot find a good one.
  4. Moving my development platform from Windows to FreeBSD. My servers have been already on FreeBSD for many years. I think now is a good time to move my desktop systems to FreeBSD as well. Why not Linux? Oh Well…
  5. LUA – I may pick up Lua if time is permitted.

Looks like I will have a busy time other than shoveling the snow this Winter.

–Derrick

Our sponsors:

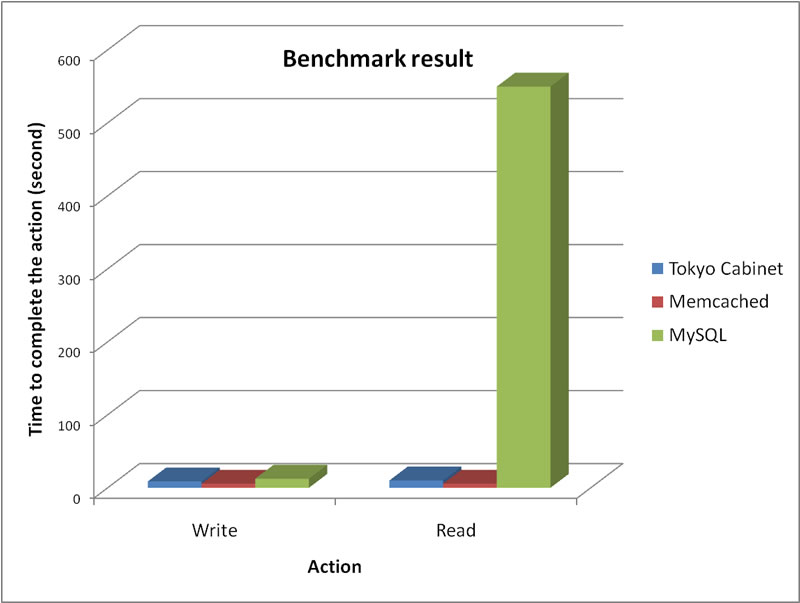
Tokyo Cabinet is 31 times faster than MySQL!!!

Today I was comparing the performance of Tokyo Cabinet, MySQL and Memcached using PHP. The result of Tokyo Cabinet is really impressive!

(Note that these results are generated from my computer. If you perform your own benchmarks, then you might find different results due to different system configurations. In fact, I encourage you to perform your own benchmarks. )

1. Quick Result

Total time used to write 10000 records and retrieve them back by each candidate  (The lower the better):
Tokyo Cabinet: 18.87s
Memcached: 11.309s
MySQL: 562.21s

A completed result will be given below.

2. Testing environment

Hardware

  • Intel Pentium II 450MHz
  • 160 MB RAM

Software

  • FreeBSD 7.2
  • Apache 2.2.11
  • PHP 5.2.9
  • Tokyo Cabinet 1.4.20
  • Tokyo Tyrant 1.1.26
  • MySQL 5.1.34
  • Memcached 1.2.6

3. Test scenario

For each candidate, I measure its performance using the following strategies through PHP:

1.) The time used to create all of the necessary objects.

2.) The time used to connect to the database.

3.) The time used to store 10000 randomly generated data.

4.) The time used to read 10000 randomly generated data.

5.) The time used to close the connection.

4. Test results

Tokyo Cabinet

time index ex time %
Start 1243136772.72818600 0.00%
create 1243136772.72838700 0.000201 0.00%
connect 1243136772.73224200 0.003855 0.02%
vanish 1243136772.73526800 0.003026 0.02%
put 1243136781.53287200 8.797604 46.60%
get 1243136791.60574800 10.072876 53.35%
close 1243136791.60755900 0.001811 0.01%
Stop 1243136791.60782300 0.000264 0.00%
total 18.879637 100.00%


Memcached

time index ex time %
Start 1243131185.86078100 0.00%
create 1243131185.86092500 0.000144 0.00%
connect 1243131185.86688300 0.005958 0.05%
put 1243131191.49702900 5.630146 49.78%
get 1243131197.16868100 5.671652 50.15%
close 1243131197.16982400 0.001143 0.01%
Stop 1243131197.17003400 0.000210 0.00%
total 11.309253 100.00%

MySQL

time index ex time %
Start 1243136138.19049000 0.00%
create 1243136138.19064700 0.000157 0.00%
connect 1243136138.22529900 0.034652 0.01%
put 1243136150.70760600 12.482307 2.22%
get 1243136700.40063700 549.693031 97.77%
close 1243136700.40078900 0.000152 0.00%
Stop 1243136700.40104500 0.000256 0.00%
total 562.210555 100.00%

The overhead time (create objects, making connections, closing connections etc) of all candidates are about the same. The only difference is storing the record and retrieving the record. Both Tokyo Cabinet and MySQL took about 10 seconds to store 10000 records in the database. However, Tokyo Cabinet took about 10 seconds to retrieve the records while MySQL took about 550 seconds! That’s about 31 times longer!

benchmark-tokyocabinet-memcached-mysql

5. Materials

Here is the material I used to make this benchmark test.
Click here to download the package.

Please feel free to let me know if you have any question or comment.

Our sponsors:

Oracle, MySQL and Berkeley DB, what’s next?

When Oracle acquired Berkeley DB, the quality of Berkeley DB has gone worse after that.

Now Oracle acquired Sun who owns MySQL, will the history repeat again?

(By the way, I am going to fall in love with Tokyo Cabinet.)

Tokyo Cabinet is now the new black.

Our sponsors:

Installing Apache, PHP, MySQL and MemCached on OS X

This is my note on how to to install Apache, PHP and MySQL on a an OS X box. Although some of these applications are come with the operating systems, it is always good to know how to upgrade them to the latest version.

1. Apple Developer Tools and Mac Port

Before installing Mac Port, you will need the Apple Developer Tools. You can download it from the Apple Developer’s Network.

After installing Apple Developer’s Tools, you can install Mac Port. You can get it from the here.

Update Mac Port

sudo port selfupdate

Add the Mac Port path in the profile: ”’~/.bash_profile”’:

export PATH=/opt/local/bin:$PATH

MySQL:Mac Port
Install MySQL from Mac Port:

sudo port install mysql5

MySQL:Package
Go to the [http://dev.mysql.com/downloads/mysql/5.0.html#macosx-dmg MySQL’s website] to download the package.

Setup the a master password for root user:

/usr/local/mysql/bin/mysqladmin -u root password 'new-password'

Add the MySQL path in the profile: ”’~/.bash_profile”’:

export PATH=/usr/local/mysql/bin:$PATH

Apache:Mac Port

Install Apache from Mac Port:

sudo port install apache2

Open the configuration file: ”’/opt/local/etc/rc.conf”’ and add the following at the end of the file:

APACHE2=-YES-

PHP:Mac Port

Install PHP from Mac Port:

sudo port install php5 +apache2 +mysql5 +pear 

When that is done, register PHP 5 with Apache 2:

cd /opt/local/apache2/modules
sudo /opt/local/apache2/bin/apxs -a -e -n "php5" libphp5.so

And create a php.ini file (which you can edit to configure PHP 5):

sudo cp /opt/local/etc/php.ini-dist /opt/local/etc/php.ini

httpd.conf

Edit the Apache configuration file ”’/opt/local/apache2/conf/httpd.conf”’ and add the following lines to the end of the file:

AddType application/x-httpd-php .php
AddType application/x-httpd-php-source .phps

Replace this line:

DirectoryIndex index.html

by the following:

DirectoryIndex index.php index.html

php.ini

If the MySQL is installed from package rather than from Mac Port, we need to modify the mysql.default_socket value.

Open ”’/opt/local/etc/php.ini”’:

mysql.default_socket = /tmp/mysql.sock

MemCached

Install MemCached from Mac Port:

 sudo port install memcached
 sudo port install php5-memcache

We need to enable MemCached in PHP5.

First, we need to add the following in ”’/opt/local/etc/php.ini:”’:

extension_dir=/opt/local/lib/php/extensions/no-debug-non-zts-20060613
extension = memcache.so

Run the following command to start MemCached:

sudo /opt/local/bin/memcached -d -u nobody

Our sponsors:

Installing Apache, PHP, MySQL and MemCached on FreeBSD

This is my note on how to to install Apache, PHP, MySQL and MemCached on a FreeBSD 7 Box.

1. MySQL

Go to the mysql52-server port directory by typing the command:

cd /usr/ports/databases/mysql51-server

Build the port by typing:

make BUILD_OPTIMIZED=yes BUILD_STATIC=yes

Using these two options will speed up the execution time.

Install the port by typing:

make install clean

Open the configuration file: ”’/etc/rc.conf”’ and add the following at the end of the file:

mysql_enable="YES"

Copy the default configuration file:

cp /usr/local/share/mysql/my-medium.cnf /etc/my.cnf

Start mysql manually to avoid having to reboot now by typing:

/usr/local/etc/rc.d/mysql-server start

Setup the a master password for root user:

/usr/local/bin/mysqladmin -u root password 'new-password'

2. Apache

Go to the apache22 port directory by typing the command:

cd /usr/ports/www/apache22

Install the port by typing:

make install clean

Open the configuration file: ”’/etc/rc.conf”’ and add the following at the end of the file:

apache22_enable="YES"

Add the following in: ”’/boot/loader.conf”’

accf_http_load=YES

3. PHP

3.1 PHP5

Go to the php5 port directory by typing the command:

cd /usr/ports/lang/php5

Install the port by typing:

make install clean

Make sure the APACHE (Build Apache module) option is checked.

3.2 PHP5 Extentions

Note: If you need to install PDF-Lite, please do the following:

fetch ftp://ftp.swin.edu.au/gentoo/distfiles/PDFlib-Lite-7.0.2.tar.gz
sudo mv PDFlib-Lite-7.0.2.tar.gz /usr/ports/distfiles/

Go to the php5 extensions port directory by typing the command:

cd /usr/ports/lang/php5-extensions

Make sure sockets is selected.

Install the port by typing:

make install clean

Install the php.ini file:

cp /usr/local/etc/php.ini-dist /usr/local/etc/php.ini

3.3 Enable PHP in Apache

3.3.1 httpd.conf

Edit the Apache configuration file ”’/usr/local/etc/apache22/httpd.conf”’ and add the following lines to the end of the file:

AddType application/x-httpd-php .php
AddType application/x-httpd-php-source .phps

Replace this line:

DirectoryIndex index.html

by the following:

DirectoryIndex index.php index.html
3.3.2 httpd-languages.conf

Edit the Languageconfiguration file ”’/usr/local/etc/apache22/extra/httpd-languages.conf”’ and add the following lines to the end of the file:

AddDefaultCharset On

Startup the Apache:

/usr/local/etc/rc.d/apache22 start

4. MEMCached

Go to the pecl-memcache port directory by typing the command:

cd /usr/ports/databases/pecl-memcache

Install the port by typing:

make install clean

Go to the memcached port directory by typing the command:

cd /usr/ports/databases/memcached

Install the port by typing:

make install clean

Open the configuration file: ”’/etc/rc.conf”’ and add the following at the end of the file:

memcached_enable="YES"

To start using MemCached without rebooting, type:

/usr/local/bin/memcached -d -u nobody

–Derrick

Our sponsors: