Today I was trying to install ZFS on a CentOS 7 box. Typically rebooting the computer, the ZFS mododule will be turned on. However, it didn’t turn on in my case.
Failed to load ZFS module stack.
Load the module manually by running 'insmod /zfs.ko' as root.
So I tried to turn on the module:
#sudo modprobe zfs
modprobe: ERROR: could not insert 'zfs': Required key not available.
Turn out this is a newer machine with UEFI available. It has something to do with the secure boot. After I reboot the machine and log in to the BIOS menu, turn on the secure boot feature, and everything is working again.
ZFS is the next generation file system. Unfortunately, it won’t be shipped with Linux because of legal/licensing issues. Fortunately, it is possible to install it (ZFS on Linux) in few commands. Since 2013, I have set up a number of Linux (CentOS/RHEL) servers with ZFS for use in a high traffic production environment. They include high-end commercial grade server (Xeon-based + ECC memory), gaming quality desktop (i7-based) and entry-level consumer grade computer (i3). In this article, I will discuss about what I have learned from my experience.
Warning on ZFS on Linux
ZFS on Linux is not a robust solution to implement ZFS on Linux because it has a very important (and impossible) requirement: The system will never get updated and rebooted. If you cannot meet this requirement (obviously), be prepare to spend tons of hours to fix the problem and get your data back. See how I fix the problem created by ZFS on Linux here. If you prefer rock solid and reliable way, you have to go with *BSD or Solaris.
Summary
Life is short. If you don’t want to waste your time to go through the entire article, here is my advice: Use FreeBSD (or *BSD) if possible. Using ZFS on Linux is like putting a giraffe in the wild Alaska. It is not going to work. However, we may want to stick with one operating system for server for various reasons. Therefore, I’ve come up some advice for you if you really want to run ZFS on Linux:
Use a commercial grade server when it is possible. A bare-bone entry-level Dell Power Edge T110 II (starting from US$300) is sufficient to run ZFS as a low traffic, light load, nightly backup server. Consumer grade computer is not recommended for use in ZFS/Linux. If you really need one, get a computer with gaming quality grade components and always back up the data on a different server.
Linux kernel plays an important role to ZFS. Try to use v.3 (e.g., RHEL 7) when possible. Using ZFS with v. 2.6 (e.g., RHEL 6) may cause some unexpected problem to non-commerical grade hardware. As of October 2019, I cannot make version 4 (e.g., install via kernel-ml or CentOS 8) works with ZFS on RHEL 7:
Loading new spl-0.6.5.9 DKMS files...
Building for 4.11.2-1.el7.elrepo.x86_64
Building initial module for 4.11.2-1.el7.elrepo.x86_64
configure: error: unknown
Error! Bad return status for module build on kernel: 4.11.2-1.el7.elrepo.x86_64 (x86_64)
Consult /var/lib/dkms/spl/0.6.5.9/build/make.log for more information.
Set up your ZFS with the hard drive identifier (e.g., /dev/disk/by-id/someid), not the generic device id (e.g., /dev/sda).
You may lose some storage space (smaller than 1%) comparing to the same setup in FreeBSD. But the amount is trivial.
If you already install ZFS on Linux, try to exclude the kernel from system update. The system will not load the ZFS after reboot, and it will take some extra work to get ZFS running again.
Some Linux distributions such as CentOS 7 will not load ZFS at the boot time. You can solve this problem by using cron job. If you have other services (e.g., MySQL, NFS, Apache) that depends on the ZFS, you will need to restart them.
I’ve wrote an article on how to rescue your ZFS file system after updating the kernel. Please click here for details.
ZFS is not native in Linux. The whole idea of ZFS on Linux is nothing more than a brunch of modules being injected to the kernel, such that the kernel will load the ZFS at boot time. This is a fantastic idea because it will not introduce the performance problem like ZFS/FUSE (running on the user land, i.e., very slow). However, there is a potential problem here. This “injection” only happens when a ZFS module (zfs-kmod) is needed to be installed or updated. During this process, the system will download the latest copy of the zfs-kmod and injecting it to the current running kernel. See the problem here?
That being said, running root (/) on ZFS in Linux is a very very bad idea. You will not be able to access anything when the ZFS is not available at the kernel level.
So we have four different situations here after hitting the update command:
Kernel has new update
Kernel has no update
zfs-kmod has new update
Yes. Your ZFS will be available after the reboot.
Yes. Your ZFS will be available after the reboot.
zfs-kmod has no update
No. Your ZFS will not be available after the reboot.
Yes. Your ZFS will be available after the reboot
In general, if you really need to update the kernel, you will need to update the kernel first, reboot to the new kernel (ZFS will be missing), and re-run the process such that ZFS module will be injected to the new kernel. Some people may recommend to uninstall the zfs-kmod and reinstall it again. Unless you have a very strong reason to use the latest kernel (e.g., you’ve got plenty of spare time), otherwise I won’t recommend doing it because the whole process is a pain.
Another thing you can do is to disable the auto update. Only update the system when there is a new update for both kernel and the zfs-kmod. Then you can update the kernel first, reboot, and then update the zfs-kmod after the reboot. However, keep in mind that you will run into some problem eventually. Many packages depend on the newer kernel, if you try to update the system, it will complaint because you will need to update the kernel first before updating those packages. You can get around by skipping the broken packages (yum update –skip-broekn).
In my settings, I simply exclude the kernel from the update. That way I only need to work with one kernel, and I know that that particular kernel knows how to handle ZFS module.
sudo nano /etc/yum.conf

exclude=kernel*
In case you are running into trouble, i.e., ZFS is missing in the latest kernel, you can try doing the following:
Before running the following commands, make sure that you know what you are doing.
#Make sure that you reboot to the kernel you want to fix.
#Find out what is the current kernel
uname -a
Linux 3.10.0-514.2.2.el7.x86_64 #1 SMP Tue Dec 6 23:06:41 UTC 2016 x86_64 x86_64 x86_64 GNU/Linux

#In my example, it is:
3.10.0-514.2.2.el7.x86_64


#Basically we want to remove the following files:
ls -al /lib/modules/your_new_kernel/extra
-rw-r--r-- 1 root root 344K Dec 12 15:58 splat.ko
-rw-r--r-- 1 root root 167K Dec 12 15:58 spl.ko
-rw-r--r-- 1 root root  14K Dec 12 16:02 zavl.ko
-rw-r--r-- 1 root root  75K Dec 12 16:02 zcommon.ko
-rw-r--r-- 1 root root 2.2M Dec 12 16:02 zfs.ko
-rw-r--r-- 1 root root 130K Dec 12 16:02 znvpair.ko
-rw-r--r-- 1 root root  34K Dec 12 16:02 zpios.ko
-rw-r--r-- 1 root root 324K Dec 12 16:02 zunicode.ko

#If you have no extra modules installed other than ZFS and SPL, you can run the following:
sudo rm -Rf /lib/modules/*/extra/*

#Otherwise just remove the files one by one.


#And we want to do the same thing to the weak-updates.
ls -al /lib/modules/your_new_kernel/weak-updates

drwxr-xr-x. 2 root root 4.0K Sep 16 10:58 .
drwxr-xr-x. 7 root root 4.0K Sep 16 10:58 ..
lrwxrwxrwx  1 root root   54 Sep 16 10:56 splat.ko -> /lib/modules/2.6.32-573.18.1.el6.x86_64/extra/splat.ko
lrwxrwxrwx  1 root root   52 Sep 16 10:56 spl.ko -> /lib/modules/2.6.32-573.18.1.el6.x86_64/extra/spl.ko
lrwxrwxrwx  1 root root   53 Feb 22  2016 zavl.ko -> /lib/modules/2.6.32-573.18.1.el6.x86_64/extra/zavl.ko
lrwxrwxrwx  1 root root   56 Feb 22  2016 zcommon.ko -> /lib/modules/2.6.32-573.18.1.el6.x86_64/extra/zcommon.ko
lrwxrwxrwx  1 root root   52 Sep 16 10:58 zfs.ko -> /lib/modules/2.6.32-573.18.1.el6.x86_64/extra/zfs.ko
lrwxrwxrwx  1 root root   56 Sep 16 10:58 znvpair.ko -> /lib/modules/2.6.32-573.18.1.el6.x86_64/extra/znvpair.ko
lrwxrwxrwx  1 root root   54 Feb 22  2016 zpios.ko -> /lib/modules/2.6.32-573.18.1.el6.x86_64/extra/zpios.ko
lrwxrwxrwx  1 root root   57 Feb 22  2016 zunicode.ko -> /lib/modules/2.6.32-573.18.1.el6.x86_64/extra/zunicode.ko


#If you have no extra modules installed other than ZFS and SPL, you can run the following:
sudo rm -Rf /lib/modules/*/weak-updates/*


#Otherwise just remove the files one by one.


#Now, let's get into the fun part. We will remove them and reinstall them.
#Don't forget to match your version.
sudo dkms remove zfs/0.6.5.8 --all
sudo dkms remove spl/0.6.5.8 --all
sudo dkms --force install spl/0.6.5.8
sudo dkms --force install zfs/0.6.5.8
And we will verify the result.
#sudo dkms status
spl, 0.6.5.8, 3.10.0-514.2.2.el7.x86_64, x86_64: installed
zfs, 0.6.5.8, 3.10.0-514.2.2.el7.x86_64, x86_64: installed
zfs, 0.6.5.8, 3.10.0-327.28.3.el7.x86_64, x86_64: installed-weak from 3.10.0-514.2.2.el7.x86_64
The Kernel Version Matters
The kernel version does matter, and I will avoid using version 2.6 or below if you don’t have a professional grade hardware, such as Xeon CPU. Here is my comment:
Hardware
Linux Kernel (v.2.6)
Linux Kernel (v.3)
FreeBSD 9 & 10
Dell Power Edge T100 II (Intel Xeon E3-1240 V2, 8GB memory, US$250)
Stable
Stable
Stable
Dell Power Edge T320 (Intel Xeon E5-2430, 64GB memory, US$2,000)
However, it doesn’t mean that you should always use the latest kernel. Remember one thing, always keep a copy of the previous kernel before switching to the latest one. You never know whether ZFS will work with the latest one or not. For example, I have a big trouble to get ZFS working with 2.6.32-573.7.1.el6.x86_64, which is the latest kernel available on CentOS 6.7 (as of Oct 26, 2015). I ended up switching the system to 2.6.32-573.3.1.el6.x86_64 (-1 kernel). So always test the system before making the switch.
The Hard Drive Identifier
Set up your ZFS with the unique, non-changeable hard drive identifier (e.g., /dev/disk/by-id/wwn-0x1234c567890d0aaa). Do not use the generic device id (e.g., /dev/sda). When you reboot the system, the generic device id (/dev/sda) may get changed. This will be a problem to the ZFS.
For example, when RHEL 7 names the hard drive, it will name the hard drives that are attached directly to the motherboard first, these includes USB flash drives, SD card etc. After that, it will name the hard drives that are attached to the PCIe raid card. When you boot the computer with a USB flash drive attached, and if the USB flash drive was not available at the time you set up the ZFS, this small change is good enough to mess up your ZFS.
Here is an example:
History for 'storage':
zpool create -f storage raidz /dev/disk/by-id/wwn-0x5000c500206e46d4 \
                              /dev/disk/by-id/wwn-0x5000c500205eba0d \
                              /dev/disk/by-id/wwn-0x50014ee25a9074e2 \
                              /dev/disk/by-id/wwn-0x50024e9001c19fb2
So far I only noticed this problem with low-end / consumer grade motherboard. However, this is not a problem with FreeBSD because it is smart enough to re-map the old values.
The Stability
For some odd reasons, the ZFS will be unstable or even unavailable when the I/O is heavy:
  pool: storage
 state: DEGRADED
  scan: none requested
status: One or more devices could not be opened.  Sufficient replicas exist for
        the pool to continue functioning in a degraded state.
config:

        NAME                        STATE     READ WRITE CKSUM
        storage                     DEGRADED     0     0     0
          raidz1-0                  DEGRADED     0     0     0
            wwn-0x5000c500206e46d4  ONLINE       0     0     0
            wwn-0x5000c500205eba0d  ONLINE       0     0     0
            wwn-0x50014ee25a9074e2  ONLINE       0     0     0
            wwn-0x50024e9001c19fb2  UNAVAIL      0     0     0
This kind of problem happens mainly with low-end consumer grade computer with older kernel. Once I upgraded the kernel to a newer version, the problem is gone. No hardware change is needed. Again, I’ve never experienced this kind of problem since FreeBSD 9. The only explanation I can think of is the older Linux Kernel does not support ZFS and low-end computer very well.
Load ZFS at Boot
Some Linux variants such as CentOS 7 will not load ZFS at boot (in my case, my kernel is 3.10.0-327.28.3.el7.x86_64). I choose to run the ZFS via cron job. What if the ZFS contains the files that are required by some service, e.g, your database or web server files are on ZFS? You will need to restart those services after loading the ZFS. Here is an example:
sudo nano /etc/crontab

#Example 1: Load all available ZFS pools
@reboot         root    sleep 20; zpool import -a;

#Example 2: Load all ZFS pools first, then restart the Apache, MySQL and NFS services
@reboot         root    sleep 20; zpool import -a; sleep 15; systemctl restart httpd.service && systemctl restart mariadb.service && systemctl restart nfs-server;
I always wanted to find out the performance difference among different ZFS types, such as mirror, RAIDZ, RAIDZ2, RAIDZ3, Striped, two RAIDZ vdevs vs one RAIDZ2 vdev etc. So I decide to create an experiment to test these ZFS types. Before we talk about the test result, let’s go over some background information, such as the details of each design and the hardware information.
Background
Here is a machine I used for experiment. It is a consumer grade desktop computer manufactured back in 2014:
CPU: Intel(R) Core(TM) i7-4770 CPU @ 3.40GHz / quard cores / 8 threads
OS: CentOS Linux release 7.3.1611 (Core)
Kernel: Linux 3.10.0-514.6.1.el7.x86_64 #1 SMP Wed Jan 18 13:06:36 UTC 2017 x86_64 x86_64 x86_64 GNU/Linux
Memory: 20 GB (2GB x 4)
Hard drives: 5 TB x 8
(Every hard drive is 4k sectors, non-SSD, consumer grade, connected via a PCI-e x 16 raid card with SAS interface)
System Settings: Everything is system default. Nothing has been done to the kernel configuration.
Also, I tried to keep each test simple. Therefore I didn’t do anything special:
To optimize the I/O performance, the block size of the zpool is based on the physical sector of the hard drive. In my case, all of the hard drives have 4k (4096 bytes) sectors, which is translated to 2^12, therefore, the ashift value of the zpool is 12.
zdb | grep ashift
ashift: 12
To measure the write performance, I first generate a zero based file with the size of 41GB and output to the zpool directly. To measure the read performance, I read the file and output to /dev/null. Notice that the file size is very large (41GB) such that it does not fit in the arc cache memory (50% of the system memory, i.e., 10GB). Notice that the block size is the physical sector of the hard drive.
One of the readers asked me why I use a large file instead of many small files. There are few reasons:
It is very easy to stress test / saturate the bandwidth (connection in between the hard drives, network etc) when working with large file.
The results of testing large files is more consistent.
#To test the write performance:
dd if=/dev/zero of=/myzpool/data/file.out bs=4096 count=10000000

#To test the read performance:
dd if=/myzpool/data/file.out of=/dev/null bs=4096
FYI, if the block size is not specified, the result can be very different:
After each test, I destroyed the zpool and created a different one. This ensures that the environment factors (such as hardware and OS) stay the same. Here is the test result. If you want to learn more about each design, such as the exact command I used for each test, the corresponding material will be available in the later section.
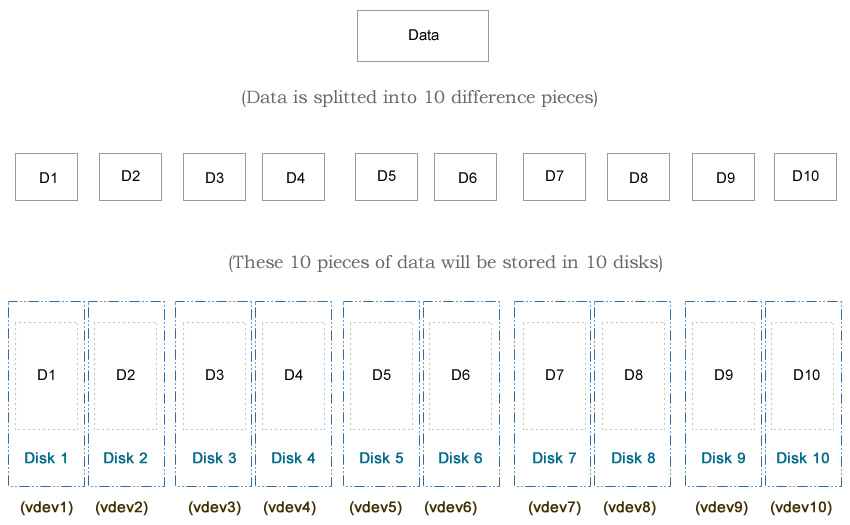
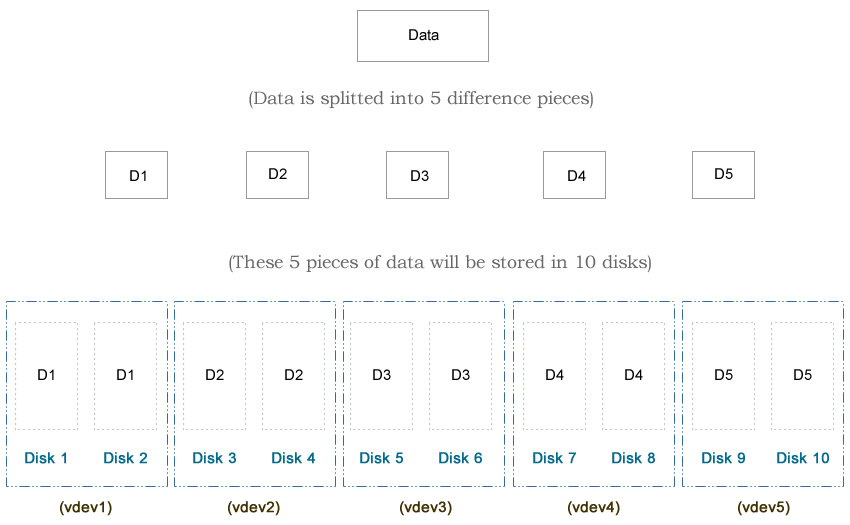
Notice that I used eight 5TiB hard drives (Total: 40TiB) in this test. Typically hard drive of 5TiB of can hold about 4.5 TB of data, that’s around 86%-90% of the advertised number, depending on which OS you are using. For example, if we use the striped design, which is the maximum possible storage capacity in ZFS, the usable space will be 8 x 5TiB x 90% = 36TB. Therefore, the following percentages will be based on 36TB rather than 40TiB.
You may notice that I use 10 disks in each diagram, while I use only 8 disks in the article here. That’s because the diagram was from my first edit. At that time I used a relative old machine, which may not reflect the modern ZFS design. The hardware and the test methods I used in the second edit is better, although both edits draw the same conclusion.
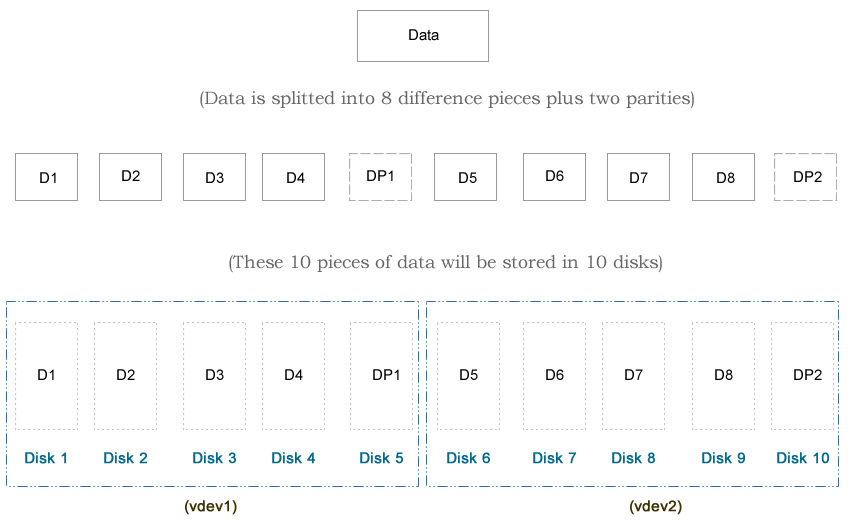
In this design, we split the data into two groups. In each group, we store the data in a RAIDZ1 structure. This is similar to RAIDZ2 in terms of data protection, except that this design supports up to one failure disk in each group (local scale), while RAIDZ2 allows ANY two failure disks overall (global scale). Since we use two disks for parity purpose, the usable space drops from 36TB to 26TB.
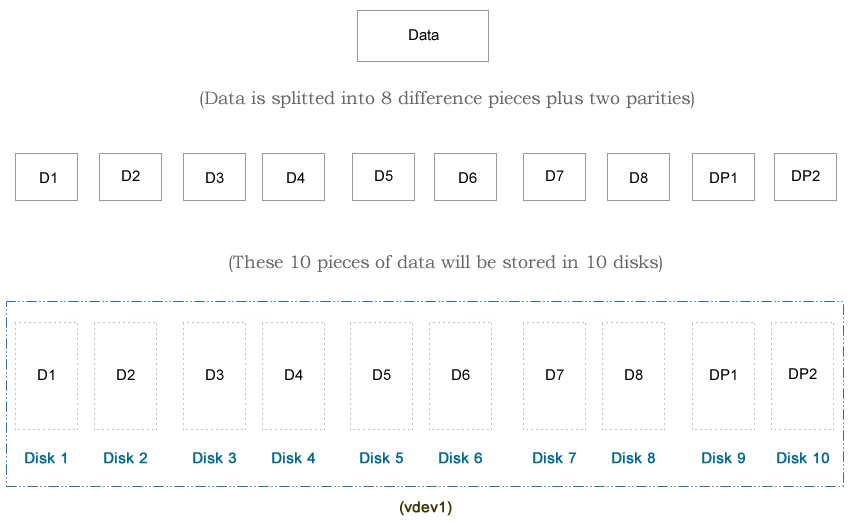
In this design, we use two disks for data protection. This allow up to two disks fail without losing any data. The usable space will drop from 36TB to 25TB.
In this design, we use one disk for data protection. This allow up to one disk fails without losing any data. The usable space will drop from 36TB to 30TB.
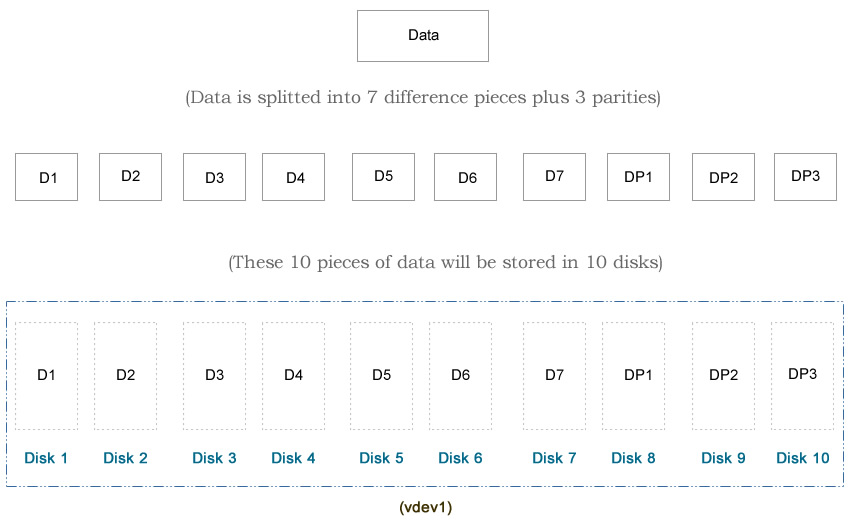
In this design, we use three disks for data protection. This allow up to three disks fail without losing any data. The usable space will drop from 36TB to 21TB.
In this design, we split the data into two groups. In each group, we store the data in a RAIDZ2 structure. Since we use two disks for parity purpose, the usable space drops from 36TB to 18TB.
I am not surprised that the striped layout offers the fastest writing speed and maximum storage space. The only drawback is zero data protection. Unless you mirror the data at the server level (e.g., Hadoop), or the data is not important, otherwise I won’t recommend you to use this design.
Personally I recommend to go with Striped RAIDZ, i.e., we try to make multiple RAIDZ vdev, and each vdev has no more than 5 disks. In theory, ZFS recommends the number of disks in each vdev is no more than 8 to 9 disks. Based on my experience, ZFS will slow down when it has about 30% free space left if we have too many disks in one single vdev.
So which design you should use? Here is my recommendation:
#Do you care your data?
No: Go with striped.
Yes: See below:

#How many disks do you have?
1:     ZFS is not for you.
2:     Mirror
3-5:   RAIDZ1
6-10   RAIDZ1 x 2
10-15: RAIDZ1 x 3
16-20: RAIDZ1 x 4
And yes, you can pretty much forget about RAIDZ2, RAIDZ3 and mirror if you need speed and data protection together.
So, you may ask a question, what should I do if there are more than one hard drive fail? The answer is: You need to keep an eye on the health of your ZFS pool every day. I have been managing over 60 servers since 2009, and I’ve used only RAIDZ1 with my consumer level harddrives (most of them actually was taken from the external harddrives). So far I don’t have any data lost.
sudo zpool status -v

or

sudo zpool status -v | grep 'state: ONLINE'
Simply write a program to get the result from this command, and send yourself an email if there is anything go wrong. You can include the program in your cron job and have it run daily or hourly. This is my version:
#!/bin/bash

result=`sudo zpool status -x`

if [[ $result != 'all pools are healthy' ]]; then
        echo "Something is wrong."
        #Do something here such as send an email, such as sending an email via HTTP...
        /usr/bin/wget "http://example.com/send_email.php?subject=Alert&body=File%20System%20Has%20Problem" -O /dev/null > /dev/null
        exit 1;
fi
In this tutorial, I will show you how to improve the performance of your ZFS using the affordable consumer-grade hardware (e.g., Gigabit network card, standard SATA non-SSD hard drives, consumer-grade motherboard etc.).
Many people found a problem on their ZFS system. The speed is slow! It is slow to read or write files to the system. In this article, I am going to show you some tips on improving the speed of your ZFS file system.
Notice that this article was originally based on ZFS on FreeBSD. Although most concepts can be applied to Linux, you may want to check out these two articles: ZFS: Linux VS FreeBSD and ZFS On Linux Emergency Recovery Guide. I always go back to the second article to rescure my ZFS data after rebooting my Linux server to a newer kernel.
This article is about how to build a single node ZFS server. If you are interested in implementing multiple-nodes ZFS system / ZFS clusters, please check here for details.
Improve ZFS Performance: Step 1
A Good 64-bit CPU + Lots of Memory
Traditionally, we are told to use a less powerful computer for a file/data server. That’s not true for ZFS. ZFS is more than a file system. It uses a lot of resources to improve the performance of the input/output, such as compressing data on the fly. For example, suppose you need to write a 1GB file. Without enabling the compression, the system will write the entire 1GB file on the disk. With the compression being enabled, the CPU will compress the data first, and write the data on the disk after that. Since the compressed data is smaller, it takes shorter time to write to the disk, which results a higher writing speed. The same thing can be applied for reading. ZFS can cache the file for you in the memory, it will result a higher reading speed.
That’s why a 64-bit CPU and higher amount of memory is recommended. I recommended at least a Quad Core CPU with 4GB of memory (Personally I use Xeon and i7, with at least 20GB of memory).
Please make sure that the memory modules should have the same frequencies/speed. If you mix them with different speed, try to group the memories with same speed together., e.g., Channel 1 and Channel 2: 1333 MHz, Channel 3 and Channel 4: 1600 MHz.
Let’s do a test. Suppose I am going to create a 10GB file with all zero. Let’s see how long does it take to write on the disk:
#CPU: i7 920 (A 4 cores/8 threads CPU from 2009) + 24GB Memory + FreeBSD 9.3 64-bit
#dd if=/dev/zero of=./file.out bs=1M count=10k
10737418240 bytes transferred in 6.138918 secs (1749073364 bytes/sec)
That’s 1.6GB/s! Why is it so fast? That’s because it is a zero based file. After the compression, a compressed 10GB file may result in few bytes only. Since the performance of the compression is highly depended on the CPU, that’s why a fast CPU matters.
Now, let’s do the same thing on a not-so-fast CPU:
Update: This section was written based on FreeBSD 8. As of today (February 12, 2017), the latest version is FreeBSD 11. I noticed that my FreeBSD/ZFS works very stable even without any tweaking! In the other words, you may skip this section if you are using FreeBSD 8.2 or later.
Many people complain about ZFS for its stability issues, such as kernel panic, reboot randomly, crash when copying large files (> 2GB) at full speed etc. It may have something to do with the boot loader settings. By default, ZFS will not work smoothly without tweaking the system parameters system. Even FreeBSD (9.1 or earlier) claims that no tweaking is necessary for 64-bit system, my FreeBSD server crashes very often when writing large files to the pool. After trial and error for many times, I figure out few equations. You can tweak your boot loader (/boot/loader.conf) using the following parameters. Notice that I only tested the following on FreeBSD. Please let me know whether the following tweaks work on other operating systems.
If you experiences kernel panic, crash or something similar, it could be the hardware problem, such as memory. I encourage to test all memory modules by using Memtest86+ first. I wish someone told me about this few years ago. That would make my life a lot easier.
Warning: Make sure that you save a copy before doing anything to the boot loader. Also, if you experience anything unusual, please remove your changes and go back to the original settings.
#Assuming 8GB of memory

#If Ram = 4GB, set the value to 512M
#If Ram = 8GB, set the value to 1024M
vfs.zfs.arc_min="1024M"

#Ram x 0.5 - 512 MB
vfs.zfs.arc_max="3584M"

#Ram x 2
vm.kmem_size_max="16G"

#Ram x 1.5
vm.kmem_size="12G"

#The following were copied from FreeBSD ZFS Tuning Guide
#https://wiki.freebsd.org/ZFSTuningGuide

# Disable ZFS prefetching
# http://southbrain.com/south/2008/04/the-nightmare-comes-slowly-zfs.html
# Increases overall speed of ZFS, but when disk flushing/writes occur,
# system is less responsive (due to extreme disk I/O).
# NOTE: Systems with 4 GB of RAM or more have prefetch enabled by default.
vfs.zfs.prefetch_disable="1"

# Decrease ZFS txg timeout value from 30 (default) to 5 seconds.  This
# should increase throughput and decrease the "bursty" stalls that
# happen during immense I/O with ZFS.
# http://lists.freebsd.org/pipermail/freebsd-fs/2009-December/007343.html
# http://lists.freebsd.org/pipermail/freebsd-fs/2009-December/007355.html
# default in FreeBSD since ZFS v28
vfs.zfs.txg.timeout="5"

# Increase number of vnodes; we've seen vfs.numvnodes reach 115,000
# at times.  Default max is a little over 200,000.  Playing it safe...
# If numvnodes reaches maxvnode performance substantially decreases.
kern.maxvnodes=250000

# Set TXG write limit to a lower threshold.  This helps "level out"
# the throughput rate (see "zpool iostat").  A value of 256MB works well
# for systems with 4 GB of RAM, while 1 GB works well for us w/ 8 GB on
# disks which have 64 MB cache.

# NOTE: in v27 or below , this tunable is called 'vfs.zfs.txg.write_limit_override'.
vfs.zfs.write_limit_override=1073741824
Don’t forget to reboot your system after making any changes. After changing to the new settings, the writing speed improves from 60MB/s to 80MB/s, sometimes it even goes above 110MB/s! That’s a 33% improvement!
By the way, if you found that the system still crashes often, the problem could be an uncleaned file system.
After a system crashes, it may cause the file links to be broken (e.g., the system sees the file tag, but unable to locate the files). Usually FreeBSD will automatically run fsck after the crash. However, it will not fix the problem for you. In fact, there is no way to clean up the file system when the system is running (because the partition is mounted). The only way to clean up the file system is by entering the Single User Mode (a reboot is required).
After you enter the single user mode, make sure that each partition is cleaned. For example, here is my df result:
These command will clean up the affected file systems.
After the clean-up is done, type reboot and let the system to boot to the normal mode.
Improve ZFS Performance: Step 3
Use disks with the same specifications
A lot of people may not realize the importance of using exact the same hardware. Mixing different disks of different models/manufacturers can bring performance penalty. For example, if you are mixing a slow disk (e.g., green disk) and a fast disk(e.g., performance disk) in the same virtual device (vdev), the overall speed will depend on the slowest disk. Also, different hard drives may have different sector size. For example, Western Digital releases a hard drive with 4k sector, while the older models use 512 byte. Mixing hard drives with different sectors can bring performance penalty too. Here is a quick way to check the model of your hard drive:
If you don’t have enough budget to replace all disks with the same specifications, try to group the disks with similar specifications in the same vdev, e.g.,
You can also verify the ashift value using this command:
sudo zdb | grep shift
Let’s say we have a group of hard drives with 4k sector, we create two ZFS, one with ashift=12, and another one with the default value (ashift=9), here is the difference:
I recently built a Linux-based ZFS file system with 12 hard disks. For some reasons, it was pretty unstable. When I tried filling the pool with 12TB of data, the ZFS system crashed randomly. When I rebooted the machine, the error was gone. However, when I resumed the copy process again, the error happened on a different disk. In short, the disks failed randomly. When I checked the dmesg, I found something like the following. Since I didn’t have the exact copy, I grabbed something similar from the web:
Basically, this message means the disk was failed during writing the data. Initially I thought it could be the SMART/bad sectors. However, since the problem happened randomly on random disks, I think the problem could be something else. I have tried to replacing the SATA cable, power cable etc. None of them worked. Finally, I upgraded my power supply (450W to 600W), and the error was gone.
FYI, here is the specs of my affected system. Notice that I didn’t use any component that required high-power such as graphic card etc.
CPU: Intel Q6600
Standard motherboard
PCI RAID Controller Card with 4 SATA ports
WD Green Drive x 12
CPU fan x 1
12″ case fan x 3
And yes, you will need a 600W power supply for such a simple system. Also, another thing worth to check is the power cable. Sometimes, using 15 pin power cable (the one for SATA drive) is better than 4pin to 15 pin converter (IDE to SATA converter).
Improve ZFS Performance: Step 5
Compression
ZFS supports compressing the data on the fly. This is a nice feature that improves the I/O speed – only if you have a high speed CPU (such as Quad core or higher). If your CPU is not fast enough, I don’t recommend you to turn on the compression feature, because the benefit from reducing the file size is smaller than the time spent on the CPU computation. Also, the compression algorithm plays an important role here. ZFS supports two compression algorithms, LZJB and GZIP. I personally use lz4 (See LZ4 vs LZJB for more information) because it gives a better balance between the compression radio and the performance. You can also use GZIP and specify your own compression ratio (i.e., GZIP-N). FYI, I tried GZIP-9 (The maximum compression ratio available) and I found that the overall performance gets worse even on my i7 with 12GB of memory.
There is no solid answer here because it all depends on what kind of files you store. Different files such as large file, small files, already compressed files (such as mp4 video) need different compression settings.
If you cannot decide, just go with lz4. It can’t be wrong:
#Try to use lz4 first.
sudo zfs set compression=lz4 mypool

#If you system does not support lz4, try to use lzjb
sudo zfs set compression=lzjb mypool
Improve ZFS Performance: Step 6
Identify the bottle neck
Sometimes, the limit of the ZFS I/O speed is closely related to the hardware. For example, I set up a network file system (NFS) that is based on ZFS. Most of the time, I mainly transfer the data in between the servers, rather than within the same server. Therefore, the maximum I/O speed I could get is the capacity of my network card, which is 125MB/s. On average, I can reach to 100-110 MB/s, which is pretty good for consumer grade network adapter.
One day, I decide to explore the options on network bonding, which combines multiple network adapters together on the same server. In theory, it multiplies the bandwidth, and it will increase the ZFS I/O speed.
I set up network bonding on a machine with two network cards. It was a CentOS 7 box with bonding mode: 6 (adaptive load balancing). I was able to double the I/O speed in both network and ZFS.
sudo cat /proc/net/bonding/bond0
Ethernet Channel Bonding Driver: v3.7.1 (April 27, 2011)

Bonding Mode: adaptive load balancing
Primary Slave: None
Currently Active Slave: em2
MII Status: up
MII Polling Interval (ms): 1
Up Delay (ms): 0
Down Delay (ms): 0

Slave Interface: em1
MII Status: up
Speed: 1000 Mbps
Duplex: full
Link Failure Count: 0
Permanent HW addr: 20:27:47:91:a3:a8
Slave queue ID: 0

Slave Interface: em2
MII Status: up
Speed: 1000 Mbps
Duplex: full
Link Failure Count: 0
Permanent HW addr: 20:27:47:91:a3:aa
Slave queue ID: 0
Improve ZFS Performance: Step 7
Keep your ZFS up to date
By default, ZFS will not update the file system itself even if a newer version is available on the system. For example, I created a ZFS file system on FreeBSD 8.1 with ZFS version 14. After upgrading to FreeBSD 8.2 (which supports ZFS version 15), my ZFS file system was still on version 14. I needed to upgrade it manually using the following commands:
ZFS has three types of cache, ARC and L2ARC. ARC is a ram-based cache, and L2ARC is disk-based cache. If you want to have a super-fast ZFS system, you will need A LOT OF memory. How much? I have a RHEL 7 based data center running NFS on top of a ZFS file system. Its the storage capacity is 48TB (8 x 8TB, running RAIDZ1), and I have 96GB of memory. The I/O is about 1.5TB a day. Is the memory too much? I can tell you that sometimes it causes kernel problem because of running out of memory.
In general, you will need lots of memory for ARC cache (ram-based), and L2ARC (disk-based) is optional. Depending on which operating system you are using (in my case, I use RHEL 7 and FreeBSD), the settings can be very different. Let’s talk about the arc cache first.
By default, when you read a file from ZFS for the first time, ZFS will read the file from the disk. However if it is frequently used, ZFS will put the file in the ARC cache, which is your memory. Now we have something interesting. How much memory should you allow ZFS to use for ARC caching? You don’t want to use too little because it will increase accessing the disk, which will slow down the system. On the other hand, you don’t want to use too much because you want to reserve the memory for your operating system and other services. For FreeBSD, depend on which version you are using, it will either use 90% of the memory for ARC, or use all but 1GB of memory. For ZFS on Linux with RHEL 7, it will use about 50% of the memory.
You can monitor the ARC usage here:
#FreeBSD
zfs-stats -A

------------------------------------------------------------------------
ZFS Subsystem Report                            Sun Feb 12 22:34:19 2017
------------------------------------------------------------------------

ARC Summary: (HEALTHY)
        Memory Throttle Count:                  0

ARC Misc:
        Deleted:                                247.52m
        Recycle Misses:                         0
        Mutex Misses:                           68.86k
        Evict Skips:                            778.88k

ARC Size:                               75.04%  16.76   GiB
        Target Size: (Adaptive)         74.94%  16.74   GiB
        Min Size (Hard Limit):          12.50%  2.79    GiB
        Max Size (High Water):          8:1     22.33   GiB

ARC Size Breakdown:
        Recently Used Cache Size:       73.41%  12.30   GiB
        Frequently Used Cache Size:     26.59%  4.46    GiB

ARC Hash Breakdown:
        Elements Max:                           1.40m
        Elements Current:               68.50%  956.10k
        Collisions:                             50.63m
        Chain Max:                              7
        Chains:                                 94.61k

------------------------------------------------------------------------


#ZFS on Linux
arcstat

    time  read  miss  miss%  dmis  dm%  pmis  pm%  mmis  mm%  arcsz     c
22:33:36     0     0      0     0    0     0    0     0    0    53G   53G
If you are using FreeBSD (the most advanced operating system in the world), you don’t need to tweak your system settings at all. ZFS is part of the FreeBSD kernel, and FreeBSD has excellent memory management. Therefore, you do not need to worry about ZFS using too much memory of your system. In fact, I’ve never crashed a FreeBSD system because of using too much memory. If you know how to do it, please show me how to do it.
If you want to tweak the ARC size, you can do it via /boot/loader.conf:
If you are using Linux, you may want to do some extra work to make your system stable. The default settings will get you to the bottom of the mountain, and you will need to do some climbing to reach the peak.
First, you want to check the arc size:
arcstat (or arcstat.py depending on the version of your ZFS on Linux)
Now you will need to think about how much memory you want to reserve for ZFS. This is a tough question, and you can’t really expect Linux works like FreeBSD. Remember, Linux does not have a good memory management system like FreeBSD. It is very easy to crash the system if you do something wrong. That is one of the reasons why ZFS on Linux uses only 50% of the memory by default, because they know Linux (Linux is not a high performance operating system without some tweaking). This could be the reason why Red Hat (the maker of RHEL) does not support ZFS on Linux. Anyway, here is how to tweak the memory:
sudo nano /etc/modprobe.d/zfs.conf

#Min: 4GB
options zfs zfs_arc_min=4000000000

#Max: 8GB (Don't exceed maximum amount of ram minus 4GB)
options zfs zfs_arc_max=8000000000
Don’t forget to reboot the server.
Many people suggest using a 2GB rule, i.e., you reserve 2GB of memory for your system, and you leave the rest to ZFS. For example, if you have 32GB of memory, you may set the maximum to 30GB. Personally I don’t recommend this as it is too risky. I have multiple Linux boxes running as light NFS servers (each NFS server has 32GB of memory, four HDD with SSD disk as ZFS read cache, serves no more than 3 clients). For some odd reasons, I’ve noticed low memory warning and relatively high swap usage. Of course, this is casuing the kenel OOM killer to step in, killing my running processes until the Linux kernel can allocate memory again. Some people think this is a Linux kernel bug and they hope it will be fixed.
When I set up Linux, I highly recommend having at least 20GB for the swap. If for any reason the ZFS is eating all of your available memory, you still have swap as backup. Otherwise your system will crash.
FYI, tweaking the memory usage of ZFS ARC is more than entering some numbers. You need to think of the whole picture. Memory is a very valuable resource. You will need to decide how do use them effectively and efficiently. You can’t expect a single server running web server, database, NFS, virtual machine host all together on top of a ZFS system, and giving you a very high performance at the mean time. You need to distribute the workload across multiple servers. For example, here is what I use in a production environment:
Server 1: A NFS host
– Running NFS only
– Have network bonding based on multiple network interfaces. This will multiply the bandwidth.
– Support other servers such as web server, databases, virtual machine host etc.
Server 2: A virtual machine host
– Running Virtual Box
– Guest systems that have higher I/O requirement are hosted in a local SSD drive with standard partitions (non-ZFS).
– Guest systems that have lower I/O requirement are hosted on a different ZFS server, connected via NFS.
– All of the system memory will be used for running virtual machines.
Server 3: A web server
– Running Apache + PHP + MySQL
– The PHP code is hosted locally.
– The large static files is hosted on the NFS server. In my case, I have over 20TB static content.
– All of the system memory will be used for running Apache / PHP / MySQL executions.
Of course, I am not talking about ZFS does not work well with Apache / PHP / MySQL. I am just saying that in some extreme environments, the services should be hosted across multiple machines instead of one single machine.
Now if you have extra resources (budget and extra SATA ports), you may consider using L2ARC cache. Basically L2ARC cache is a very fast hard drive (i.e., SSD). Think of it as a hybrid hard drive, it is a buffer for reading and writing.
So what is the role of L2ARC to ARC? In general, the most frequently used files are stored in the ARC cache (ram). For the less frequently used files, or if the files are too large to fit in the arc cache, they will be stored in the L2ARC cache.
To improve the reading performance:
sudo zpool add myzpool cache 'ssd device name'
To improve the writing performance:
sudo zpool add myzpool log /dev/ssd_drive
It was impossible to remove the log devices without losing the data until ZFS v.19 (FreeBSD 8.3+/9.0+). I highly recommend to add the log drives as a mirror, i.e.,
Now you may ask a question. How about using a ram disk as log / cache devices? First, ZFS already uses your system memory for I/O, so you don’t need to set up a dedicated ram disk by yourself. Also, using a ram disk for log (writing) devices is not a good idea. When somethings go wrong, such as power failure, you will end up losing your data during the writing.
Improve ZFS Performance: Step 9
More Disk = Faster
Do you know ZFS works faster on multiple devices pool than single device pool, even they have the same storage size?
In general, if you are using RAIZ1, the more disk you have, the better the overall performance. Imagine we have two different setups: One with many disks, and another one with few disks. Assuming the disk are standard consumer grade SATA HDD disk (i.e., the maximum achievable speed is around 100MB/s). Let’s say we need to calculate a checksum of a large file (e.g., 10GB). Here are the steps:
CPU tells the ZFS to get the file
The ZFS gets the file from each disk.
Each disk is looking for the file:
Setup #1: It has many disks. Each disk contains a small part of the file. It takes shorter time to return the file to the CPU.
Setup #2: It has fewer disks. Each disk contains a larger part of the file. It takes longer time to return the file to the CPU.
The CPU joins the pieces together and calculates the checksum.
As you can tell, the bottleneck of such simple operation is not the CPU, but retrieving the file. The maximum speed of standard HDD is around 100MB/s. So the more disks you have, the faster the I/O. This is the reason why we need to rebalance the ZFS every once a while, because we want to keep the data distributed evenly across all disks.
Here is a quick comparison. I had two servers available. Both had exact the same software installed (same OS/ZFS/DKMS/kernel). One had a slower CPU and one had a faster CPU. The main difference was the ZFS setup. I performed MD5 checksum on 10 files (these files are available on both systems. The total size is 70GB). They were not in the memory cache before running the checksum. Here is the result:
Setup #1: Slower CPU (4th generation i7) + ZFS with more disks.
CPU: Intel(R) Core(TM) i7-4770 CPU @ 3.40GHz
Memory: 32GB
OS: CentOS 7
ZFS Setup: 16 HDDs: RAIDZ1 (8 HDDs) + RAIDZ1 (8 HDDs), no cache/log.

time md5sum *
real    2m47.139s
user    1m58.631s
sys     0m31.239s
Setup #2: Faster CPU  (8th generation i7) + ZFS with fewer disks.
CPU: Intel(R) Core(TM) i7-8700 CPU @ 3.20GHz
Memory: 32GB
OS: CentOS 7
ZFS Setup: 3 HDDs: RAIDZ1 (3 HDDs), no cache/log.

time md5sum *
real    6m40.768s
user    3m18.477s
sys     0m33.790s
As you can tell, a good ZFS design makes a big difference. The first setup leaves the second one in dust (2.38x faster) even it has a slower CPU (4th generation i7 vs. 8th generation i7).
Improve ZFS Performance: Step 10
Use a combination of Striped and RAIDZ if speed is your first concern.
Striped design also gives the best performance. Since it offers no data protection at all, you may want to use RAIDZ (RAIDZ1, RAIDZ2, RAIDZ3) or mirror to handle the data protection. However, there are too many choices and each of them offer different degree of performance and protection level. If you want a quick answer, try to use a combination of striped and RAIDZ. I posted a very detail of comparison among Mirror, RAIDZ, RAIDZ2, RAIDZ3 and Striped here.
Distribute your free space evenly (How to rebalance ZFS)
One of the important tricks to improve ZFS performance is to keep the free space evenly distributed across all devices.
Technically, if the structure of a zpool has not been modified or alternated, you should not need to worry about the data distribution because ZFS takes care of that for you automatically. However, when you add new devices to an existing zpool, that will be a different story.
The following example was retrieved from one of my newly created system. I first created a pool and filled with data first (first group with 93% full). Later I added another vdev (second group). As you can see, the first group of disks is 93% full, and the second group of disks are only 0.2% full. Keep in mind that this number shows the capacity at the vdev level. In the other words, these numbers may not add up to 100. A perfectly distributed pool may have 80%/80% in two vdevs.
zpool list -v
#This is a wide table. You may need to scroll to the right.

NAME                                     SIZE  ALLOC   FREE  CKPOINT  EXPANDSZ   FRAG    CAP  DEDUP    HEALTH  ALTROOT
storage                                  138T  95.2T  43.1T          -         -     0%    68%  1.00x    ONLINE  -
  raidz1                                 102T  95.1T  6.77T          -         -     1%  93.3%      -  ONLINE
  raidz1                                36.4T  78.0G  36.3T          -         -     0%  0.20%      -  ONLINE
So what is the problem here? When ZFS retrieves the old data (data that was stored before adding the second vdev), the data is retrieved from the first vdev. When ZFS adding new data, the data will be stored in the second vdev (because the first vdev is almost full). ZFS won’t be able to fix this problem until some old data is deleted from the first vdev to free up the space. Otherwise ZFS will keep using the second vdev. For performance reason, we want ZFS to store the data across all vdevs instead of just one or two vdev. We want all harddrives to work together rather than some harddrives are working hard while the rest of the harddrives are doing nothing. In the other words, the more devices ZFS writes, the better the performance.
There are two ways to rebalance your ZFS data distribution.
1. Back up your data
2. Destroy the pool
3. Rebuild the pool
4. Put your data back
or
1. Copy your folder
2. Delete your original folder
3. Rename your folder back to the original name
The first method is the best because ZFS will balance the data completely. Depending on how much data do you have, it may take days to weeks to copy your data from one server to another server over a gigabit network (8.64TB per day, assuming the average network transfer speed is 100MB/s). You don’t want to use scp to do it because you will need to re-do everything again if the process is dropped. In my case, I use rsync:
(One single line)
#Run this command on the production server:
rsync -avzr --delete-before backup_server:/path_to_zpool_in_backup_server/ /path_to_zpool_in_production_server/
Of course, netcat is a faster way if you don’t care about the security. (scp / rsync will encrypt the data during transfer).
See here for further information
The second method offers great flexibility because it doesn’t require another server. It can be performed at any time as long as you have enough free space available. However it will take longer time and the result won’t be as good as the first one. Here is an example:
Let’s me give you an example. Suppose we have two vdevs. Both of them are 100TB. We started with the vdev#1 first, fill it with data and we added vdev#2 later.
Event
vdev#1
vdev#2
Original (TB)
Free Space (TB)
10
90
Used Space (TB)
90
10
After copying 10TB data
5
5
Free Space (TB)
5
85
Used Space (TB)
95
15
After deleting the original 10TB data
10
0
Free Space (TB)
15
85
Used Space (TB)
85
15
As you can see, the capacity of used space changes from 90%/10% to 85%/15% after these operations. It will take several trials to make these two numbers the same.
Keep in mind that when you clone the data, you need to make sure that the vdev1 (the old vdev) has enough free space to store the data (ZFS always splits the data evenly and stores them in all vdevs). Otherwise the cloned data will be written in vdev2, which is not what we want.
FYI, this is what I have after copying and deleting multiple large folders, one at a time. The capacities of both vdev had improved from from 93%/0% to 72%/60%.
#After copying and deleting all larger folders one at a time
#Group 1 capacity becomes 72%
#Group 2 capacity becomes 60%
NAME                                     SIZE  ALLOC   FREE  CKPOINT  EXPANDSZ   FRAG    CAP  DEDUP    HEALTH  ALTROOT
storage                                  138T  94.8T  43.5T        -         -     0%    68%  1.00x    ONLINE  -
  raidz1                                 102T  73.1T  28.8T        -         -     0%  71.8%      -  ONLINE
  raidz1                                36.4T  21.7T  14.7T        -         -     0%  59.6%      -  ONLINE
Improve ZFS Performance: Step 12
Make your pool expandable
Setting up a ZFS system is more than a one-time job. Unless you take a very good care of your storage like how supermodels monitor their body weights, otherwise you will end up using all of the available space one day. Therefore, it is a good idea to come up a good design that it can grow in the future.
Suppose we want to build a server with maximum storage capacity, how will we start? Typically we try to put as many hard drives on a single machine as possible, i.e., it will be around 12 to 14 hard drives, which is what a typical consumer grade full tower computer case can hold. Let’s say we have 12 disks, here are couple setups which maximize storage capacity with a decent level of data safety:
Design #1: RAIDZ2
In this design, we create a giant pool and let the ZFS to take care of the rest. This pool will offer n-2 storage capacity which will allow up to 2 hard drives fail without losing any data.
Design #2: RAIDZ1 + RAIDZ1
In the second design, it offers the same level of storage capacity and a similar level of data protection. It allows up to one failure disk in each vdev. Keep in mind that the first design offers a great data protection. However, the second design will offer a better performance and greater flexibility in terms of future upgrade. Check out this article if you want to learn more about the difference in ZFS design.
First, let’s talk about the good and bad of the first design. It offers a great data security because it allows ANY two disks in the zpool to fail. However, it has couple disadvantages. ZFS works great when the number of disk of vdev is small. Ideally, the number should be smaller than 8 (Personally, I will stick with 5). In the first design, we put 12 disks in one single vdev, which will be problematic when the storage is getting full (>90%). Also, when we talk about upgrading the entire zpool, we will need to upgrade each disk one by one first. We won’t be able to use the extra space until we replace all 12 disks. This may be an issue for those who do not have budget to get 12 new disks at a time.
For the second design, it does not have the problem mentioned in the first design. The number of disk in each vdev is small (6 disks in each vdev). For those who don’t have plenty of budgets, it is okay to get six disks at a time to expand the pool.
Here is how to expand the pool by replacing the hard drive one by one without losing any data:
1. Shutdown the computer, replace the hard drive and turn on the computer.

2. Tell ZFS to replace the hard drive. This will force it to fill in the new hard drive with the existing data based on the check sum.
zpool replace mypool /dev/ada1

3. Resilver the pool
zpool scrub mypool

4 Shutdown the server and replace the second ard drive again. Repeat the steps until everything is done.

5. zpool set autoexpand=on mypool

6. Resilve the pool if needed.
zpool scrub mypool
Improve ZFS Performance: Step 13
Backup your data on a different machine, not on the same pool
ZFS comes with a very cool feature. It allows you to save multiple copies of the same data in the same pool. This adds an additional layer on data security. However, I don’t recommend using this feature for backup purpose because it adds more work when writing the data to the disks. Also, I don’t think this is a good way to secure the data. I prefer to set up a mirror on a different server (Master-Slave). Since the chance of two machines fail at the same time is much smaller than one machine fails. Therefore, the data is safer in this settings.
And put this file in a cronjob, i.e.,
/etc/crontab
@daily root /path/to/getContentFromMaster.sh
Now, you may ask a question. Should I go with strip-only ZFS (i.e., stripping only. No mirror, RAIDZ, RAIDZ2) when I set up my pool? Yes or no. ZFS allows you to mix any size of hard drive in one single pool. Unlike RAID[0,1,5,10] and concatenation, it can be any size and there is no lost in the disk space, i.e., you can connect 1TB, 2TB, 3TB into one single pool while enjoying the data-stripping (Total usable space = 6TB). It is fast (because there is no overhead such as parity etc) and simple. The only down side is that the entire pool will stop working if at least one device fails.
Let’s come back to the question, should we employ simple stripping in production environment? I prefer not. Strip-only ZFS divides all data into all vdev. If each vdev is simply a hard drive, and if one fails, there is NO WAY to get the original data back. If something screws up in the master machine, the only way is to destroy and rebuild the pool, and restore the data from the backup. (This process can takes hours to days if you have large amount of data, say 6TB.) Therefore, I strongly recommend to use at least RAIDZ in the production environment. If one device fails, the pool will keep working and no data is lost. Simply replace the bad hard drive with a good one and everything is good to go.
To minimize the downtime when something goes wrong, go with at least RAIDZ in a production environment (ideally, RAIDZ or strip-mirror).
For the backup machine, I think using simple stripping is completely fine.
Here is how to build a pool with simple stripping, i.e., no parity, mirror or anything
zpool create mypool /dev/dev1 /dev/dev2 /dev/dev3
And here is how to monitor the health
zpool status
Some websites suggest to use the following command instead:
zpool status -x
Don’t believe it! This command will return “all pools are healthy” even if one device is failed in a RAIDZ pool. In the other words, your data is healthy doesn’t mean all devices in your pool are healthy. So go with “zpool status” at any time.
FYI, it can easily takes few days to copy 10TB of data from one machine to another through a gigabit network. In case you need to restore large amount of data through the network, use rsync, not scp. I found that scp sometimes fail in the middle of transfer. Using rsync allows me to resume it at any time.
Improve ZFS Performance: Step 14
rsync or ZFS send?
So what’s the main difference between rsync and ZFS send? What’s the advantage of one over the other?
Rsync is a file level synchronization tool. It simply goes through the source, find out which files have been changed, and copy the corresponding files to the destination. Also rsync is portable and cross-platform. Unlike ZFS, rsync is available in most Unix platforms. If your backup platform does not support ZFS, you may want to go with rsync.
ZFS send is doing something similar. First, it takes a snapshot on the ZFS pool first:
zfs snapshot mypool/vdev@20120417
After that, you can generate a file that contains the pool and data information, copy to the new server to restore it:
#Method 1: Generate a file first
zfs send mypool/vdev@20120417 > myZFSfile
scp myZFSfile backupServer:~/
zfs receive mypool/vdev@20120417 < ~/myZFSfile
Or you can do everything in one single command line:
#Method 2: Do everything over the pipe (One command)
zfs send mypool/vdev@20120417 | ssh backupServer zfs receive mypool/vdev@20120417
In general, the preparation time of ZFS send is much shorter than rsync, because ZFS already knows which files have been modified. Unlike rsync, a file-level tool, ZFS send does not need to go through the entire pool and find out such information. In terms of the transfer speed, both of them are similar.
So why do I prefer rsync over ZFS send (both methods)? It’s because the latter one is not practical! In method #1, the obvious issue is the storage space. Since it requires generating a file that contains your entire pool information. For example, suppose your pool is 10TB, and you have 8TB of data (i.e., 2TB of free space), if you go with method #1, you will need another 8TB of free space to store the file. In the other words, you will need to make sure that at least 50% of free space is available all the time. This is a quite expensive way to run ZFS.
What about method #2? Yes, it does not have the storage problem because it copies everything over the pipe line. However, what if the process is interrupted? It is a common thing due to high traffic in the network, high I/O to the disk etc. Worst worst case, you will need to re-do everything again, say, copying 8TB over the network, again.
rsync does not have these two problems. In rsync, it uses relatively small space for temporary storage, and in case the rsync process is interrupted, you can easily resume the process without copying everything again.
Improve ZFS Performance: Step 15
Disable dedup if you don’t have enough memory (5GB memory per 1TB storage)
Deduplication (dedup) is a space-saving technology. It works at the block level (a file can have many blocks). To explain it in simple English, if you have multiple copies of the same file in different places, it will store only one copy instead of multiple copies. Notice that dedup is not the same as compression. Check out this article: ZFS: Compression VS Deduplication(Dedup) in Simple English if you wan to learn more.
The idea of dedup is very simple. ZFS maintains an index of your files. Before writing any incoming files to the pool, it checks whether the storage has a copy of this file or not. If the file already exists, it will skip the file. With dedup enabled, instead of store 10 identical files, it stores one only copy. Unfortunately, the drawback is that it needs to check every incoming file before making any decision.
After upgrading my ZFS pool to version 28, I enabled dedup for testing. I found that it really caused huge performance hit. The writing speed over the network dropped from 80MB/s to 5MB/s!!! After disabling this feature, the speed goes up again.
sudo zfs set dedup=off your-zpool
In general, dedup is an expensive feature that requires a lot of hardware resources. You will need 5GB memory per 1TB of storage (Source). For example, if zpool is 10TB, I will need 50GB of memory! (Which I only have 12GB). Therefore, think twice before enabling dedup!
Notice that it won’t solve all the performance problem by disabling the dedup. For example, if you enable dedup before and disable it afterward, all files stored during this period are dedup dependent, even dedup is disabled. When you need to update these files (e.g., delete), the system still needs to check again the dedup index before any processing your file. Therefore, the performance issue still exists when working with these affected files. For the new files, it should be okay. Unfortunately, there is no way to find out the affected dedup files. The only way is to destroy and re-build the ZFS pool, which will clear the list of dedup files.
Improve ZFS Performance: Step 16
Reinstall Your Old System
Sometimes, reinstalling your old system from scratch may help to improve the performance. Recently, I decided to reinstall my FreeBSD box. It was an old FreeBSD box that was started with FreeBSD 6 (released in 2005, about 8 years ago from today). Although I upgraded the system every release, it already accumulated many junk and unused files. So I decide to reinstall the system from scratch. After the installation, I can tell that the system is more responsive and stable.
Before you wipe out the system, you can export the ZFS tank using the following command:
sudo zpool export mypool
After the work is done, you can import the data back:
sudo zpool import mypool
Improve ZFS Performance: Step 17
Connect your disks via high speed interface
Recently, I found that my overall ZFS system is slow no matter what I have done. After some investigations, I noticed that the bottle neck was my RAID card. Here are my suggestions:
1. Connect your disks to the ports with highest speed. For example, my PCI-e RAID card deliveries higher speed than my PCI RAID card. One way to verify the speed is by using dmesg, e.g.,
dmesg | grep MB

#Connected via PCI card. Speed is 1.5Gb/s
ad4: 953869MB  at ata2-master UDMA100 SATA 1.5Gb/s

#Connected via PCI-e card. Speed is 3.0 Gb/s
ad12: 953869MB  at ata6-master UDMA100 SATA 3Gb/s
In this case, the overall speed limit is based on the slowest one (1.5Gb/s), even the rest of my disks are 3Gb/s.
2. Some RAID cards come with some advanced features such as RAID, linear RAID, compression etc. Make sure that you disable these features first. You want to minimize the workload of the card and maximize the I/O speed. It will only slow down the overall process if you enable these additional features. You can disable the settings in the BIOS of the card. FYI, most of the RAID cards in $100 ranges are “software RAID”, i.e., they are using the system CPU to do the work. Personally, I think these fancy features are designed for Windows users. You really don’t need any of these features in Unix world.
3. Personally, I recommend any brand except Highpoint Rocketraid because of the driver issues. Some of the Highpoint Rocketraid products are not supported by FreeBSD natively. You will need to download the driver from their website first. Their driver is version-specified, e.g., they have two different set of drivers for FreeBSD 7 and 8, and both of them are not compatible with each other. One day if they decide to stop supporting the device, then you either need to stick with the old FreeBSD, or buy a new card. My conclusion: Stay away from Highpoint Rocketraid.
Improve ZFS Performance: Step 18
Do not use up all spaces
Depending on the settings / history of your zpool, you may want to maintain the free space at a certain level to avoid speed-drop issues.
Recently, I found that my ZFS system is very slow in terms of reading and writing. The speed dropped from 60MB/s to 5MB/s over the network. After some investigations, I found that the available space was around 300GB (out of 10TB), which is 3% left. Someone suggest that the safe threshold is about 10%, i.e., the performance won’t be impacted if you have at least 10% of the free space. I would say 5% is the bottom line, because I haven’t noticed any performance issues until it hits 3%.
After I free up some spaces, the speed comes back again.
I think it doesn’t make any sense not to use all of my space. So I decide to find out what caused this problem. The answer is the zpool structure.
In my old setup, I put set up a single RAIDZ vdev with 8 disks. This gives me basic data security (up to one disk fails), and maximum disk spaces (Usable space is 7 disks). However, I notice that the speed drops a lot when the available free space was 5%.
In my experiment setup, I decide to do the same thing with RAIZ2, i.e., it allows up to two disks fail, and the usable space is down to 6 disks. After filling up the pool, I found that it does not have the speed-drop problem. The I/O speed is still fast even the free space is 10GB (That’s 0.09%).
My conclusion: RAIDZ is okay up to 6 devices. If you want to add more devices, either use RAIDZ2 or split them into multiple vdevs:
Typically, there is a setting to control how the motherboard interacts with the hard drives: IDE or AHCI. If your motherboard has IDE ports (or manufactured before 2009), it is likely that the default value is set to IDE. Try to change to AHCI. Believe me, this litter tweak can save you countless of hours on debugging.
I had set up my zpool for five years. Over the past five years, I had performed lots of upgrade and changed a lot of settings. For example, during the initial set up, I didn’t enable the compression. Later, I set the compression to lzjb and changed it to lz4. I also enabled and disabled the dedup. So you can imagine some part of the data is compressed using lzjb, some data has dedup enabled. In short, the data in my zpool has all kind of different settings. That’s dirty.
The only thing I can clean up is to destroy the entire zpool and rebuild the whole thing. Depending on the size of your data, it can take 2-3 days to transfer 10TB of data from one to another server, i.e., 4-6 days round trip. However, you will see the performance gain in long run.
Keep in mind that this step is completely optional, and it all depends on your current ZFS pool status. I have a ZFS server running on professional hardware for over 10 years, high I/O traffic every day, with over 50TB of data, and it is still running strong.
Improve ZFS Performance: Step 21
Great performance settings
The following settings will greatly improve the performance of your ZFS pool. However, each of them comes with a price tag. Its like removing the air bag from your car. Yes, it will save few pounds here and few pounds there. However, when something goes wrong, it could be a nightmare. Do it at your own risk.
Disable the sync option
sudo zfs set sync=disabled mypool
From the man page:
“File system transactions are only committed to stable storage periodically. This option will give the highest performance. However, it is very dangerous as ZFS would be ignoring the synchronous transaction demands of applications such as databases or NFS. Administrators should only use this option when the risks are understood.”
Keep in mind that disabling the sysnc options will force the synchronous writes to be treated as asynchronous writes, i.e., this will eliminating any double write penality (e.g., ZIL). In the other words, if you have ZIL (ZFS logs device), you are virtually by passing it.
Disable the checksum
sudo zfs set checksum=off mypool
Disabling the checksum is like removing air bag from your car. Most people don’t do it but some people do for their own reason (e.g., Formula 1). It will save some CPU computation time, but won’t be a lot for each operation. However if you have a lot of data to write to the pool, saving a little bit in every write operation will end up a lot. There is only a catch: your data is not important and you don’t care the data integrity. For example, I do a lot of genomic analyses. Each analysis is lengthy (may last several days) and it generate lots of temporary files (e.g., output logs). Since those files are not important information in my case, I store them in a compressed, checksum disabled zpool partition to speed up the write process. Long story short. If you care your data, enable the checksum. If you don’t, disable it.
Disable the access time
sudo zfs set atime=off mypool
From the man page:
“Turning this property off avoids producing write traffic when reading files and can result in significant performance gains, though it might confuse mailers and other similar utilities.”
Customize the record size
The default record size of ZFS is 128k, meaning that ZFS will write 128k of data to a logical block. Imagine if there is only few changes in a block, what ZFS will do is to read the whole chunk, make the changes, and write the changes back to the disk (plus other overhead such as compression, checksum etc). Most database program prefers smaller size. This magic number is different for different types of engine.
#For MySQL MyISAM Engines
sudo zfs create -o recordsize=8k mypool/mysql_myisam

#For MySQL InnoDB
sudo zfs create -o recordsize=16k mypool/mysql_innodb
To keep things simple, I create symplic links within the MySQL folder and link to the right place, e.g.,
Since ZFS caches the data in RAM, it may be wise to increase the amount of reserved memory for ZFS, and reduce the memory used by the database program. This will avoid the double caching, which is a waste. Plus ZFS does a way better job in terms of using memory, e.g., it compresses the data using lz4 on the fly, which not all databases do it.
Similarly, you can do the same thing for virtual machine images or other applications that write a lot of small changes to large files:
sudo zfs create -o recordsize=16k mypool/vm
Redundant Metadata
Set the redundant_metadata to most will improve the performance of random writes. The default value of redundant_metadata is all.
sudo zfs set redundant_metadata=most mypool
Enable the system attribute based xattrs
Storing xattrs as system attributes significantly decreases the amount of disk I/O. (Not available on FreeBSD)
sudo zfs set xattr=sa mypool
Improve ZFS Performance: Step 22
My Settings – Simple and Clean
I have set up over 50 servers based on ZFS. They all have different purposes. In general, they all share the same ZFS settings, and they can reach the hardware limit, e.g., ARC cache uses about 90% of the system memory, the network transfer speed maxes out the limit of the network card etc.
sudo zpool history

#I like to use raidz, and each raidz vdev contains no more than 5 disks.
zpool create -f storage raidz /dev/hd1 /dev/hd2 ... raidz /dev/hd6 /dev/hd7 ... raidz /dev/hd11 /dev/hd12

#A partition for general purposes
zfs create storage/data

#A partition for general web
zfs create storage/web

#A partition for MySQL / MYISAM tables
zfs create -o recordsize=8k storage/mysql (MYISAM tables)

#Some common settings
zfs set compression=lz4 storage
zfs set atime=off storage
zfs set redundant_metadata=most storage

#For Linux server
zfs set xattr=sa storage
A simple nload when running rsync over a gigabit LAN:
(Bonding mode: 6, based on two gigabit network cards)
#nload -u M

Outgoing:
Curr: 209.48 MByte/s
Avg: 207.50 MByte/s
Min: 198.66 MByte/s
Max: 209.53 MByte/s
Ttl: 3755.46 GByte
I only uses two operating systems:
#Personal
FreeBSD 10.3-RELEASE-p11 FreeBSD 10.3-RELEASE-p11 #0: Mon Oct 24 18:49:24 UTC 2016     [email protected]:/usr/obj/usr/src/sys/GENERIC  amd64


#Work
CentOS Linux release 7.3.1611 (Core)
Linux 3.10.0-514.6.1.el7.x86_64 #1 SMP Wed Jan 18 13:06:36 UTC 2017 x86_64 x86_64 x86_64 GNU/Linux
Most of the hard drives I use are consumer-grade. Typically, I buy the external one and remove the hard drive from the enclosure because of the lower cost. Sometimes when I need to use all of the SATA ports, I will use USB flash drive for the operating system (I have some older machines with USB 2.0 port only). As long as all of the frequently used files are in the ZFS pool, the performance is not a problem. Another thing you can is to install card size SSD drive on the mSATA port, and connect a regular hard drive to the eSATA port on the back of the motherboard using a long eSATA-SATA cable. That will help to maximize the number of hard drives. Most computer cases will fit 10-12 3.5″ hard drives, some of them (e.g., Rosewill RSV-R4000) can hold 15 3.5″ hard drives for under USD 100. Personally I was able to hold 18 3.5″ hard drives using Rosewill RSV-R4000 with some modifications, plus 3 2.5″ hard drives. The most powerful one will fit 18 hard drives with a price tag of USD 200.
The amount of the memory is going to be tricky, as it depends on what applications you want to run on your server and how much memory will be consumed by the service. It also depends on how large is your ZFS pool capacity. Here are some of the servers I have set up:
#A light weight web (Apache+MySQL+PHP), and file server (Samba)
CPU: Intel(R) Xeon(R) CPU E5-2440 v2 @ 1.90GHz (A mid-level server grade CPU from 2014)
Memory: 4GB
ZFS Pool Capacity: 1.6TB
OS: CentOS 7
Kernel: 3.10.0-514.6.1.el7.x86_64 #1 SMP Wed Jan 18 13:06:36 UTC 2017 x86_64 x86_64 x86_64 GNU/Linux


#A server for nightly backup
CPU: Intel(R) Core(TM) i7 CPU K 875  @ 2.93GHz (A gaming-grade CPU from 2010)
Memory: 8GB
ZFS Pool Capacity: 43TB
OS: CentOS 7
Kernel: 3.10.0-514.6.1.el7.x86_64 #1 SMP Wed Jan 18 13:06:36 UTC 2017 x86_64 x86_64 x86_64 GNU/Linux


#A server for analyzing genomic data, with a very high CPU usage
CPU: Intel(R) Core(TM) i7-6700 CPU @ 3.40GHz (A gaming-grade CPU from 2015)
Memory: 64GB
ZFS Pool Capacity: 8.5TB
OS: CentOS 7
Kernel: 3.10.0-514.6.1.el7.x86_64 #1 SMP Wed Jan 18 13:06:36 UTC 2017 x86_64 x86_64 x86_64 GNU/Linux


#A heavy weight network file server
CPU: Intel(R) Xeon(R) CPU E5-2430 0 @ 2.20GHz (A mid-level server grade CPU from 2012)
Memory: 96GB
ZFS Pool Capacity: 53TB
OS: CentOS 7
Kernel: 3.10.0-514.6.1.el7.x86_64 #1 SMP Wed Jan 18 13:06:36 UTC 2017 x86_64 x86_64 x86_64 GNU/Linux


#A heavy weight web server
CPU: Intel(R) Xeon(R) CPU E3-1225 v3 @ 3.20GHz (An entry-level server grade CPU from 2013)
Memory: 16GB
ZFS Pool Capacity: 1.8TB
OS: CentOS 7
Kernel: 3.10.0-514.6.1.el7.x86_64 #1 SMP Wed Jan 18 13:06:36 UTC 2017 x86_64 x86_64 x86_64 GNU/Linux


#A light weight web (Apache+MySQL+PHP), and file server (Samba)
CPU: Intel(R) Core(TM) i7 CPU 920  @ 2.67GHz  (A gaming-grade CPU from 2008)
Memory: 24GB
ZFS Pool Capacity: 25TB
OS: FreeBSD 10.3
Kernel: FreeBSD 10.3-RELEASE-p11 FreeBSD 10.3-RELEASE-p11 #0: Mon Oct 24 18:49:24 UTC 2016     [email protected]:/usr/obj/usr/src/sys/GENERIC  amd64


#A low-end backup server
CPU: Intel(R) Core(TM)2 Quad CPU Q6600 @ 2.40GHz (An entry-level CPU from 2007)
Memory: 8GB
ZFS Pool Capacity: 15TB
OS: FreeBSD 10.3
Kernel: FreeBSD 10.3-RELEASE-p11 FreeBSD 10.3-RELEASE-p11 #0: Mon Oct 24 18:49:24 UTC 2016     [email protected]:/usr/obj/usr/src/sys/GENERIC  amd64
If you are interested in implementing network-based ZFS, please check here for details.
Today I am going to share my story with you on how to expand my ZFS storage. I have a giant ZFS pool, which consists of 8x2TB (RAIDZ2) and 4×1.5TB (RAIDZ1), with a total of 15TB usable spaces. Since I am running out of space, I decide to upgrade the ZFS by replacing the disks one at a time. So here is the ZFS structure:
What I decide to do is to replace the 1.5TB disks by 3TB disks (i.e., da[0-3]) one at a time. Basically, here are the steps you typically found on the web:
Power down the server
Replace the 1.5TB disk by 3TB disk one at a time
Power on the server
Replace the disk
Resilver the entire pool.
Hope the resilver process does not return any error.
Repeat the above steps until all disks are replaced.
Turn on the auto expand option and enjoy the extra space
Here are the corresponding commands. After replacing the first disk, you should see the following:
Depending on how much data you have on the old disk and the hardware (such as motherboard, SATA configurations etc), resilvering a 1.5TB drive (with 1.3TB of data) took me about 15 hours. Personally, I recommend to start this process in the morning, then you can check the progress and start the next one in the evening. That way you can speed up the work.
So after the resilvering process is done. Make sure that you check the error status. If some files were missing, you need to delete those files first and restore them from your backup. Here is an example of the error:
#sudo zpool status -v

errors: Permanent errors have been detected in the following files:

/storage/data/aaa
/storage/data/bbb
/storage/data/ccc
Remember, you need to delete the file first, then put the file back from your backup. If you simply replace/overwrite the file, it will not clear the error. Try to check the status again. If the error is not gone yet, you may want to scrub the zpool to trigger the resilver process.
sudo zpool scrub mypool
Or you can try to clear the error message. It will trigger the resilver process automatically.
sudo zpool clear -f mypool
I know what you are trying to say now. How come the ZFS will lose the data even I have RAIDZ and checksum enabled? I have no idea. That’s why we need back up on a different machine. Anyway, the resilver process will take another 15 hours.
After the error is cleared, repeat the steps to replace the disks one by one. Make sure that the error is cleared after every replacement. For me, replacing four hard drives took me exact 5 days, or 120 hours in total. Yes, it is not a fun job.
So after everything is completed, no error or anything bad. You try to check the pool status and you expect a magic will happen. Unfortunately, you will see the same amount of space available. Here are what you will need to do:
#I still have 1.3TB space left.
storage/data     14T     13T    1.3T    91%    /storage/
sudo zpool set autoexpand=on mypool
Locate one of the disks you have replaced, in my case, they are da0, da1, da2 and da3
#Now I have 5.3TB space available.
storage     18T     13T    5.3T    72%    /storage
FYI, here is the math behind the free space calculations. I had 4 x 1.5TB on a RAIDZ1 setup. After the upgrade, I have 4 x 3TB on a RAIDZ1 set up. The increase space will be (3TB – 1.5TB) x (4 – 1) * 0.9 = 4TB
Enjoy the new space!
If you have spent too many hours on the resilvering process, consider the old school way. My old school method is nothing new, but it is rock solid, reliable, takes shorter time and most importantly, no data will be lost. Yes, you are right, I back up the data to another server first, and then I rebuild the ZFS pool on my main server, and copy the data back. Typically, copying the 10TB of data via rsync daemon over a gigabit network will take about 3 days. So it isn’t too bad. The only down side of this solution is the down time, which is about 3 days in my case. If you decide to go with the ZFS replacement, the downtime will be minimized, because the ZFS pool will continue to work during the resilver process.
If you have set up a ZFS system, you may want to stress test the system before putting it in a production environment. There are many different ways to stress test the system. The most common way is to fill the entire pool using dd. However, I think scrubbing the entire pool is the best.
In case you are not familiar with scrubbing, basically it is a ZFS tool to test the data integrity. The system will go through every single file and perform checksum calculation, parity check etc. During scrubbing the entire pool, the system will generate a lot of I/O traffic.
First, please make sure that your ZFS is filled with some data. Then we will scrub the system:
sudo zpool scrub mypool
Afterward, simply run the following command to check the status:
#sudo zpool status -v
  pool: storage
 state: ONLINE
  scan: scrub in progress since Sun Jan 26 19:51:03 2014
        36.6G scanned out of 14.4T at 128M/s, 32h38m to go
        0 repaired, 0.25% done
Depending on the size of your pool, it may take few hours to few days to finish the entire process.
So how does the scrubbing related to the stability? Let’s take a look to the following example. Recently I set up a ZFS system which was based on 6 hard drives. During the initial setup, everything was fine. It gives no error or anything when loading the data. However, after I scrubbed the system, something bad happened. During the process, the system disconnected two hard drives, which made the entire pool unreadable (That’s because RAID1 can afford up to one disk fails). I was feeling so lucky because it didn’t happen in a production environment. Here is the result:
sudo zpool status
  pool: storage
 state: UNAVAIL
status: One or more devices could not be opened.  There are insufficient
        replicas for the pool to continue functioning.
action: Attach the missing device and online it using 'zpool online'.
   see: http://illumos.org/msg/ZFS-8000-3C
  scan: none requested
config:

        NAME                      STATE     READ WRITE CKSUM
        storage                   UNAVAIL      0     0     0
          raidz1-0                UNAVAIL      0     0     0
            ada1                  ONLINE       0     0     0
            ada4                  ONLINE       0     0     0
            ada2                  ONLINE       0     0     0
            ada3                  ONLINE       0     0     0
            9977105323546742323   UNAVAIL      0     0     0  was /dev/ada1
            12612291712221009835  UNAVAIL      0     0     0  was /dev/ada0
After some investigations, I found that the error had nothing to do with the hard drives (such as bad sectors, bad cables etc). Turn out that it was related to bad memory. See? You never know what component in your ZFS is bad until you stress test it.
ZFS offers a new compression method in the latest version: lz4. It claims to be better than lzjb. Since lzjb is pretty good already, I am curious to find out how good will lz4 be comparing to lzjb. According to my tests, lz4 is performing better than lzjb in terms of spacing saving and I/O, but not too much.
lz4 VS lzjb: Space Saving
Long story short, here is what I did. I set up two servers with brand new ZFS settings. One server is set to lzjb, and the other server is set to lz4. Both servers have exact the same hardware, software, operating system etc. Both of them are loaded with the same set of data (10TB) via rsync and rsyncd. These data are real data that I use everyday, which includes office documents (PDF, Word, Excel), photos(Raw and JPEG), music(mp3), video(mpeg), zip, source codes, binary applications, database (MySQL, Redis), webserver files (PHP, HTML, CSS), etc. Notice that some of these files are already compressed (such as jpeg, zip etc), and the file types are not evenly distributed (e.g., 40% of the files are jpeg, 25% are docs, 10% are zip, 5% are something else). I want to make a test in a more realistic scenario.
Also, all ZFS settings are set BEFORE loading the data. This will ensure that all data on the same server share the same compression settings. Below is the summary of the used space. Keep in mind that the space saving test is independent to the hardware, such as CPU type, memory, speed of the disks, etc. Just like running the same command to compress the same set of files in two systems. We expect the result will have the same size. The only difference will be the time spent on compressing the data.
#ZFS with lzjb
df
Filesystem    512-blocks        Used     Avail Capacity  Mounted on
storage/data 23007987368 22996620466  11366902   100%    /storage/data

#Used space: 22996620466 blocks = 10965.6 GB
#ZFS with lz4
df
Filesystem    512-blocks        Used      Avail Capacity  Mounted on
storage/data 31527470077 22942284913 8585185164    73%    /storage/data

#Used space: 22942284913 blocks = 10939 GB
I found that for 10TB of data, the server with lzjb uses 26GB more space than lz4, which translate to 0.23% (26GB out of 10TB). The difference is quite small and not too significant. However, when your ZFS is nearly full or you are too busy to upgrade your system, the extra saving may matter a lot.
lz4 VS lzjb: Time Saving
I am also curious to know how much time I will save by switching from lzjb to lz4. Therefore I did another simple test. First, I generated a 1GB of random data and wrote to the lzjb system. After that, I destroyed the zpool and rebuilt the zpool with lz4. This will eliminate other factors such as hardware, network traffic etc, because both tests were done within the same system.
#ZFS with lzjb
time dd if=/dev/random of=/storage/data/file.out bs=1M count=1000
1000+0 records in
1000+0 records out
1048576000 bytes transferred in 23.725955 secs (44195313 bytes/sec)

real    0m24.144s
user    0m0.024s
sys     0m18.326s
#ZFS with lz4
time dd if=/dev/random of=/storage/data/file.out bs=1M count=1000
1000+0 records in
1000+0 records out
1048576000 bytes transferred in 22.589257 secs (46419234 bytes/sec)

real    0m22.802s
user    0m0.016s
sys     0m18.273s
P.S. The /dev/random in FreeBSD is nothing like the one in Linux. It is very fast.
By just upgrading from lzjb to lz4, the time is reduced from 24.144 to 22.802 seconds, which translate to 5.5% (1.342s out of 24.144s) improvement.
This result also agrees with my overall experience: The improvement is small and not noticeable. In fact, I barely notice any performance improvement after switching from lzjb to lz4, which primarily includes transferring the files between Windows and FreeBSD-based ZFS system via Samba on a gigabit network. The I/O speed are about the same. However, if you are talking about a busy server with lots of traffic, a 5% improvement will be something.
Anyway, this is what I recommend. If lz4 is available in your ZFS version, use it. It can’t be wrong.
I am so happy that I finally solved a problem today. This problem had existed in my server farms for few months already. In the past few months, I had absolutely no idea what was causing the issues. Here is my story:
I built a file server using FreeBSD and ZFS. The hardware components are consumer grade hardware. Basically, it is a desktop computer with multiple hard drives. The hard drives are connected to the SATA ports on the motherboard. It is a very simple setup.
After I set up a ZFS pool, I started to load the data and stress tested the system. I noticed that the ZFS pool turned into a fault state after 15 mins, e.g.,
#sudo zpool status -v
  pool: storage
 state: FAULTED
status: One or more devices could not be opened.  There are insufficient
        replicas for the pool to continue functioning.
action: Attach the missing device and online it using 'zpool online'.
config:

        NAME        STATE     READ WRITE CKSUM
        storage     ONLINE       0     0     0
          raidz1-0  ONLINE       0     0     0
            ada4    ONLINE       0     0     0
            ada0    REMOVED      0     0     0
            ada2    ONLINE       0     0     0
            ada5    ONLINE       0     0     0
            ada3    ONLINE       0     0     0

errors: Permanent errors have been detected in the following files:
In short, a drive is missing. So I tried to run dmesg
Oct 17 20:24:00 kernel: (ada0:ahcich4:0:0:0): lost device
Oct 17 20:24:00 kernel: (ada0:ahcich4:0:0:0): removing device entry
Oct 19 20:42:14 kernel: (ada0:ahcich3:0:0:0): lost device
Oct 19 23:19:18 kernel: (ada0:ahcich4:0:0:0): lost device
Oct 19 23:19:18 kernel: (ada0:ahcich4:0:0:0): removing device entry
Oct 19 23:19:18 kernel: (ada0:ahcich4:0:0:0): lost device
Oct 19 23:19:18 kernel: (ada0:ahcich4:0:0:0): removing device entry
Oct 19 23:19:18 kernel: (ada0:ahcich4:0:0:0): lost device
Oct 19 23:19:18 kernel: (ada0:ahcich4:0:0:0): removing device entry
Oct 19 23:19:18 kernel: (ada0:ahcich4:0:0:0): lost device
Oct 19 23:19:18 kernel: (ada0:ahcich4:0:0:0): removing device entry
Oct 19 23:19:18 kernel: (ada0:ahcich4:0:0:0): lost device
Oct 19 23:19:18 kernel: (ada0:ahcich4:0:0:0): removing device entry
Oct 19 23:33:02 kernel: (ada0:ahcich4:0:0:0): Synchronize cache failed
Oct 20 22:53:40 kernel: (ada0:ahcich4:0:0:0): WRITE_FPDMA_QUEUED. ACB: 61 40 30 af 4e 40 7a 00 00 00 00 00
Oct 20 22:53:40 kernel: (ada0:ahcich4:0:0:0): CAM status: ATA Status Error
Oct 20 22:53:40 kernel: (ada0:ahcich4:0:0:0): ATA status: 61 (DRDY DF ERR), error: 04 (ABRT )
Oct 20 22:53:40 kernel: (ada0:ahcich4:0:0:0): RES: 61 04 00 00 00 40 00 00 00 00 00
Oct 20 22:53:40 kernel: (ada0:ahcich4:0:0:0): Retrying command
Interestingly, the device is still available. This is very confusing because the system sees the hardware (with some error), but the application could not see the hardware. So I decided to perform the following tests:
Reboot
Shutdown and reboot
Replacing the SATA cables
Connecting the hard drive to a different SATA port
Replacing the hard drive with a new one that is certified by the manufacturer
Replacing the motherboard
Replacing the hard drive power cable
Replacing the power supply
Updating the firmware of the motherboard
Unfortunately, none of these fixed the problem. I also checked the S.M.A.R.T. status of the hard drives but I didn’t see any issues. One thing I noticed is that the error is not consistent. It happens randomly on different SATA port and hard drive. That doesn’t make any sense to me because I saw the same thing on 3 different motherboards. Finally, I decided to try one last thing: I connected the hard drives through an USB port. Guess what, my FreeBSD box stopped complaining.
So I decided to a different approach. I used the same hardware setup (the hard drives were connected using SATA instead of USB) and loaded a Windows. The system worked perfectly fine and stable. I didn’t experience any issue at all. So I believed the problem had nothing to do with the hardware. It must be the software settings issue.
Finally, I decided to try one last thing, something I hadn’t paid attention before: BIOS Settings
AHCI/IDE
Typically there is a setting to control how the motherboard interacts with the hard drives: IDE or AHCI. I usually stick with the default settings. In my case, the default value of my motherboard is IDE. After I changed the settings to AHCI, I found that the problem is gone. Yes, it’s gone and my headache is gone too.
I have many hard drives circulating among my servers for testing purpose. For example, I took a hard drive from one server and put it on a different server. After doing this for many times, I’ve noticed that the ZFS has put many header information / meta data left on my hard drive. While it does not do anything harmful to the normal ZFS operation, I think it is not a good idea to have some outdated information living on my hard drive.
Here is an example:
#sudo zpool import

  pool: storage
    id: 4394681882400895515
 state: UNAVAIL
status: The pool was last accessed by another system.
action: The pool cannot be imported due to damaged devices or data.
   see: http://www.sun.com/msg/ZFS-8000-EY
config:

        storage                   UNAVAIL  insufficient replicas
          raidz1-0                UNAVAIL  insufficient replicas
            12688516256739208392  UNAVAIL  cannot open
            ada3                  ONLINE
            4218969245912188584   UNAVAIL  cannot open
            1537006695366032450   UNAVAIL  cannot open
            8194123525800888894   UNAVAIL  cannot open
            13778624724471040977  UNAVAIL  cannot open

  pool: storage
    id: 12159013771499288095
 state: FAULTED
status: One or more devices contains corrupted data.
action: The pool cannot be imported due to damaged devices or data.
        The pool may be active on another system, but can be imported using
        the '-f' flag.
   see: http://www.sun.com/msg/ZFS-8000-5E
config:

        storage                FAULTED  corrupted data
          6113585248511400089  UNAVAIL  corrupted data
Although ZFS provides a way (zpool labelclear) to remove this information, it only works if the hard drive is still attached to the server. If the hard drive is missing, there is nothing you can do. For example, the following command will be failed:
#sudo zpool labelclear -f ada3
I googled for solutions and I found many idea. Unfortunately, none of them works.
Anyway, I came up a solution that is quick, easy and simple. Since ZFS stores the header information in the first and last sector of the hard drive, all I need to do is to wipe out the first and the last sector. That’s it.
How To Remove ZFS Meta Data – Linux
#replace /dev/sdXX with that actual ID of your hard drive
dd if=/dev/zero of=/dev/sdXX bs=512 count=10
dd if=/dev/zero of=/dev/sdXX bs=512 seek=$(( $(blockdev --getsz /dev/sdXX) - 4096 )) count=1M
That’s it for Linux. Below is the FreeBSD version.
How To Remove ZFS Meta Data – FreeBSD
First, you will need to identify which hard drive you want to clean up. The easiest way is to use dmesg
In this example, my goal is very clear. I need to wipe clear ada1, ada2, ada3 and ada4, and leave ada0 untouched.
Next, I need to clear the first sector:
#sudo dd if=/dev/zero of=/dev/ada1 count=1 bs=512k

repeat this for the other hard drives
Next, I need to clear the last sector. You can use the sector information from dmesg (if available), or you can use the following command to find the location of the last sector:
#sudo diskinfo -c /dev/ada1

which will return something like the following:

/dev/ada1
        512             # sectorsize
        1500301910016   # mediasize in bytes (1.4T)
        2930277168      # mediasize in sectors
        0               # stripesize
        0               # stripeoffset
        2907021         # Cylinders according to firmware.
        16              # Heads according to firmware.
        63              # Sectors according to firmware.
        S1Y6J1KS710613  # Disk ident.

I/O command overhead:
        time to read 10MB block      0.091942 sec       =    0.004 msec/sector
        time to read 20480 sectors   1.945038 sec       =    0.095 msec/sector
        calculated command overhead                     =    0.090 msec/sector
In this example, the total number of sector is 2930277168 (mediasize in sectors).
To keep things simple, I am going to wipe out the hard drive from 2930270000 to the end (Replace the last four digits of the sector size to zero).
Now, repeat the same thing for each hard drive. Keep in mind that the sector size of each hard drive may not be the same. So it is better to run the command and get the sector information first.
After running these commands, the ZFS meta information should be removed. You can verify your work by doing this:
I got a lot of unused USB thumb drives, CF flash card and SD cards sitting in my drawer. The sizes range from 8MB to 8GB. Unlike few years ago, it is getting a lot easier to access to the Internet, so I no longer need to carry my data via memory device any more. Instead, I simply connect to the Internet and the data is with me. That’s why my USB thumb drivers / CF flash cards / SD cards have been sitting in my drawer for few years.
I got an idea one day. It would be a waste to let them sitting in my drawer (or waiting to be sent to landfill). Why not I use them to build a file server. At least I can test out whether the idea is doable or not. So here are the candidates:
USB Thumb drives
8GB x 2
1GB x 1
256MB x 2
CF Flash Card
2GB x 1
1GB x 1
512MB x 2
SD Card
4GB x 2
As you can see from my list, the size of each candidates varies from 256MB to 8GB. So it will be interesting to put them together and build a super large file server.
Most computer has multiple USB ports available. If you don’t have enough USB port, get a powered USB hub (i.e., the USB hub has it own power unit), it will be more efficient then getting the power from the computer. For the CF card, I use a SYBA SY-PCI48001 PCI to Compact Flash Adapter to connect my CF Flash cards to my computer. For the SD cards, I simply connect each of them to a Sandisk USB SD card reader.
Okay, let’s talk about the software. I am going to use ZFS to implement it, because it is quick and simple. First, connect all devices to your computer, and make sure that your operating systems can recognize all of them. In this tutorial, I am using FreeBSD as a tutorial. However, the idea should be the same in other ZFS ready system, such as Solaris.
Make sure that all USB devices are recognized by your operating system. In FreeBSD, the devices are registered as /dev/da* or /dev/ad*:
dmesg | egrep 'ad|da'
Now, you need to think about how to group your devices together. Do you simply want to build a pure USB ZFS pool, or a hybrid hard drive/USB pool. To keep thing simple, I will go with pure USB ZFS pool.
Suppose I am going to create a pure USB pool, which simply include every device in one single place:
As you can see, the system is split the data and write it to each devices. ZFS is very smart to adjust the number of split to optimize the performance.
Okay, what about the performance? Honestly you can’t expect too much from a pure-USB zpool, because the write speed is limited to 40MB/s, which is way too slow compared to the disk. The only advantage is that there is no moving parts, which significant decrease the failure rate, and the overall cost is cheap. Now, let’s make talk about the hybrid pool, a combination of USB and hard drive pool.
A hybrid ZFS pool is a combination of hard drives and USB drives. In my experiment, I put the USB devices as log and cache devices, while the hard drives are used as main storage. If you don’t know what is ZFS log or ZFS cache, you can think about a ZFS log devices is a buffer for writing the data, while a ZFS cache is for reading the data.
Ideally, you should use two identical devices (same size) for ZFS log (writing the data). For ZFS cache, it doesn’t matter.
First, let’s create our ZFS pool with the storage devices (i.e., hard drives) only.
With this combination, I get a pretty good performance (both read/write). When I copy the data from Windows to this ZFS pool using Samba, I can get a pretty high transfer speed (Over 100MB/s). Sometimes it get even close to 110MB/s. This result is very amazing given that my hard drives are the standard SATA drives (non-SSD) only.
The reliability of the USB devices / CF card / SD card sometimes questionable. That’s one of the reason why I don’t use them as the permanent storage media (using as Cache / log is okay). In this design, I use two SD cards (4GB x 2 = 8GB) as the ZFS log devices. Since they are set up as mirror, if one dies, the other one will kick in, which will minimize the data lost. For the cache devices, if one device is failed, I can remove it from the ZFS pool at any time. There will be no data lost so it will be okay.
I have run this super large server for few months already. There is about 200GB data I/O everyday, so far I am very happy with the overall performance. The most important thing is, those unused memory devices are now very happy as they don’t need to be sent to landfill.