How to get HP LaserJet 1000 (or any ancient HP printers) working on Windows 7/8 64-bit

I bought a HP LaserJet 1000 printer back in 2001. Still Loving it! The running cost is low and the output quality is great. It is still working great after running for 13 years! Its quality even out beats my brand new Samsung LaserJet! HP LaserJet 1000 is a almost-perfect printer except that HP no longer supplies the right driver for modern operating system. Long story short, if you are a Windows 7/8 (64-bit) user, HP wants you to dump your fully working printer to the landfill and get a new one.

To be honest, I don’t see any reason why I should buy a new printer just because the driver is no longer available. The core part of the printing technology hasn’t been changed for many years. In the other words, if I get a new printer, I will expect to get the same results (may be slightly better) in terms of printing quality. That’s it. Anyway, if you have few hours to spend, you may want to follow this tutorial to give your printer a new life.

Normally, many printers share similar chips and processors such that if the driver of this model is not available, you can still use the drivers from other models. However, this printer is special. It does not have its own processor and it relies on the operating system to process the print job first before sending to it. That’s why driver is very important in this case.

I have googled for a solution for a long time because I don’t want to send this almost-perfect printer to landfill, and I don’t want to go back to Windows XP either. Unfortunately, most solutions I found online either do not work or don’t make any scenes to me. Here are some highlights:

Solution 1: Attach the printer to Windows XP 32-bit. Share the printer with Windows 7 64-bit through network.

Comments: No it won’t work. Windows 7/8 keeps asking for a driver, which I don’t have one.

Solution 2: Install a Windows XP 32-bit virtual machine (VM) in your Windows 7 64-bit. In the VM, install a software to monitor a folder and print all .PDF files automatically. At the same time, print your documents to PDF in Windows 7 and save the files in that folder.

Comments: Don’t you think it is too complicated?

Solution 3: Install the printer driver in XP mode.

Comments: No it won’t work!

Solution 4: Stick with Windows 7 32-bit

Comments: No way! I want to use more than 4GB of memory.

So after spending months and months and months to trial and error, I finally found a working solution. In fact, my solution is pretty simple. I attach my printer to a Linux box and share it on the network, i.e., I make my HP LaserJet 1000 to be a network printer. Now I can print from the following systems:

  • Windows 7/8 32-bit and 64-bit
  • OS X 10.9 64-bit
  • Windows XP 32-bit
  • Linux

Before we begin, we will need the following ingredients: A Linux Box. If you already have a Linux box, you are more than welcome to use it. If you don’t have one around, you may consider to grab a spare machine and install a Linux. The machine does not need to be very powerful. In my case, I use a Pentium 4 (1 GB ram) desktop which was born in 2004. You can go to local university / library / recycle center to get one. They usually sell it for very low price (below $30) or sometimes give away for free.

Install the HP Printer Driver

In this tutorial, I am going to use CentOS as an example. CentOS is a free version of Red Hat. You can use other Linux such as RHEL, Fedora, Scientific Linux etc. The reason why I prefer CentOS because of its stability and long term support. It is stable and I will be able to update the system for at least 7 years.

Before we begin, we want to make sure that the USB version 1 is available. Simply go to the BIOS and make sure that your system supports the legacy USB (i.e., USB 1). Since HP LaserJet 1000 uses USB 1, and some manufacturers disable the USB 1 settings by default, we want to enable them.

So after installing CentOS, we need to do the following:

#The default repository of CentOS is very limited. Let's add a more powerful one:
sudo rpm -Uvh http://linux.mirrors.es.net/fedora-epel/6/x86_64/epel-release-6-8.noarch.rpm
sudo rpm -Uvh http://rpms.famillecollet.com/enterprise/remi-release-6.rpm
sudo yum update --enablerepo=remi,remi-test

The following tutorial is based on this page. Depending on your hardware, I notice that the tutorial is not 100% working. You may want to follow my version below. Before we start, I encourage you to open this page first, and keep the current page side-by-side for reference.

#Install the developer tools
sudo yum groupinstall "Development Tools"
sudo yum install kernel-devel kernel-headers


#Install the HP printer and related
sudo yum install hplip hplip-gui hplip-libs

#Install the avahi daemon
sudo yum install avahi
sudo service avahi-daemon start

#Install the libraries required by hp
sudo yum install cups cups-devel gcc-c++ ghostscript libjpeg-devel glibc-headers libtool libusb-devel make python python-devel PyXML openssl-devel net-snmp-devel policycoreutils-gui PyQt PyQt-devel dbus-python notify-python sane-backends sane-backends-devel sane-frontends xsane python-imaging python-imaging-devel

#Depending on your HP printer. If your printer is old enough and use USB 1, you may want to install the following:
Install some hardware-related libraries
sudo yum install avahi-tools libusb1-devel libusb1 dbus dbus-devel libsane-hpaio


#Install the following chemicals:
sudo rpm -ev --nodeps libsane-hpaio
sudo rpm -ev hplip-gui
sudo rpm -ev hplip
sudo rpm -ev hpijs

Disable the SELinux. It’s like the Windows Firewall. A fancy looking crap which does nothing useful except causing lots of trouble.

sudo nano /etc/selinux/config

SELINUX=disabled

Now, visit here to get the latest version of HP software. Go to the latest directory and download the gz file. In the following, I will assume that the version is: 3.14.6, i.e., hplip-3.14.6.tar.gz. You may want to adjust the version.

Of course, we need to extract it.

tar xvfz hplip-3.14.6.tar.gz
cd hplip-3.14.6

Now, go to this page and head to step 5. Try to find the corresponding command to install HPLIP. In my case, I am using CentOS 6.5 64-bit, so my command will be:

./configure --with-hpppddir=/usr/share/cups/model/HP --libdir=/usr/lib64 --prefix=/usr --enable-qt4 --disable-libusb01_build --enable-doc-build --enable-cups-ppd-install --disable-foomatic-drv-install --disable-foomatic-ppd-install --disable-hpijs-install --disable-udev_sysfs_rules --disable-policykit --disable-cups-drv-install --enable-hpcups-install --enable-network-build --enable-dbus-build --enable-scan-build --enable-fax-build

In case you got error (such as missing libraries), try to run the following for trouble-shooting:

./check.py

Now, let’s compile the source. You may want to run the make as a regular user.

make

And we are ready to install it!

sudo make install

Oh, we need to add some important users as well:

su -c "/usr/sbin/usermod -a -G lp,sys $USER"

Time to reboot the computer:

sudo reboot

Now, log in to the desktop / graphic mode. We need to use the HP tool to set up the printer. Open the terminal within the CentOS graphic interface.

sudo hp-setup

Just following the instructions. It is very simple. Click here if you need help.

Now, let’s open the printer settings. You can either go to System –> Admin –> Printing, or run the following:

system-config-printer

Find your printer, open the property and print a test page. If you see the actual printer, you are half way done.

Make the Printer Available On The Network

sudo service cups start

Also, remember to set the CUPS password:

sudo lppasswd -a admin

Now, we need to update the firewall settings:

sudo nano /etc/sysconfig/iptables
-A INPUT -m state --state NEW -m udp -p udp --dport 631 -j ACCEPT
-A INPUT -m state --state NEW -m tcp -p tcp --dport 631 -j ACCEPT
-A INPUT -m state --state NEW -m tcp -p tcp --dport 443 -j ACCEPT
-A INPUT -m state --state NEW -m tcp -p tcp --dport 80 -j ACCEPT

and restart the firewall:

sudo service iptables restart

Now, let’s go to the following:

http://your_ip_address:631/printers/

Click your printer. In my case, mine is:

http://192.168.1.104:631/printers/hp_LaserJet_1000

Install the HP LaserJet 1000 on Windows 7/8 64-Bit

Now, go to Windows and add a printer. It’s a network printer. The corresponding location is:

http://192.168.1.104:631/printers/hp_LaserJet_1000

When it asks for the driver, try to use HP Laserjet 2300 PS. I found that this driver is pretty generic and it works great with my printer. After the installation is completed, try to print a test page. The idea will be similar in other operating systems, such as Windows XP and OS X.

Now your printer has a new life.

–Derrick

Our sponsors:
[Lightroom] How to save Lightroom Catalog on Network Drive in Windows

I am a heavy user of Adobe Lightroom. Often, I need to access my Lightoom catalog files using multiple computers. Currently, Lightroom only allows users to save the catalog files on a local hard drive, which is very inconvenient. For example, after I do the work using my office computer, I like to continue my work using my home computer. Unfortunately, it is very hard to synchronize my work with the current settings. I just don’t understand why Adobe have such a requirement because the catalog file is nothing more than a SQL Lite file (i.e., a database).

I tried to google for the solution, and I found a lot of different creative (but not practical) solutions. For example, someone suggested that the catalog could be saved on an external hard drive. Other suggested that the catalog can be saved to Dropbox, and let Dropbox to handle the synchronization. While these solutions seem to work, they are not practical at all! For the first solution (saving the data to an external drive), I think it is too risky and inconvenient to carry the data because the drive may fail at any time. For the second solution (saving the data to Dropbox), it only works for those who have fiber optics connections. For example, my catalog is nearly 40GB. Think about how long goes it take to upload/download a 40GB file with Dropbox…

Anyway, before you come here, you’ve probably already tried some other solutions, such as mapping your network drive locally, or creating a symbolic link. Obviously, none of those can trick Lightroom. Finally, I found a way to save my Lightroom catalog on a network drive. It is very simple and it can be done in few minutes.

I tested my solution on Windows 7 with Lightroom 4.4 and 5, and both Lightrooms have no problem to recognize my catalog that is stored on a network drive.

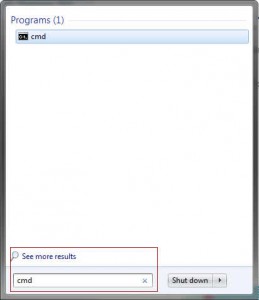
First, go to command prompt. You can do it by clicking the Start icon and type cmd and hit the ENTER key.

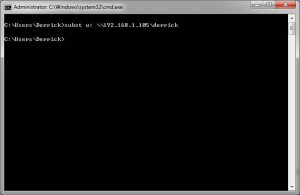
Now you will see a command line window. Type the following:

subst X: \\servername\sharename\

For example, suppose I want to map \\192.168.1.101\home to X:, I can type the following:

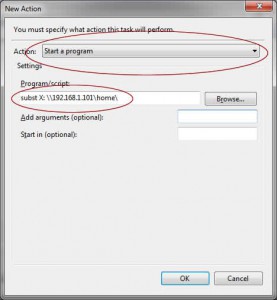
subst X: \\192.168.1.101\home\

Please click the thumbnail to enlarge the screenshots.

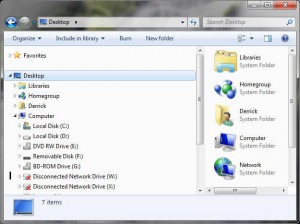
Now if you head to Windows Explorer, you will see something like this. Don’t worry about the “Disconnected Network Drive”, it is misleading. Try to open the drive. If it works, then you are half way done.

Now try to create a new Lightroom catalog and save to here. Adobe Lightroom doesn’t complain!

Next, we want to make this solution permanent. That’s because what we just did is for the current session only. Once we log off or reboot the computer, the drive will be gone. We are going to make Windows to automatically map the drive for us.

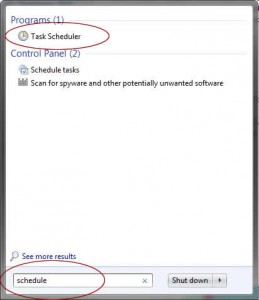
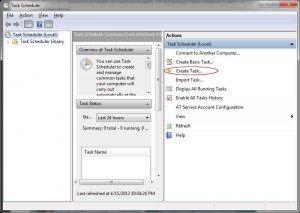
First, go to Start and type schedule. This will bring up the Task Schedule.

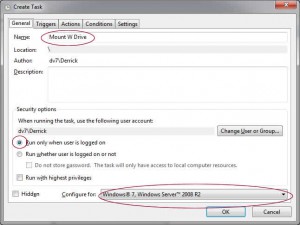
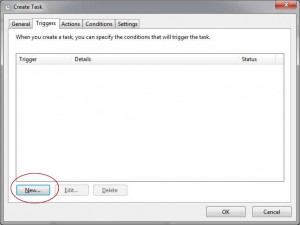
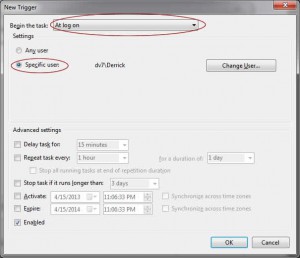
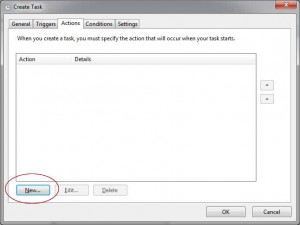
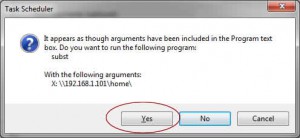
Click Create Task and following the screenshots:

After saving your task. Try to reboot your computer. Make sure that your network drive comes back after boot. If everything works fine, then you are can move your Lightroom catalog to the network drive.

Before moving your production work to the network drive, I suggest you to create a test catalog first. If it is stable after trying for multiple times, then you can safely move your production work to the network drive.

Have fun with Lightroom (and network drive)!

–Derrick

Our sponsors:

[FreeBSD]Problem to update PHP port

A new version of PHP (5.3.9) was available in FreeBSD today. Since it contained a lot of security fixes and enhancements, I decided to give it a try. After testing the new PHP in couple test servers, I think it is ready to upgrade the PHP on the production server. Oh well, I didn’t expect that I needed to spend my whole lunch break to trouble-shoot this problem. So here is what I did:

# cd /usr/ports/lang/php5
# make install
===>  Vulnerability check disabled, database not found
===>  License check disabled, port has not defined LICENSE
===>  Found saved configuration for php5-5.3.9
===>  Extracting for php5-5.3.9
=> SHA256 Checksum mismatch for php-5.3.9.tar.bz2.
=> SHA256 Checksum OK for suhosin-patch-5.3.4-0.9.10.patch.gz.
===>  Refetch for 1 more times files: php-5.3.9.tar.bz2
===>  Vulnerability check disabled, database not found
===>  License check disabled, port has not defined LICENSE
===>  Found saved configuration for php5-5.3.9
=> php-5.3.9.tar.bz2 doesn't seem to exist in /usr/ports/distfiles/.
=> Attempting to fetch from http://dk.php.net/distributions/.
fetch: http://dk.php.net/distributions/php-5.3.9.tar.bz2: Requested Range Not Satisfiable
=> Attempting to fetch from http://de.php.net/distributions/.
fetch: http://de.php.net/distributions/php-5.3.9.tar.bz2: Requested Range Not Satisfiable
=> Attempting to fetch from http://es.php.net/distributions/.
fetch: http://es.php.net/distributions/php-5.3.9.tar.bz2: Requested Range Not Satisfiable
=> Attempting to fetch from http://fi.php.net/distributions/.
fetch: http://fi.php.net/distributions/php-5.3.9.tar.bz2: Requested Range Not Satisfiable
=> Attempting to fetch from http://fr.php.net/distributions/.
===>  Vulnerability check disabled, database not found
===>  License check disabled, port has not defined LICENSE
===>  Found saved configuration for php5-5.3.9
=> SHA256 Checksum mismatch for php-5.3.9.tar.bz2.
=> SHA256 Checksum OK for  suhosin-patch-5.3.9-0.9.10.patch.gz
===>  Giving up on fetching files: php-5.3.9.tar.bz2
Make sure the Makefile and distinfo file (/usr/ports/lang/php5/distinfo)
are up to date.  If you are absolutely sure you want to override this
check, type "make NO_CHECKSUM=yes [other args]".
*** Error code 1

Stop in /usr/ports/lang/php5.
*** Error code 1

Stop in /usr/ports/lang/php5.
*** Error code 1

Stop in /usr/ports/lang/php5.

Initially, I thought it was a checksum error. So I decided to skip the checksum, i.e.,

#make install NO_CHECKSUM=yes

Unfortunately, it gave the same error. I think the problem might come from corrupted port files or port database. Instead of finding the source of the problem, I decided to rebuild the whole thing.

First, let’s remove the port database:

#sudo rm -Rf /var/db/portsnap/*

Next, we need to re-download all port files:

#sudo portsnap fetch extract

Some new ports may be released during the extraction, let’s make sure that the port tree is up to date:

#sudo portsnap fetch update

Now, we need to manually download the php source. Make sure that the file is stored in /usr/ports/distfiles/

#cd /usr/ports/distfiles/
#sudo wget http://fi.php.net/distributions/php-5.3.9.tar.bz2

Now, try to test whether the system can build php again. Notice that this will not install the PHP in your system.

cd /usr/ports/lang/php5
sudo make

If it gives no error, which means the PHP is ready to go. Now let’s clean up our work and make sure everything is ready.

sudo make clean

Notice that there is no way to upgrade the PHP from Make without uninstall it. Since it is a production server, I want to keep the website running. So I decide to let Portmaster to do all dirty works for me.

sudo portmaster -Da

Depending on your CPU, it may take 5 minutes to an hour to finish the update. Normally, the standard php package will work fine after the update. However, if it is not a standard package, such as PECL, you will need to do one more step. For example, here is the error messages right after I upgraded PHP:

#php -v
[eAccelerator] This build of "eAccelerator" was compiled for PHP version 5.3.8.
Rebuild it for your PHP version (5.3.9) or download precompiled binaries.

PHP Warning:  PHP Startup: Unable to load dynamic library '/usr/local/lib/php/20090626/memcache.so' - /usr/local/lib/php/20090626/memcache.so: Undefined symbol "php_session_create_id" in Unknown on line 0

PHP Warning:  PHP Startup: Unable to load dynamic library '/usr/local/lib/php/20090626/tokyo_tyrant.so' - /usr/local/lib/php/20090626/tokyo_tyrant.so: Undefined symbol "ps_globals" in Unknown on line 0

PHP 5.3.9 with Suhosin-Patch (cli) (built: Jan 12 2012 13:09:43)
Copyright (c) 1997-2012 The PHP Group
Zend Engine v2.3.0, Copyright (c) 1998-2012 Zend Technologies

[eAccelerator] This build of “eAccelerator” was compiled for PHP version 5.3.8.
Rebuild it for your PHP version (5.3.9) or download precompiled binaries.

To solve this problem, simple rebuild the package, i.e.,

cd /usr/ports/www/eaccelerator
sudo make deinstall install clean

PHP Warning: PHP Startup: Unable to load dynamic library ‘/usr/local/lib/php/20090626/memcache.so’ – /usr/local/lib/php/20090626/memcache.so: Undefined symbol “php_session_create_id” in Unknown on line 0

#cd /usr/ports/databases/pecl-memcache
#sudo make deinstall
#sudo make install clean

PHP Warning: PHP Startup: Unable to load dynamic library ‘/usr/local/lib/php/20090626/tokyo_tyrant.so’ – /usr/local/lib/php/20090626/tokyo_tyrant.so: Undefined symbol “ps_globals” in Unknown on line 0

#cd /usr/ports/pecl-tokyo_tyrant
#sudo make deinstall
#sudo make install clean

After the re-installation is completed, make sure that PHP gives no complain:

#php -v

PHP 5.3.9 with Suhosin-Patch (cli) (built: Jan 12 2012 13:09:43)
Copyright (c) 1997-2012 The PHP Group
Zend Engine v2.3.0, Copyright (c) 1998-2012 Zend Technologies

That’s it! Have fun.

Our sponsors:

ZFS+USB: Building a Super Large Server Using USB Memory, CF Card and SD Card.

I got a lot of unused USB thumb drives, CF flash card and SD cards sitting in my drawer. The sizes range from 8MB to 8GB. Unlike few years ago, it is getting a lot easier to access to the Internet, so I no longer need to carry my data via memory device any more. Instead, I simply connect to the Internet and the data is with me. That’s why my USB thumb drivers / CF flash cards / SD cards have been sitting in my drawer for few years.

I got an idea one day. It would be a waste to let them sitting in my drawer (or waiting to be sent to landfill). Why not I use them to build a file server. At least I can test out whether the idea is doable or not. So here are the candidates:

  • USB Thumb drives

    1. 8GB x 2
    2. 1GB x 1
    3. 256MB x 2
  • CF Flash Card

    1. 2GB x 1
    2. 1GB x 1
    3. 512MB x 2
  • SD Card

    1. 4GB x 2

As you can see from my list, the size of each candidates varies from 256MB to 8GB. So it will be interesting to put them together and build a super large file server.

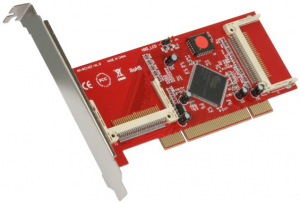
Most computer has multiple USB ports available. If you don’t have enough USB port, get a powered USB hub (i.e., the USB hub has it own power unit), it will be more efficient then getting the power from the computer. For the CF card, I use a SYBA SY-PCI48001 PCI to Compact Flash Adapter to connect my CF Flash cards to my computer. For the SD cards, I simply connect each of them to a Sandisk USB SD card reader.

Okay, let’s talk about the software. I am going to use ZFS to implement it, because it is quick and simple. First, connect all devices to your computer, and make sure that your operating systems can recognize all of them. In this tutorial, I am using FreeBSD as a tutorial. However, the idea should be the same in other ZFS ready system, such as Solaris.

Make sure that all USB devices are recognized by your operating system. In FreeBSD, the devices are registered as /dev/da* or /dev/ad*:

dmesg | egrep 'ad|da'

Now, you need to think about how to group your devices together. Do you simply want to build a pure USB ZFS pool, or a hybrid hard drive/USB pool. To keep thing simple, I will go with pure USB ZFS pool.

Suppose I am going to create a pure USB pool, which simply include every device in one single place:

zpool create myzpool /dev/ad0 /dev/ad1 /dev/ad2 /dev/da0 /dev/da1 /dev/da2

where the ad* and da* are the locations of my devices.

This will create a big pool. When you write some data to this pool, e.g.,

sudo dd if=/dev/random of=/myzpool/test_file count=10g bs=1M

The system will simply split the file into multiple chunks, and write all chunks to each USB devices at the same time.

Now let’s verify the pool information:

zpool iostat -v
               capacity     operations    bandwidth
pool         used  avail   read  write   read  write
----------  -----  -----  -----  -----  -----  -----
myzpool
  ad12       969M   112K      0      0  1.15K  66.4K
  ad13      1.90G   112K      0      0  1.74K  66.4K
  ad14       480M    11K      0      0  3.08K  66.9K
  da0          1G  2.78G      0      0  5.55K  66.1K
  da1          1G  2.78G      0      0  5.55K  66.1K
  da2        240M    80K      0      0  2.41K  66.8K
  da3        240M   112K      0      0  1.87K  66.8K
  da4       7.50G    80K      0      0  4.35K  66.5K
  da5       7.50G    96K      0      0  2.98K  66.3K
  da6        972M   112K      0      0    278  39.9K
----------  -----  -----  -----  -----  -----  -----

As you can see, the system is split the data and write it to each devices. ZFS is very smart to adjust the number of split to optimize the performance.

Okay, what about the performance? Honestly you can’t expect too much from a pure-USB zpool, because the write speed is limited to 40MB/s, which is way too slow compared to the disk. The only advantage is that there is no moving parts, which significant decrease the failure rate, and the overall cost is cheap. Now, let’s make talk about the hybrid pool, a combination of USB and hard drive pool.

A hybrid ZFS pool is a combination of hard drives and USB drives. In my experiment, I put the USB devices as log and cache devices, while the hard drives are used as main storage. If you don’t know what is ZFS log or ZFS cache, you can think about a ZFS log devices is a buffer for writing the data, while a ZFS cache is for reading the data.

Ideally, you should use two identical devices (same size) for ZFS log (writing the data). For ZFS cache, it doesn’t matter.

First, let’s create our ZFS pool with the storage devices (i.e., hard drives) only.

zpool create myzpool raidz /dev/ad0 /dev/ad1 /dev/ad2

Next, we need to add the ZFS log. We are going to create a mirror, so that they have to be identical.

zpool add myzpool log mirror /dev/da0 /dev/da1

Finally, we add the ZFS cache.

zpool add myzpool cache /dev/da2 /dev/da3 /dev/da4

And let’s take a look to the whole picture:

zpool iostat -v
               capacity     operations    bandwidth
pool         used  avail   read  write   read  write
----------  -----  -----  -----  -----  -----  -----
myzpool     5.83T  6.79T      9      2  1.03M   311K
  raidz1    5.83T  6.79T      9      1  1.03M   179K
    ad0         -      -      2      0   171K  29.9K
    ad1         -      -      2      0   171K  29.9K
    ad2         -      -      2      0   171K  29.9K
    ad3         -      -      2      0   171K  29.9K
    ad4         -      -      2      0   171K  29.9K
    ad5         -      -      2      0   171K  29.9K
    ad6         -      -      2      0   171K  29.9K
  da0        128K  3.78G      0      0      0  65.9K
  da1           -      -      0      0      0  65.9K
cache           -      -      -      -      -      -
  da2        961M     8M      0      0  1.14K  66.6K
  da3       1.89G     8M      0      0  1.73K  66.6K
  da4        472M     8M      0      0  3.06K  67.0K
  da5        232M     8M      0      0  2.40K  66.9K
  da6        232M     8M      0      0  1.86K  66.9K
  da7       7.50G     8M      0      0  4.33K  66.6K
  da8       7.50G     8M      0      0  2.96K  66.5K
  da9        964M     8M      0      0    276  39.6K
----------  -----  -----  -----  -----  -----  -----

With this combination, I get a pretty good performance (both read/write). When I copy the data from Windows to this ZFS pool using Samba, I can get a pretty high transfer speed (Over 100MB/s). Sometimes it get even close to 110MB/s. This result is very amazing given that my hard drives are the standard SATA drives (non-SSD) only.

The reliability of the USB devices / CF card / SD card sometimes questionable. That’s one of the reason why I don’t use them as the permanent storage media (using as Cache / log is okay). In this design, I use two SD cards (4GB x 2 = 8GB) as the ZFS log devices. Since they are set up as mirror, if one dies, the other one will kick in, which will minimize the data lost. For the cache devices, if one device is failed, I can remove it from the ZFS pool at any time. There will be no data lost so it will be okay.

I have run this super large server for few months already. There is about 200GB data I/O everyday, so far I am very happy with the overall performance. The most important thing is, those unused memory devices are now very happy as they don’t need to be sent to landfill.

Our sponsors:

Natural Sort. MySQL. Sorting a 2D Array By Multiple Columns in PHP Naturally. Array_MultiSort with Natural Sort

MySQL has a biggest missing feature: It does not sort naturally. This has been an opened request since 2003, and MySQL team has no plan to fix this in a near future. I have looked for a solution to solve this problem for a while. Unfortunately, I found nothing useful. Here is a summary:

The + 0 Trick

Many developers suggest this solution:

SELECT names FROM your_table ORDER BY age + 0 ASC

This is not a good solution because it only works in some very specific situations. This query fails in most general cases.

Drupal Patch

Some developers suggest to use the patch from Drupal. Forget it, I could not even install it in my system.

My solution: Let PHP to handle the dirty work

So I decide to move the process to PHP. Before you say something about the performance issue, please keep reading my story first. I will talk about it in the later section.

MySQL is a relational database, it stores everything in a table. If we express that in an array, it will look something like this:

Array
(
    [1] => Array
        (
            [Name] => John
            [Identification] => 10
            [Address] => 100 Michigan Ave.
        )

    [2] => Array
        (
            [Name] => Peter
            [Identification] => 1000
            [Address] => 1 Michigan Ave.
        )

    [3] => Array
        (
            [Name] => Tom
            [Identification] => 2
            [Address] => 10 Michigan Ave.
        )

    [4] => Array
        (
            [Name] => Paul
            [Identification] => 1
            [Address] => 10 Michigan Ave.
        )

)

where the array key represents the record ID in the table.

Now, let say I want to sort the contents in the following orders:

  1. Sort by Identification: Ascending
  2. Then by Address: Descending
  3. Then by Name: Ascending

I specify the orders in an array:

$order = array('Identification' => 'ASC',
			   'Address' => 'DESC',
			   'Name' => 'ASC');

And include the following function in my code:

//array_multiSort with natural sort
function naturalSort2D(&$array){

   if (!function_exists(naturalSort2DCompare)){
	function naturalSort2DCompare($a, $b){
		global $order;

		foreach($order as $key => $value){
			
			if (!isset($a[$key])) continue;

			unset($compareResult);

                        //Case insensitive string comparisons using a "natural order" algorithm
			$compareResult = strnatcasecmp($a[$key], $b[$key]);
			
			if ($compareResult === 0) continue;
			
			$value = strtoupper(trim($value));
			
			if ($value === 'DESC'){
				$compareResult = $compareResult*-1;
			}
			
			return $compareResult;
		}
		
		return 0;
	}
   }
	
   //Maintain index association
   //Preserve array keys
   //Use usort if you don't care about key index
   uasort($array, 'naturalSort2DCompare');
	
   return true;
}

Now I sort the array:

naturalSort2D($array);

And I get my result like the following:

Array
(
    [4] => Array
        (
            [Name] => Paul
            [Identification] => 1
            [Address] => 10 Michigan Ave.
        )

    [3] => Array
        (
            [Name] => Tom
            [Identification] => 2
            [Address] => 10 Michigan Ave.
        )

    [1] => Array
        (
            [Name] => John
            [Identification] => 10
            [Address] => 100 Michigan Ave.
        )

    [2] => Array
        (
            [Name] => Peter
            [Identification] => 1000
            [Address] => 1 Michigan Ave.
        )

)

Performance

Before we talk about the performance issue, I like to talk about my database design first. In my application, the records are stored in a table. It is a multiple user system. Each user can access their own records only. Each user has about 3000 records, and we have 1000 users. Therefore we have about 3 millions of records in one table.

Here is a data structure:

#Information input by users
Name
Identification
Address

#Information input by system
ID
UserID

So the SQL quere is nothing more than something like:

Select * FROM `database`.`table` WHERE `UserID` = '1'

Previously, I let MySQL to handle the filter and sorting, i.e.,

Select * FROM `database`.`table` WHERE (`UserID` = '1') AND (`Address` LIKE `%Michigan%`) ORDER BY `Identification` ASC LIMIT 5, 10

After moving to PHP, I just let MySQL to handle the filter,

Select * FROM `database`.`table` WHERE (`UserID` = '1') AND (`Address` LIKE `%Michigan%`)

Notice that I will get all qualified records, could be few thousands. Then I let PHP to do the sorting:

$order = array('Identification' => 'ASC');
naturalSort2D($array);

Now I have a sorted array. Next I need to slice the records:

$array = array_slice($array, 5, 10);

Sounds like lots of work huh? Now let’s talk about the performance impact. Guess what, I see performance improvement for about 15%!

In the new approach, MySQL does lesser work. PHP does more work. Apparently, PHP works more effectively than MySQL. However, this may not true for all database model. Remember that in my situation, the system needs to handle at most few thousands records at a time? So I think PHP is doing better in this range. If your application needs to handle millions of records at a time, e.g., bookstore, then you better let MySQL to do the work.

By the way, the new approach allows to sort the dynamic generated content, which is a big plus in my situation. That is something I cannot do in MySQL approach.

Have fun.

–Derrick

Our sponsors:
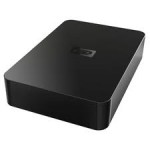
How to Open / Take Apart a Western Digital Elements Hard Drive Case

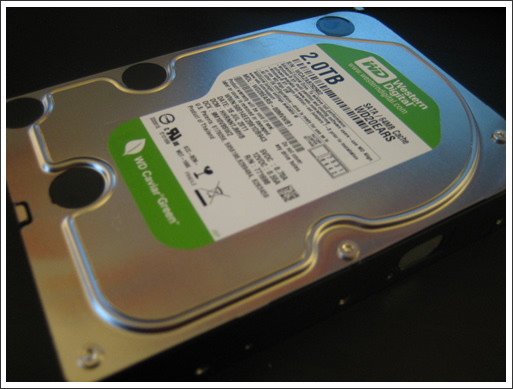
Recently I decide to add more space to my server. For some reasons, the internal hard drives are always more expensive than the external one, even the hard drives are exact the same thing. So I decide to buy an external hard drives first, and disassemble the case and take the hard drive out. I guess Western Digital doesn’t want you to do it, so there is no easy way to open the case. In fact, it is pretty easy to take out the hard drive without breaking the case. And I am going to show you how to open the Western Digital Elements hard drive case. The whole process should take no more than 5 minutes.

Open a Western Digital Elements Hard Drive Case:

Step 1 – Get the Tools Ready

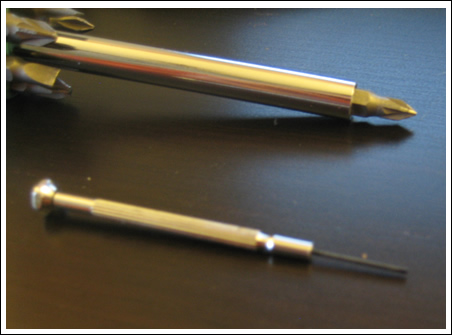
You don’t need any fancy tool to get the job done. Simply use a precision screw driver such as 1/32″ flat and a regular Philip screw driver (PZ1) are enough.

Open a Western Digital Elements Hard Drive Case

Open a Western Digital Elements Hard Drive Case:

Step 2 – Knowing the Plan

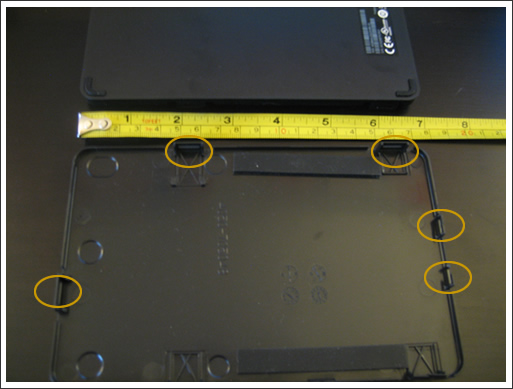
Since Western Digital uses a self-snapping cover to snap on the case, it is good to know where are these clips.

Open a Western Digital Elements Hard Drive Case

Open a Western Digital Elements Hard Drive Case:

Step 3 – Open the Case

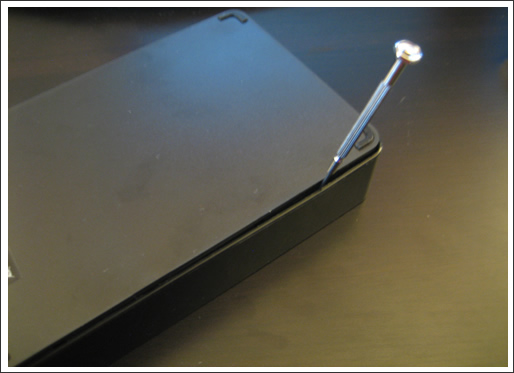
After knowing the locations of these clips, simply use a screw driver to open the case carefully on these locations.

Open a Western Digital Elements Hard Drive Case

Open a Western Digital Elements Hard Drive Case:

Step 4 – Almost Done

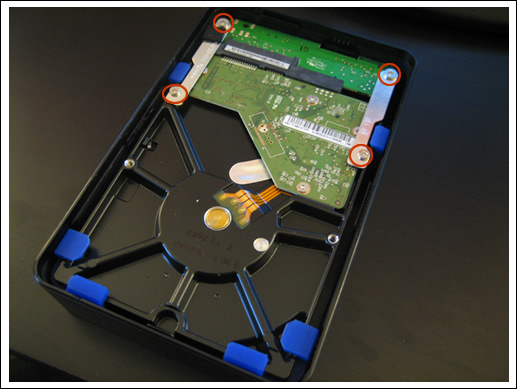
After removing the cover, you will see something like this. Unscrew the 4 circled screws with the Phillip screw driver and take out the hard drive very carefully.

Open a Western Digital Elements Hard Drive Case

Open a Western Digital Elements Hard Drive Case:

Step 5 – Remove the Connectors and Protections

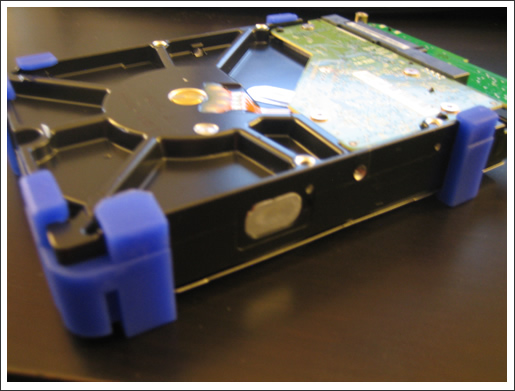
We are almost there. All you need to do is to remove the blue protections and the circuit board.

Open a Western Digital Elements Hard Drive Case

Open a Western Digital Elements Hard Drive Case:

Step 6 – Completed!

Now the hard drive is ready. Simply snap it into your desktop and it is ready to go!

Open a Western Digital Elements Hard Drive Case

Open a Western Digital Elements Hard Drive Case:

The Adapter

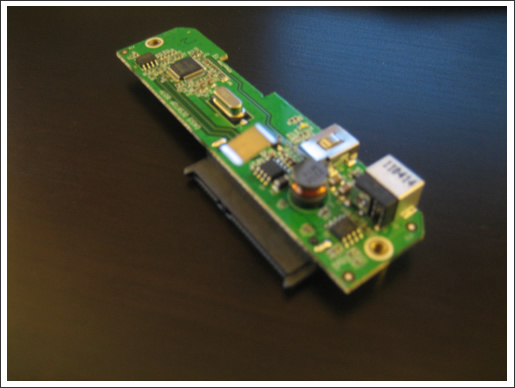
Now you have an extra USB-SATA adapter available. You can simply build you own Lego SATA enclosure with it. However, keep in mind that it only works with Western Digital hard drives. If you plug in a non-Western Digital hard driver such as Seagate, it won’t recognize it at all.

Open a Western Digital Elements Hard Drive Case

Updated on June 25, 2023

WD is doing something weird to their hard drives since 8TB. You can’t directly plug the WD hardrive to your power supply. There are three methods:

1.) Tape or strip out the connector on the power port to disable the 3.3V pin. Google: “How to disable the 3.3v pin on Western Digital USB White Label Drives”. Personally I think this is a bit unreliable (if you tape to cover the connector) or risky (if you strip out the connector)

2.) Use a “SATA to PATA power converter” and “PATA to SATA power converter”, i.e., Power supply -> SATA to PATA power converter -> PATA to SATA power converter -> Hard Drive. You can find them on Amazon.

3.) If you use server grade components, such as Dell PowerEdge servers, typically it comes with a hard drive bay, i.e., it comes with a hard drive enclosure and you need to slide your hard drives into the big box. The big box contains everything including the data and power supply. Based on my experience, it works great with the new WD hard drives.

4.) Get a power supply that work with WD hard drive. Some people say Consair works with the WD hard drive. I have exact the same model but I can’t get it work.

Have fun.

–Derrick

Our sponsors:

How to install HighPoint RocketRAID 2640X4SGL on FreeBSD 8.X

This tutorial is for FreeBSD 8. If you are looking for the driver for FreeBSD 9, you can forget about it. According to HighPoint, there are no plans to update the RocketRaid 26XX driver to FreeBSD 9. Since it is a binary driver, there are very limited things we can do. FYI, here is the reply from their support team:

New Priority: Medium

Status: Active -> Awaiting Customer Action

Dear customer there are no plans to update the RocketRAID driver to support FreeBSD 9.0.

Note: Our RocketRAID 27xx series controllers have native support in FreeBSD 9.0.

Regards

HighPoint Support Team

I will never purchase any product from this HighPoint.


Recently I decide to upgrade my file server. I decide to get a PCI-Express SATA controller, and attach my hard-drives to it. After researching some cards, I finally decide to buy this one:

HighPoint RocketRAID 2640X4SGL

What it differentiates with other similar cards is the number of PCI-express channel. It comes with 4 channels while the other cards only carry one. In the other words, it will make transfer speed higher.

Anyway, long story short. FreeBSD does not recognize this card by default. You need to install a driver to support it. Unfortunately, the driver is version specific, and the driver on the web only supports up to FreeBSD 7. I have two choices – Switch to the legacy Microsoft Windows / Linux, or downgrade to FreeBSD 7.0. One way or the other, I need to say Goodbye to ZFS.

After some searches and hacks, finally I found the hidden driver. Here you are: Driver For FreeBSD 8.X

1. Extract the driver

tar -zxvf rr26xx-bsd-8.0-v1.2.tgz

2. Copy the driver (64-bit)

cp rr26xx-8.0-amd64.ko /boot/kernel/rr26xx.ko

3. Add the following in /boot/defaults/loader.conf

rr26xx_load="YES"

4. Reboot

reboot

4. After the reboot is done, you can see the hard-drives (/dev/da*) by running the following commands:

dmesg | grep da

That’s it! Have fun.

–Derrick

Our sponsors:
Starting MySQL.. ERROR! The server quit without updating PID file

This article is a bit outdated. Please visit the following article instead. It includes a better discussion on how to solve this problem using different scenarios:

Thanks.

–Derrick

Our sponsors: